1-5
BEFORE USING THE MACHINE
Contents
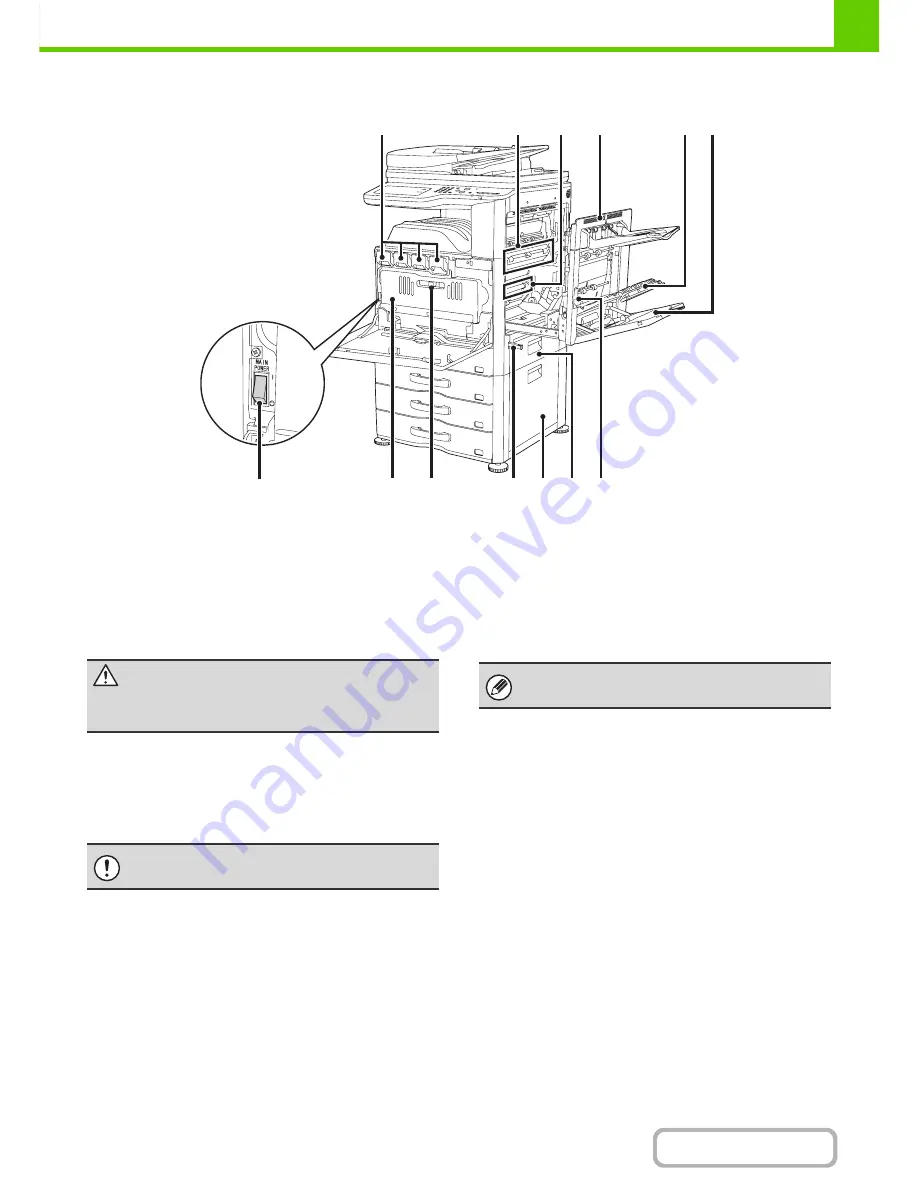
INTERIOR
(13) Toner cartridges
These contain toner for printing. When the toner runs out
in a cartridge, the cartridge of the colour that ran out must
be replaced.
☞
REPLACING THE TONER CARTRIDGES
(page 1-61)
(14) Fusing unit
Heat is applied here to fuse the transferred image onto
the paper.
(15) Transfer belt
During full colour printing, the toner images of each of the
four colours on each of the photoconductive drums are
combined together on the transfer belt. During black and
white printing, only the black toner image is transferred
onto the transfer belt.
(16) Right side cover
Open this cover to remove a misfeed.
(17) Paper reversing section cover
This is used when 2-sided printing is performed. Open
this cover to remove a paper misfeed.
(18) Bypass tray
Use this tray to feed paper manually.
When loading a large sheet of paper, be sure to pull out
the bypass tray extension.
☞
LOADING PAPER IN THE BYPASS TRAY
(page 1-32)
(19) Main power switch
This is used to power on the machine.
When using the fax or Internet fax functions, keep this
switch in the "on" position.
☞
TURNING THE POWER ON AND OFF
(page 1-15)
(20) Waste toner box
This collects excess toner that remains after printing.
☞
REPLACING THE WASTE TONER BOX
(page 1-64)
(21) Waste toner box release lever
Move this lever when you need to release the waste
toner box lock to replace the waste toner box or clean the
laser unit.
☞
CLEANING THE LASER UNIT
(page 1-57)
☞
REPLACING THE WASTE TONER BOX
(page 1-64)
(22) Handle
Pull this out and grasp it when moving the machine.
(23) Right cover of paper drawer
(when a paper drawer is installed)
Open this to remove a paper misfeed in tray 2, tray 3 or
tray 4.
(24) Paper tray right side cover
Open this to remove a paper misfeed in tray 1.
(25) Right side cover release lever
To remove a paper misfeed, pull and hold this lever up to
open the right side cover.
(13)
(14)
(15)
(18)
(17)
(16)
(21)
(20)
(24) (25)
(23)
(22)
(19)
Caution
The fusing unit is hot. Take care not to burn yourself
when removing a paper misfeed.
Do not touch or damage the transfer belt. This may
cause a defective image.
Your service technician will collect the waste toner
box.
Summary of Contents for MX-2615N
Page 11: ...Conserve Print on both sides of the paper Print multiple pages on one side of the paper ...
Page 35: ...Organize my files Delete a file Delete all files Periodically delete files Change the folder ...
Page 283: ...3 19 PRINTER Contents 4 Click the Print button Printing begins ...
Page 836: ...MX3114 3115 EX ZZ Operation Guide MX 2614N MX 2615N MX 3114N MX 3115N MODEL ...


