background image

MX-5111N  MX-TU13 (EXIT TRAY CABINET)  8 – 1

MX-5111N

Service Manual


[8] MX-TU13 (EXIT TRAY CABINET)

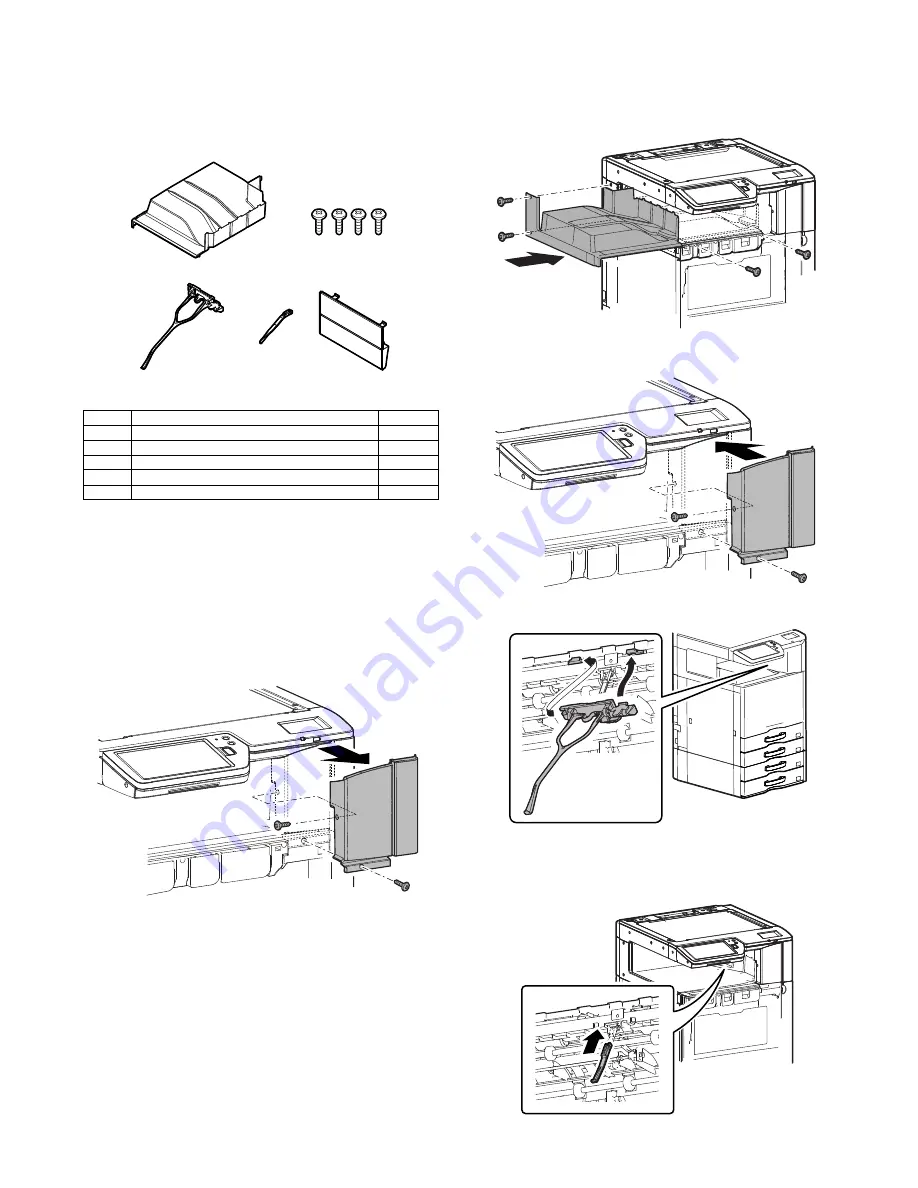
1. Unpacking

A. Packed items check

2. Installation

NOTE: Before installation, be sure to turn both the operation and

main power switches off and disconnect the power plug
from the power outlet. Make double sure that the data lamp
on the operation panel does not light up or blink when per-
forming installation. 

A. Paper exit tray attachment

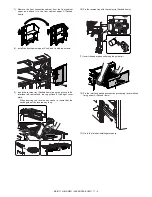
1)

Open the front cabinet, and remove the front cabinet upper.

2)

Attach the paper exit tray (Packed items), and fix it with the
screw (Packed items).

3)

Attach the front cabinet upper, and close the front cabinet.

4)

Attach the paper holding arm (Packed items).

5)

Attach the full detection actuator (Packed items).

NOTE: Be careful of the installing direction of the full detection

actuator.

No.

Name

Quantity

1

Paper exit tray

1

2

Screw

4

3

Paper holding arm

1

4

Full detection actuator

1

5

Paper exit cover

1

2

1

3

4

5

Summary of Contents for MX-4110N

Page 1: ... 14 MX FN11 FINISHER 14 1 15 MX FN18 SADDLE STITCH FINISHER 15 1 16 MX PNX6A B C D PUNCH MODULE 16 1 17 MX PK11 PS3 EXPANSION KIT 17 1 18 MX PUX1 XPS EXPANSION KIT 18 1 19 MX PF10 BARCODE FONT KIT 19 1 20 MX FX11 FACSIMILE EXPANSION KIT 20 1 21 AR SU1 STAMP UNIT 21 1 22 MX FWX1 INTERNET FAX EXPANSION KIT 22 1 23 MX AMX1 APPLICATION INTEGRATION MODULE 23 1 24 MX EB11 ENHANCED COMPRESSION KIT 24 1 2...

Page 2: ...acking 18 1 2 Installation 18 1 19 MX PF10 BARCODE FONT KIT 1 Unpacking 19 1 2 Installation 19 1 20 MX FX11 FACSIMILE EXPANSION KIT 1 Unpacking 20 1 2 Installation 20 1 21 AR SU1 STAMP UNIT 1 Unpacking 21 1 2 Installation RSPF model 21 1 3 Installation DSPF model 21 3 22 MX FWX1 INTERNET FAX EXPANSION KIT 1 Unpacking 22 1 2 Installation 22 1 23 MX AMX1 APPLICATION INTEGRATION MODULE 1 Unpacking 23...

Page 3: ...e of a step up transformer is also available In this case the capacity must be great enough for the max power consumption of the machine 3 Power frequency waveform The frequency must be within the range of the specified frequency 2 If power waveform is deformed a trouble may occur 4 Safety Be sure to properly ground the machine Grounding earth connection must be performed before inserting the powe...

Page 4: ...ty may be adversely affected and a trouble may be caused There was a trouble in a place where silicon series gas or volatile components are generated Use great care for avoiding this 5 Vibration Avoid installation near a machine which produces vibrations If vibrations are applied to the copier machine copy images may be deflected and a trouble may be caused F Note for handling PWB and electronic p...

Page 5: ...erial on the developing unit Fusing unit Be careful not to leave fingerprints oil grease or other foreign material on the fusing roller and the external heating belt Do not leave the fusing roller in contact state for a long time If these items are neglected a trouble may be generated in the copy and print image quality 2 Transit and delivery A Implements facility and manpower It is recommendable ...

Page 6: ...UN50A Sharp OSA Network Scanner Tool 50 License Kit MX UN1HA Sharp OSA Network Scanner Tool 100 License Kit MX AMX1 APPLICATION INTEGRATION MODULE MX AMX2 APPLICATION COMMUNICATION MODULE MX AMX3 EXTERNAL ACCOUNT MODULE MX PK11 PS3 EXPANSION KIT MX PUX1 XPS EXPANSION KIT MX PF10 BARCODE FONT KIT AR SU1 STAMP UNIT MX FX11 FACSIMILE EXPANSION KIT MX EB11 ENHANCED COMPRESSION KIT MX US10 SHARPDESK 10...

Page 7: ...1 PS3 EXPANSION KIT STD OPT STD OPT STD OPT Yes 2 MX PUX1 XPS EXPANSION KIT OPT OPT OPT Yes 3 MX PF10 BARCODE FONT KIT OPT OPT OPT Yes Image send expansion MX FX11 FACSIMILE EXPANSION KIT OPT OPT OPT 4 AR SU1 STAMP UNIT OPT OPT OPT MX FWX1 INTERNET FAX EXPANSION KIT OPT OPT OPT Yes MX EB11 ENHANCED COMPRESSION KIT OPT OPT OPT Authentication Security MX FR33 DATA SECURITY KIT OPT OPT OPT Yes MX FR3...

Page 8: ...e 1 Remove the PP band 2 Remove the internal packing pads with the machine B Removal of the fixing tape and protection material C Packed items check 1 North America only DSPF model RSPF model No Name Quantity 1 Developer 1 4 2 Operation manual 1 3 Operation manual pocket 1 standard equipment model KEYBOARD standard equipment model EXIT TRAY CABINET option model 1 1 2 3 ...

Page 9: ...ng material to the position shown in the figure for future use Close the tray which was pulled out 2 Scanner 2 3 mirror unit lock release 1 Remove the optical unit fixing screw and remove the note label B Developing each color installation Be careful not to attach fingerprints or oily dirt on the DV roller sur face 1 Open the front cabinet and remove the waste toner box 2 Check that the lock is re...

Page 10: ...ter stir ring toner and developer in the bag supply it to the develop ing unit When replacing developer use an extreme care not to drop developer on the drive section marked with 8 Install the DV cover in the arrow direction A When installing the DV cover be sure to engage the pawl with the boss 9 Secure the DV cover with the two screws 10 Shake the developer unit horizontally a few times When sup...

Page 11: ...and sets stores in memory the average sensor detection level as the control level for the ref erence toner density Operating times approx 3 minutes MEMO Be sure to select all of the four colors K C M Y 6 After the machine completes cycling exit the simulation mode by pressing the CA key on the main unit D Installation of individual color toner cartridges The life of each toner cartridge is as foll...

Page 12: ...dge positions 3 Insert the cartridge securely until it locks Push it until the click sound is heard E Cleaning of LSU s dust proof glass Dust from the transfer belt or shutter or some other adjacent part may fall onto the LSU during transport or installation Be sure to clean the dust proof glass before checking the image quality 1 Open the front cabinet and remove the waste toner box 2 Detach the ...

Page 13: ...cus tomer s request To customize the following items after completion of the destination setup change the set values I Image quality check 1 Image loss void area image off center check Make a copy in the original table mode and in the RSPF DSPF mode Check to confirm that the image loss and the void area are in the range shown below Item Description Type Select the type of paper that is loaded in t...

Page 14: ...stment is completed EXECUTE key returns to the normal display and the value of the adjustment result is displayed The current skew level for each color is displayed on the SKEW display section No Item SIM 1 Print engine image distortion adjustment Manual adjustment OPC drum phase adjustment Automatic adjustment Color registration adjustment Automatic adjustment 50 22 2 Copy color balance and densi...

Page 15: ...h drive section and the process sec tion Display Item Content Display Default NOTE MAIN F C Registration adjustment value main scanning direction Cyan laser writing position F side 1 0 199 0 100 M Registration adjustment value main scanning direction Magenta laser writing position F side 1 0 199 0 100 Y Registration adjustment value main scanning direction Yellow laser writing position F side 1 0 ...

Page 16: ...ecified paper for color b Note for checking the monochrome copy mode density To check the density use the gray test chart UKOG 0162FCZZ Set the copy density level to Manual 3 in the Text Printed Photo mode Manual In addition all the color balance adjustments in the user adjust ment mode must be set to the default center Check with the gray test chart UKOG 0162FCZZ In the copy density check with th...

Page 17: ... 0 5 points can be seen 4 The color difference in gray balance between the F and the R sides is not so great 5 There are no white and black streaks 6 Color texts are clearly reproduced 7 The background density is not so light Color difference in gray balance between the F and the R sides No white and black streaks Background density Color text reproduction capability Void Void Void Void Void Void ...

Page 18: ...e density difference between the F and the R sides is not so great 4 There are no white and black streaks 5 The background density is not so light 6 The black low density gradation is copied slightly Void Resolution Void Low density gradation Resolution Density difference between the F and the R sides No white and black streaks Background density Resolution Resolution Void Void Void Void Resolutio...

Page 19: ...o the darker level The density changing direction must not be reversed The density level of each color must be almost at the same level Method 2 When the PCL or the PS printer function is not provided GDI model use this method for check Use SIM 67 25 to print the color balance adjustment sheet and compare each process CMY black patch color balance and the black patch to check the color balance The...

Page 20: ...t and the color balance is registered with SIM63 7 as the service target if the color balance is required to be adjusted select the SERVICE target The copy color balance adjustment is automatically executed and prints the color balance check patch image If there is any streak or unclear print on the printed check pat tern check the print engine for any problems 5 Press EXECUTE key The printer colo...

Page 21: ...justment step 1 is automatically performed and the color balance check patch image is printed out If there is any streak or unclear print on the printed check pat tern check the print engine for any problems 8 The initial setting menu of the half tone image correction is dis played Press OK key The initial setting of the half tone image correction is per formed 9 Wait until EXECUTE key is displaye...

Page 22: ...ute the automatic adjustment and a satisfactory result is not obtained perform the manual color balance adjustment ADJ 10C 2 12 Check the printer color balance and density Refer to the item of the printer color balance and density check When satisfactory color balance and density are not obtained from the automatic adjustment by selecting the factory target in procedure 7 change the factory color ...

Page 23: ...d tipped LX BZ1041FCZZ 2 18 Screw M4x6 Bind machine screw XBBS740P06000 1 19 Snap band LBNDJ0043FCZZ 1 Desk heater kit DKIT 0429FCZZ 120V series DKIT 0429FC11 230V series 20 Desk heater 120V series RHETP0144FCZZ 1 Desk heater 230V series RHETP0139FCZZ 21 Heater heat sink PRDAR0087FCZZ 1 22 Screw M3x4 S tight XHBS730P04000 4 23 Desk heater mounting plate LPLTM6021FCZZ 1 24 Edge wire saddle LHLDW150...

Page 24: ... NOTE Install the dehumidifier heater switch so that the side of the mounting terminal post is the inward side of the main unit 2 Cut the switch part of the left rear lower cabinet NOTE Be careful not to damage the cabinet 3 Attach the label for heater switch package part No 2 to the left rear lower cabinet NOTE Wipe the surface where the label is to be affixed with alco hol then attach the label ...

Page 25: ... 1 Assembling of the heater unit 1 Attach the heater package part No 6 to the heater mounting plate package part No 7 and secure it with the screw M3x6 S tight package part No 8 2 Attach the heater mounting plate to the T Heater cover pack age part No 9 and secure it with the screw M3x6 S tight package part No 8 Attach the snap band of the heater harness to the T Heater cover NOTE After installing...

Page 26: ...connect it to the WH PWB Bind the harness of the heater and the AC DC WH harness with the omega lock package part No 12 4 Attach the core This procedure only applies to the 200V series 41cpm Attach the AC cable connection plate only for 120V series or attach the inlet mounting plate only for 230V series Secure it with screw NOTE When installing be careful to biting the wire D Installation of the r...

Page 27: ...part No 15 3 Tighten the snap band and cut its tip to approx 5 mm or less Slide the banding band head to the square hole Part that is enclosed by the mark NOTE The banding band head and cut tip must not protrude behind the heater fixing plate 2 Removal of the table glass the paper exit cover 1 Remove the screw and remove the SPF glass and the glass holder Remove the table glass 2 Remove the paper ...

Page 28: ... through the clamp NOTE The convex part of the scanner heater must be inserted into the hole of the scanner frame 5 Tighten the loose scanner heater harness by pulling it in the arrow direction and secure it with the snap band packing part No 19 then cut its tip to approx 5 mm or less 6 Move the lamp unit by hand and check that it move smoothly in all movable area NOTE Check that there is no inter...

Page 29: ...r mounting plate packing part No 23 and secure it with the screw M3x4 S tight packing part No 22 Attach the edge wire saddle packing part No 24 and pass the desk harness through it 2 Removal of the tray the desk rear cabinet the rear cover of the main unit 1 Remove the tray 3 and the tray 4 2 Remove the screw and remove the desk rear cabinet and the rear cover of the main unit 3 Installation of th...

Page 30: ...ini clamp package part No 29 Attach the snap band of the desk heater harness to the desk frame and connect the desk heater harness to the harness of the desk heater 4 Installation of the tray the desk rear cabinet and the rear cover of the main unit 1 Install the desk rear cabinet to the desk heater tray that pulled out and secure it with the screw NOTE Put out the desk heater harness from the not...

Page 31: ...al 1 Pull out the paper feed tray 2 Open the upper cover 3 Remove the upper cabinet 4 Disconnect the connector and remove the paper feed unit 2 Heater cover and cabinet removal 1 Remove the heater cover 2 Remove the cabinet 3 Heater attachment 1 Attach the heater 1 1 2 2 3 1 2 1 2 1 1 2 1 2 2 1 ...

Page 32: ...to mistake the attaching direction of the AC cord fixer 2 Pull the harness tightly in the arrow direction and check to confirm that there is no disconnection of the snap band and that the square hole in the frame is not covered with the har ness 3 Connect the connector of the heater harness unit and attach the earth wire NOTE Attach the earth wire at an angle of 45 degrees 5 Cabinet and heater cov...

Page 33: ...ed unit 2 Attach the upper cabinet 3 Close the upper cover 4 Insert the paper feed tray 7 Connector connection 1 Remove the connector cover 2 Connect the connector and tighten the screw H Operation check after installation 1 Turn on the dehumidifier heater switch 2 1 2 2 1 3 3 2 2 1 1 2 ...

Page 34: ...value between the earth terminal and the AC terminal L side and between the earth terminal and AC terminal N side with the circuit tester and confirm they are not short circuited 3 When not using the heater after checking turn off the dehu midifier heater switch ...

Page 35: ... package and unpack it when connecting the connector to the machine C Packed items check 2 Installation NOTE Before installation be sure to turn both the operation and main power switches off and disconnect the power plug from the power outlet Make double sure that the data lamp on the operation panel does not light up or blink when per forming installation A Installation of the adjuster 1 Install...

Page 36: ...ore to lift the main unit Place the main unit on the desk unit slowly by fitting the external lines Check to insure that the positioning pin on the top of the desk unit is securely engaged in the positioning groove of the main unit 3 Remove the No 2 paper feed tray 4 Pull out the No 3 paper feed tray until it stops 5 Lift the connection plates on the right and left of the main unit front side and ...

Page 37: ...vers C Release the lock 1 Pull out each tray Turn and remove the fixing material and remove the caution sheet Attach the removed fixing material to the position shown in the figure for storage Close the cassette which was pulled out NOTE Before turning on the power check to insure that the fixing material of the tray is disengaged If the power is turned on without disengaging the fixing material a...

Page 38: ... main scan print position to shift by 0 1 mm toward the rear Increasing the adjustment value by 1 causes the main scan print position to shift by 0 1 mm toward the front 5 After entering the adjustment value press the EXECUTE key on the touch panel to start printing and save the setting 6 Check that the adjustment pattern image is printed in the cor rect position Measure the dimensions of the void...

Page 39: ...n power switches off and disconnect the power plug from the power outlet Make double sure that the data lamp on the operation panel does not light up or blink when per forming installation A Installation of the adjuster 1 Attach the right adjuster included in the package to the machine stand Insert the right adjuster until it is locked 2 Turn each adjuster to fix the machine stand No Name Quantity...

Page 40: ... main unit on the machine stand slowly by fitting the external lines Check to insure that the positioning pin on the top of the machine stand is securely engaged in the positioning groove of the main unit 3 Open the front door of the machine stand Unfasten the fixed screw and lift the connection plates on the right and left sides of the front side of the machine stand and fix them with the fixing ...

Page 41: ...MX 5111N MX DS15 STAND 5 3 4 Lift the connection plates and fix them with the fixing screws Packed items 5 Install the connection plate covers 2 1 2 1 11 Jul 25 1 ...

Page 42: ...let Make double sure that the data lamp on the operation panel does not light up or blink when per forming installation A Release the lock 1 Remove the paper feed desk fixing screw NOTE Before turning on the power check to insure that the fixing screw of the tray is removed If the power is turned on with out removing the fixing screw a trouble may be resulted No Name Quantity 1 Mounting plate uppe...

Page 43: ... on the lower side 2 Remove the right door cover from the machine 3 Disengage the pawl and remove the right adjuster 4 Remove the screw cap and remove the screw 5 Remove the cover 6 Temporarily fix the fixing screw B Packed items midway 7 Insert the temporarily fixed screw B into the key hole in the connection unit Packed items and temporarily fix the con nection unit 8 Fix the other fixing screw ...

Page 44: ...ent is not required insert the large capac ity tray unit further more If the height adjustment is required perform the adjustment procedures from 4 4 Loosen the adjustment screw on the F side Use the adjustment screw on the front side for the adjust ment Do not touch the screw on the rear side 5 In the case of a shift to the right press the front upper section and fit the height adjustment check r...

Page 45: ...ctor connection 1 Remove the screw and remove the connector cover 2 Connect the connector and tighten the screw E Paper size switch 1 Paper size switch from A4 to LT Since the factory setting of the paper size is A4 if paper size switch is required perform the following procedures 1 Slowly pull out the tray until it stops 2 Loosen the stopper fixing screw 1 pc on the right lower side of the tray s...

Page 46: ...iliary guide 3 Set the mark position of the auxiliary guide and the cas sette R to the size from A4 to LT and fix with the fixing screw flat screw At that time set the mark position of the auxiliary guide and the cassette R to the same scale of the mark position of the side plate R and the size guide adjustment plate con firmed in procedure 1 If the scale of the size guide adjust ment plate is at ...

Page 47: ...m the following procedures 1 Slowly pull out the tray until it stops 2 Loosen the stopper fixing screw 1 pc on the right lower side of the tray so that the stopper does not function 3 Pull out the tray again until it stops a Side plate size switch 1 Remove four fixing screws blue screws which are fixing the upper and the lower sections of the side plate F and the side plate R 2 Adjust the mark pos...

Page 48: ...with the fixing screw blue screw which was removed previously NOTE When the rear edge shaft is switched to B5 check to con firm that the side plates F R are already set to B5 If the side plates F R are not set to B5 the rear edge shaft can not be switched to B5 3 Slightly push the tray restore the stopper to the original posi tion and fix the fixing screw At that time check to insure that the stop...

Page 49: ...Check that the adjustment pattern image is printed in the cor rect position Measure the dimensions of the void areas on the front and rear frame sides of the adjustment pattern image and make sure that the following conditions are met No adjustment is needed if A B 0 3 0 mm If the above condition is not met do the following 7 Change the adjustment value Enter a new adjustment value and press the O...

Page 50: ...on Then make a copy to check to insure that there is no more shift Repeat the procedures until there is no shift b When the shift is in the rear side To adjust the print line in the direction B from the paper center as shown in the figure 1 Loosen two fixing screws red screws of the front rear size guide adjustment plate and move the size guide adjustment plate in the direction B F side by the shi...

Page 51: ...ion panel does not light up or blink when per forming installation A Installation of the exit roller unit 1 Open the right door Remove the screw and remove the con nector cover 2 Remove the screw Disengage the engagement in the front side then in the rear side and remove the paper exit cover 3 Connect the connector and install the exit roller unit Packed items Use the screw which was removed in st...

Page 52: ...cked items Be careful of the installing direction of the full detection actu ator B Turn on the power of the main unit 1 Connect the power plug of the machine to the power outlet and turn ON the main power switch and the operation panel power switch C Tray setting Use SIM26 1 to set the tray YES NO A B B ...

Page 53: ...link when per forming installation A Paper exit tray attachment 1 Open the front cabinet and remove the front cabinet upper 2 Attach the paper exit tray Packed items and fix it with the screw Packed items 3 Attach the front cabinet upper and close the front cabinet 4 Attach the paper holding arm Packed items 5 Attach the full detection actuator Packed items NOTE Be careful of the installing direct...

Page 54: ...AY CABINET 8 2 6 Attach the paper exit cover Packed items B Turn ON the power of the main unit 1 Connect the power plug of the machine to the power outlet and turn ON the main power switch and the operation panel power switch ...

Page 55: ...al C Packed items check No Name Quantity 1 Finisher fixing plate 1 2 Front slide rail 1 3 Dummy punch unit 1 4 Front open close cover 1 5 Punch cover 1 6 Left front cover 1 7 Finisher slide stopper 1 8 Fixing screw 8 9 Resin clip 1 10 Coin screw 1 11 Staple position label For scanner 1 12 Staple position label For RSPF DSPF 1 13 Punch position label For scanner 1 14 Punch position label For RSPF D...

Page 56: ...oth of the paper holding arm which is easily removed alone and the paper holding arm holder B Installation of the inner finisher 1 Open the front cabinet Remove two screws and remove the front cabinet upper 2 Disengage two pawls and remove the paper exit tray cover 3 Remove four screws and remove the paper exit tray When removing the paper exit tray there is no need to remove the screws in the sec...

Page 57: ...r finisher 10 Fix the rear slide rail with the fixing screw Packed items 11 After pushing the intermediate rail of accuride insert the fin isher slide stopper Packed items between the rear slide rail and the accuride Fix it with the coin screw Packed items 12 Install the front open close cover Packed items to the front rail stay rotating shaft and fix it with the resin clip Packed items 13 Fix the...

Page 58: ...tach the staple position label Packed items to the position indicated in the figure For scanner For DSPF RSPF E Turn on the power of the main unit 1 Connect the power plug of the machine to the power outlet and turn ON the main power switch and the operation panel power switch 1 2 DSPF RSPF Cleaningofthedocumentscansection CAUTION When streaks appear on copy or scan images open the automatic docum...

Page 59: ... or blink when per forming installation NOTE When the punch unit is installed together with installation of the inner finisher first install the inner finisher and then install the punch unit Do not install the punch unit first because doing so would cause interference between the inner finisher slide rail and the punch unit drawer connector possibly resulting in fail ure when you attempt to insta...

Page 60: ...w and remove the band and the punch cover 6 Remove the screw and remove the dummy punch unit 7 Fix the punch unit with a screw When installing the punch unit be careful not to bump it against the drawer connector Fit the positioning pin and insert it 8 Make positioning with the dove A and fix the punch unit with the screw which was fixing the dummy punch unit 9 Cut the lid of the punch cover with ...

Page 61: ... upper part using the two screws removed in step 5 14 Insert the finisher slide stopper between the slide rail and the accuride and fix it with the coin screw 15 Slide the inner finisher to the original position and close the front cover B Punch position label attachment 1 Attach the punch position label Packed items to the position indicated in the figure For scanner 1 2 1 2 ...

Page 62: ...er outlet and turn ON the main power switch and the operation panel power switch DSPF RSPF R2 5 connection line Edge line R 2 5 CAUTION Cleaning of the document scan section When streaks appear on copy or scan images open the automatic document feed unit and clean the document scan section with the glass cleaner accessory Document scan section ...

Page 63: ...mp on the operation panel does not light up or blink when per forming installation A Removal of the paper holding arm unit 1 Push up the section A to disengage the pawl and remove the paper holding arm and the paper holding arm holder together as a unit Be careful to remove both of the paper holding arm which is easily removed alone and the paper holding arm holder No Packed part names Quantity 1 ...

Page 64: ...the installing direction of the reverse detection actuator 5 Engage the projection of the main unit frame with the hole in the right cover plate Packed items and install the right cover plate and fix it with the fixing screw A Packed items Be sure to clamp and fix the paper exit tray shifter side plate with the fixing guide 6 Insert the rib of the interface left cabinet Packed items into the slit ...

Page 65: ...ray Packed items along the groove in the interface left cabinet and the top surface of the right cover plate When inserting the reverse tray check to insure that the switch guide of the reverse tray is up 10 Fix the reverse tray with the resin crip Packed items 11 Insert the paper pass unit along the guide rail 12 Fix the interface pass disconnection preventing lever with the fixing screw A Packed...

Page 66: ...ired 1 Remove the fixing material and remove the top case Remove the packing cushion and bundled items 2 Holding the upper part of the saddle stitch finisher by two peo ple pull up the saddle stitch finisher and make it stand upright Be careful to sliding worker s foot 3 Remove the skid and packing cushions 4 One person tilt the saddle stitch finisher another person remove the lower tray 5 Remove ...

Page 67: ...tion plate provided on the front side of the option desk is securely installed Make sure that the connection plate included in the pack age is securely installed A Replacement of the Operation Manual storage cover 1 Remove the Operation Manual storage cover on the left side of the machine 2 Install the Operation Manual storage cover which was removed from the machine to the saddle finisher B Insta...

Page 68: ...n is smoothly inserted into the connection hole If the guide pin is not inserted smoothly perform the follow ing adjustment 1 When the guide pin is not fit with the connection hole in the finisher 1 Loosen the fixing screw of the adjustment section on the rear side Adjust the height adjustment screw so that the guide pin is fit with the connection hole in the finisher By making space between the m...

Page 69: ...even 2 If the upper and lower clearances between the main unit and the finisher are not even remove the screw one for each of the foot covers on the front rear sides and remove the foot cover 3 Loosen four fixing screws of the adjustment section and turn the height adjustment screws on the front rear sides to adjust so that the clearances are even By making space between the main body and ground t...

Page 70: ...the screw G Staple position label attachment 1 Attach the staple position label Packed items to the position indicated in the figure For scanner For DSPF RSPF H Turn on the power of the main unit 1 Connect the power plug of the machine to the power outlet and turn ON the main power switch and the operation panel power switch DSPF RSPF Cleaningofthedocumentscansection CAUTION When streaks appear on...

Page 71: ...he power plug from the power outlet Make double sure that the data lamp on the operation panel does not light up or blink when per forming installation A Installation of the punch unit 1 Disconnect the connector between the main unit and the sad dle finisher 2 Release the lock and separate the saddle finisher from the main unit 3 Remove the screw and remove the rear cover 4 Remove the screw and re...

Page 72: ...hich was removed from the dummy punch guide Before installing remove the dust box Check to confirm that the punch guide pin is securely inserted into the guide pin insertion hole of the finisher Check to confirm that the pawl A is engaged with the plate frame 8 Connect the harness on the punch unit side with the PWB on the finisher side 9 Fix the front inner cover with screws and close the front c...

Page 73: ...shown in the figure C Punch position label attachment 1 Attach the punch position label to the position indicated in the figure For scanner For DSPF RSPF 000 0000 Label attachment reference DSPF RSPF R2 5 connection line Edge line R 2 5 CAUTION Cleaning of the document scan section When streaks appear on copy or scan images open the automatic document feed unit and clean the document scan section ...

Page 74: ...A B C D PUNCH MODULE 13 4 D Turn on the power of the main unit 1 Connect the connector 2 Connect the power plug of the machine to the power outlet and turn ON the main power switch and the operation panel power switch ...

Page 75: ...e fixing material and remove the top case 2 Remove the bundled items from packing cushion 3 Holding the upper part of the saddle stitch finisher by two peo ple pull up the saddle stitch finisher and make it stand upright Be careful to sliding worker s foot 4 Remove the skid and packing cushions 5 One person tilt the finisher another person remove the lower tray 6 Remove the other side similarly ...

Page 76: ...ed items check No Name Quantity 1 Binding head round tapping M4x8 2 2 IT tapping M4x20 2 3 Binding head M4x12 4 4 Step screw B 2 5 Rail 1 6 Rail reception sheet metal 1 7 Connection fixture F for x3 1 8 Connection fixture R for x3 1 9 Staple position label For scanner 1 10 Staple position label For RSPF DSPF 1 11 Punch position label For scanner 1 12 Punch position label For RSPF DSPF 1 13 Guide m...

Page 77: ...eft side of the machine 2 Install the Operation Manual storage cover which was removed from the machine to the finisher B Installation of the rail 1 Install the rail Packed items to the finisher with the fixing screws Packed items 2 Install the rail reception sheet metal Packed items to the main unit with the fixing screws Packed items C Removal of the paper pass latch reception parts and the posi...

Page 78: ... Packed items to the position indicated in the figure E Attach the interface left cabinet 1 Insert the rib of the interface left cabinet into the slit on the lower surface of the scanner left cabinet Install the interface left cabinet with the screw F Installation of the connection fixture F R 1 Install the connection fixture R Packed items to the main unit with the fixing screws Packed items Corn...

Page 79: ... sheet metal of the main unit install the finisher 2 Remove the screw and remove the connector cover on rear side of the finisher 3 Check that the center of the screw hole of the finisher is in the range of specification of an oval hole of the connection fixture that exist on main body rear side When not the range of specification progress to the proce dure of I Adjustment If the adjustment is not...

Page 80: ... slide to the left the front lower cover and remove it 3 Open the front upper door and remove the screw 4 Remove the screws and open the front cover 5 Remove the fixing tapes 6 Remove the screws and remove the auxiliary wheels 7 Remove the screws and remeve the rear lower cover 8 Remove the fixing tapes ...

Page 81: ...side 10 Remove the screw and remove the spanner installed inside the front lower door 11 Turn the bolt for which the adjustment is necessary and adjust to become it within the range of specification 12 Check to insure that the upper and lower clearances between the main unit and the finisher are even ...

Page 82: ...it 14 Install the rear lower cover with the fixing screws 15 Install the auxiliary wheels with the fixing screws 16 Install the spanner for adjustment to inside the front lower door 17 Close the front cover and secure it with the fixing screws 18 Attach the fixing screw and close the front upper door ...

Page 83: ...nisher to the main unit 2 Open the front cover of finisher 3 Fix the finisher to the main unit with the step screw B Packed items 4 Close the front cover 5 Remove the screw and remove the connector cover on rear side of the finisher 6 Install the Step screw B Packed items 7 Attach the connector cover on rear side of the finisher ...

Page 84: ...ms to the position indicated in the figure For scanner For DSPF RSPF M Turn on the power of the main unit 1 Connect the power plug of the machine to the power outlet and turn ON the main power switch and the operation panel power switch DSPF RSPF Cleaningofthedocumentscansection CAUTION When streaks appear on copy or scan images open the automatic document feed unit and clean the document scan sec...

Page 85: ...s required 1 Remove the fixing material and remove the top case 2 Remove the bundled items from packing cushion 3 Holding the upper part of the saddle stitch finisher by two peo ple pull up the saddle stitch finisher and make it stand upright Be careful to sliding worker s foot 4 Remove the skid and packing cushions 5 One person tilt the saddle stitch finisher another person remove the lower tray ...

Page 86: ...ction material 1 Remove the fixing tapes and protection material 2 Remove the screws and remove the fixing material for paper exit tray four positions 3 Open the front door of the finisher and remove the fixing tapes and protection material 4 Pull out the stapler unit ...

Page 87: ...Attach the right lower cover with the fixing screws C Packed items check No Name Quantity 1 Binding head round tapping M4x8 2 2 IT tapping M4x20 2 3 Binding head M4x12 4 4 Step screw B 2 5 Rail 1 6 Rail reception sheet metal 1 7 Connection fixture F for x4 1 8 Connection fixture R for x4 1 9 Staple position label For scanner 1 10 Staple position label For DSPF 1 11 Punch position label For scanner...

Page 88: ...e rail 1 Install the rail Packed items No 5 to the saddle stitch fin isher with the fixing screws Packed items No 1 2 Install the rail reception sheet metal Packed items No 6 to the main unit with the fixing screws Packed items No 2 B Removal of the paper pass latch reception parts and the positioning pin 1 Remove the screw and release the paper pass disconnection preventing lever 2 Remove the pap...

Page 89: ... of the paper exit tray which was removed in procedure 4 E Installation of the connection fixture F R 1 Install the connection fixture R Packed items No 8 to the main unit with the fixing screws Packed items No 3 2 Install the connection fixture F Packed items No 7 to the main unit with the fixing screws Packed items No 3 F Attaching the cushion 1 Attach the cushion S Packed items the cushion M Pa...

Page 90: ...ide of the finisher 3 Check that the center of the screw hole of the finisher is in the range of specification of an oval hole of the connection fixture that exist on main body rear side When not the range of specification execute the following adjustment If the adjustment is not required Progress to the procedure of I Connection of the saddle stitch finisher H Adjustment 1 Remove the finisher fro...

Page 91: ...w of the front lower cabinet 2 5 Remove the screws and slide to the left the front lower cabinet 2 and remove it 6 Remove the fixing tapes 7 Remove the screws and remove the rear lower cover 8 Remove the fixing tapes 9 Loosen the caster fixing screws 10 Remove the screw and remove the spanner installed inside the front door ...

Page 92: ...ation 12 Check to insure that the upper and lower clearances between the main unit and the finisher are even 13 Tighten the caster fixing screws so that the indicator scale is fit 14 Install the rear lower cover with the fixing screws 15 Install the front lower cabinet 2 with the fixing screws 16 Install the front lower cabinet 1 with the fixing screws ...

Page 93: ... to inside the front door with screw 19 Close the front door I Connection of the saddle stitch finisher 1 Engage the saddle stitch finisher to the main unit 2 Open the front door of saddle stitch finisher 3 Fix the saddle stitch finisher to the main unit with the step screw B Packed items No 4 4 Close the front cover ...

Page 94: ...ighten the screws K Staple position label attachment 1 Attach the staple position label Packed items to the position indicated in the figure For scanner Packed items No 9 For DSPF RSPF Packed items No 10 L Turn on the power of the main unit 1 Connect the power plug of the machine to the power outlet and turn ON the main power switch and the operation panel power switch DSPF RSPF Cleaningofthedocum...

Page 95: ...E 1 Unpacking A Pulling out of the punch unit B Removal of the protection material 1 Remove the fixing tape and protection material 2 Open the front cover and open the top cover 3 Remove the screws and remove the fixing material 2 posi tions 4 Close the top cover and close the front cover 1 2 1 2 ...

Page 96: ... Installation of punch unit 1 Attach the step screw A Packed items to the finisher 2 Remove the fixing screw and remove the connector cover on rear side of the finisher 3 Hang the punch unit on the step screws installed to the fin isher 4 Tighten the step screws bundled to the punch unit fix the punch unit No Name Quantity 1 P tight M4x12 1 2 Step screw A 2 3 Cap screw M3x6 3 4 Binding head M4x12 ...

Page 97: ... door of punch unit 7 Engage the pawls of the rear side of front cover Packed items attach the front cover with the fixing screw Packed items B Connection of connector of the finisher and punch unit 1 Remove the fixing screws and remove the rear cover 2 Connect two connectors of the finisher to the PWB of punch unit and fix the harness to the clamp C Attaching the mylar 1 Attach the guide mylar up...

Page 98: ...with the fixing screws Packed items E Check of the connected position of main unit and finisher 1 Engage the finisher that has installed punch unit to the main unit and temporarily fix Insert the rail of the finisher unit into the rail reception fixture of main unit fix temporarily 2 Open the front door of punch unit 3 Check that the center of the screw hole of the punch unit is in the range of sp...

Page 99: ...1 only F Adjustment Refer to the adjustment procedure of each finisher G Install to main unit 1 Engage the finisher that has installed punch unit to the main unit 2 Open the front door of punch unit 3 Secure the main unit and the punch unit with the fixing screw Packed items of the MX FN11 4 Close the front door of punch unit 5 Install the fixing screw Packed items of MX FN11 on rear side 6 Instal...

Page 100: ...tachment 1 Attach the punch position label Packed items of the MX FN11 to the position indicated in the figure For scanner For DSPF RSPF J Turn on the power of the main unit 1 Connect the power plug of the machine to the power outlet and turn ON the main power switch and the operation panel power switch DSPF RSPF R2 5 connection line Edge line R 2 5 CAUTION Cleaning of the document scan section Wh...

Page 101: ... input mode c Enter the product key d Press the registration key 2 After completion of the product key input turn OFF the power switch on the operation panel of the machine and turn OFF the main power switch 3 Turn ON the main power switch and the power switch on the operation panel B Confirmation of function enable Execute SIM22 10 Machine configuration display to check to con firm that the set f...

Page 102: ...ns a Enter the system setting mode b The machine enters the product key input mode c Enter the product key d Press the registration key 2 After completion of the product key input turn OFF the power switch on the operation panel of the machine and turn OFF the main power switch 3 Turn ON the main power switch and the power switch on the operation panel B Confirmation of function enable Execute SIM...

Page 103: ...able Execute SIM22 10 Machine configuration display to check to con firm that the set functions are enable No Name Quantity 1 CD ROM 1 2 Product key sheet 1 Font No Font name 1 Code128TT Regular 2 Code128 NarrowTT Regular 3 Code128 WideTT Regular 4 Code39HalfInch Regular 5 Code39OneInch Regular 6 Code39QuarterInch Regular 7 Code39SmallHigh Regular 8 Code39Slim Regular 9 Code39SmallLow Regular 10 C...

Page 104: ...cabinet of the main unit 2 Attach the step screw Packed items to one of the two posi tions from which the screws are removed 3 Insert the step screw into the mounting hole of the fax box unit Packed items 4 Use a screw that has been removed in step 1 to secure the fax box unit B Pull out the control PWB 1 Push the location indicated in the illustration to unlock and remove the ozone filter cover f...

Page 105: ... that the four hooks are properly fitted to the main unit 5 Secure the right rear cabinet with the screw 6 Attach the ozone filter cover to the main unit E Turn ON the power of the main unit 1 Connect the power plug of the machine to the power outlet and turn ON the main power switch and the operation panel power switch F Destination setting 1 Enter the SIM26 6 mode 2 Check to confirm that the des...

Page 106: ... indicated as LINE MEMO When connecting the line cable to LINE or TEL wind the line cable two turns around the ferrite core Packed items as shown in the figure and connect to the modular jack which is marked with LINE MEMO After connection perform the setting of External tele phone connection of the system setting administrator About 10 cm ...

Page 107: ...r switches off and disconnect the power plug from the power outlet Make double sure that the data lamp on the operation panel does not light up or blink when per forming installation A Install the stamp unit 1 Open the RSPF unit and remove the OC mat For removing and fixing screws use a stubby screwdriver If stubby screwdriver is not available loosen the screw of the angle adjustment plate on the ...

Page 108: ...ct the connector 5 Install the sensor cover 6 Install the stamp cartridge Packed items 7 Install the OC mat and close the RSPF unit If the angle adjustment plate was lowered for installation lift the angle adjustment plate and fix it with the screw and close the RSPF unit B Turn on the power of the main unit 1 Connect the power plug of the machine to the power outlet and turn ON the main power swi...

Page 109: ...tamp unit Packed items to the stamp case which was removed from the DSPF unit with the installing screw Packed items Fix it together with the earth wire Arrange the harness of the stamp unit as shown below 4 Install the stamp case unit and fasten it with the screw Install the earth wire Connect the connector 5 Install the paper exit PG cover 6 Disengage the pawl and open the stamp case unit Instal...

Page 110: ...4 7 Install the OC mat to the SPF glass and close the DSPF unit B Turn on the power of the main unit 1 Connect the power plug of the machine to the power outlet and turn ON the main power switch and the operation panel power switch ...

Page 111: ...o enable the functions a Enter the system setting mode b The machine enters the product key input mode c Enter the product key d Press the registration key 2 After completion of the product key input turn OFF the power switch on the operation panel of the machine and turn OFF the main power switch 3 Turn ON the main power switch and the power switch on the operation panel B Confirmation of functio...

Page 112: ...ode c Enter the product key d Press the registration key 2 After completion of the product key input turn OFF the power switch on the operation panel of the machine and turn OFF the main power switch 3 Turn ON the main power switch and the power switch on the operation panel B Confirmation of function enable Execute SIM22 10 Machine configuration display to check to con firm that the set functions...

Page 113: ...cated in the illustration to unlock and remove the ozone filter cover from the right rear cabinet 2 Remove the screw from the right rear cabinet and remove the right rear cabinet 3 Remove the two screws from the control PWB unit 4 Pull out the control PWB unit If the fax box unit is installed carry out steps 5 6 and 7 additionally 5 Remove the screw and remove the snap band 6 Remove the interface ...

Page 114: ...ce cable into the right rear cabinet cover 7 Attach the right rear cabinet cover to the main unit At this time check that the four hooks are properly fitted to the main unit 8 Secure the right rear cabinet with the screw 9 Attach the ozone filter cover to the main unit Reconnect the cables that have been removed in step A to the original positions of the control PWB unit D Turn ON the power of the...

Page 115: ...ff and disconnect the power plug from the power outlet Make double sure that the data lamp on the operation panel does not light up or blink when per forming installation A Pull out the control PWB If cables are connected to the control PWB unit remove all cables 1 Push the location indicated in the illustration to unlock and remove the ozone filter cover from the right rear cabinet 2 Remove the s...

Page 116: ...At this time check that the four hooks are properly fitted to the main unit 8 Secure the right rear cabinet with the screw 9 Attach the ozone filter cover to the main unit Reconnect the cables that have been removed in step A to the original positions of the control PWB unit D Turn ON the power of the main unit 1 Connect the power plug of the machine to the power outlet and turn ON the main power ...

Page 117: ...y flash instantaneously during the install update process This is a normal operation 6 Check the result of install update of the firmware Use UP key and DOWN key to check the results of install update of all the firmware programs Display of firmware update results OK Update success NG Update failed Not Update The update process is not executed Cause of Update process not executed The option unit f...

Page 118: ... enters the product key input mode c Enter the product key d Press the registration key 2 After completion of the product key input turn OFF the power switch on the operation panel of the machine and turn OFF the main power switch 3 Turn ON the main power switch and the power switch on the operation panel B Confirmation of function enable Execute SIM22 10 Machine configuration display to check to ...

Page 119: ...he product key input mode c Enter the product key d Press the registration key 2 After completion of the product key input turn OFF the power switch on the operation panel of the machine and turn OFF the main power switch 3 Turn ON the main power switch and the power switch on the operation panel B Confirmation of function enable Execute SIM22 10 Machine configuration display to check to con firm ...

Page 120: ...oes not light up or blink when per forming installation A External fixture removal 1 Remove the front cabinet upper 2 Remove the operation panel cover 3 Remove the operation panel upper cover B Operation panel removal 1 Slide the operation panel unit to the left and put it down Remove the operation panel cover 2 Remove the operation panel lower cover No Name Quantity 1 Keyboard unit 1 2 Operation ...

Page 121: ...rd interface harness and attach the opera tion section cover NOTE Be sure to place the key interface harness between the operation section cover and the FFC Section A D Operation panel attachment 1 Connect the connector to the operation panel unit and fix the harness with the clamp NOTE When assembling put the mylar on the flat cable and fix them with the clamp NOTE Fit the flat cable edges with s...

Page 122: ...Allow slack around section A of the flat cable 2 Attach the operation panel unit 3 Attach the operation panel cover 4 Attach the operation panel lower cover For keyboard Packed items E External fixture attachment 1 Attach the operation panel upper cover 2 Attach the operation panel cover A 2 2 1 2 1 3 3 2 2 1 1 1 2 2 2 2 3 3 3 1 2 11 Jul 25 1 ...

Page 123: ...nd the operation panel power switch G Keyboard input check 1 Touch Image send on the touch panel 2 Touch File name on the touch panel 3 Push the keyboard and check the input display on the touch panel H USB operation check 1 Insert a USB memory into the USB connector of the operation panel 2 Check to confirm that the recognition memory of the USB memory is displayed on the operation panel 1 2 2 ...

Page 124: ... which has been used are available for failure in automatic data copy to the mirroring kit HDD 2 Data backup 1 Use SIM56 2 or Web Page to backup the HDD data Device cloning data Storage backup data 2 Use SIM56 3 or Web Page to backup the HDD data Document filing data 3 Use SIM56 4 or Web Page to backup the HDD data Jog log data Reinstallation disable 3 Installation NOTE Before installation be sure...

Page 125: ...e banding band which is fixing the communication harness 5 Fix the communication harness with the banding band Packed items with reference to the banding band which is fix ing the communication harness 6 Put the bound communication harness under the SATA har ness 7 Attach the protection sheet and the mini saddle which were removed in the above procedure to the mirroring unit NOTE Arrange so that t...

Page 126: ...et with the screw 9 Attach the ozone filter cover to the main unit Reconnect the cables that have been removed in step A to the original positions of the control PWB unit D Turn ON the power of the main unit 1 Turn on the main power switch and the operation panel power switch Date copying from the standard HDD to the mirroring unit HDD is started It is called Rebuilding 2 Check to confirm that the...

Page 127: ...n and select Edit home b Select Key registration c Select the key to be registered With the above operations the key icon appears on the home screen B Confirmation of function enable Execute SIM22 10 Machine configuration display to check to con firm that the set functions are enable C Network setting Perform the setting below according to the user environment Network Settings Protocol settings me...

Page 128: ... filter cover from the right rear cabinet 2 Remove the screw from the right rear cabinet and remove the right rear cabinet 3 Remove the two screws from the control PWB unit 4 Pull out the control PWB unit If the fax box unit is installed carry out steps 5 6 and 7 additionally 5 Pull out the control PWB unit and remove the snap band 6 Remove the interface cable from the frame 7 Remove the connector...

Page 129: ...he right rear cabinet If the fax box unit is installed carry out steps 1 2 and 3 additionally 1 Connect the interface cable to the control PWB unit 2 Push the interface cable into the recessed portion of the sheet metal on the control PWB unit 3 Attach the snap band to the sheet metal of the control PWB unit 4 Push the control PWB unit into the main unit 5 Secure the unit with the two screws 6 Fit...

Page 130: ...e main unit Reconnect the cables that have been removed in step A to the original positions of the control PWB unit D Turn ON the power of the main unit 1 Connect the power plug of the machine to the power outlet and turn ON the main power switch and the operation panel power switch ...

Page 131: ...upper 2 Remove the operation panel cover 3 Remove the operation panel upper cover No Type of card readers Manufacturer Model Name 1 Non contact IC card reader RFIDeas RDR 6081AKU 2 Equitrac Y591 EHID 201 v01 3 Elatec TWN3 4 RFIDeas RDR 7582AKU No Parts code Parts name Price rank Q ty 1 LHLDZ2230FCZZ IC Card reader holder B AX 1 2 LHLDZ2231FCZZ IC card reader holder C AX 1 3 PTPE 0352FCZZ Card read...

Page 132: ...pe C RDR 6081AKU TWN3 RDR 7582AKU Vertical direction Fit with the notch Horizontal direction Fit with the notch and the lower edge 2 Cut out the boss The cutting position of the boss of the IC card reader holder differs depending on the kind of the IC card reader Holder type C RDR 6081AKU RDR 7582AKU Holder type C TWN3 3 Attach the IC card reader to the IC card reader holder accord ing to the atta...

Page 133: ...ne 5 Bind up the cables of the card reader The length and the winging method differ depending on the kind of the IC card reader Holder type B Y591 EHID 201 v01 Pass the binding band through the hole before winding Hang the cable on the four hooks and wind so that there is no slack If there is some slack the cable may be pinched Fix with a screw 11 Jul 25 1 ...

Page 134: ... section of the USB connector in the card reader side and the USB connector socket section in the USB mini harness side with the binding bands Fix so that the USB connection position is at the center of the card reader holder Holder type C TWN3 Hang the cable on the two hooks and wind it so that there is no slack If there is some slack the cable may be pinched Fold and put the rest of the cable un...

Page 135: ... System setting modification IC card reader device registration 1 Device registration a Enter the card reader setting menu as shown below System Settings User Control Card Reader Device Registration b Press Read button c Disconnect the connector which links the machine and the IC card reader and then insert it back d Press OK button e Check to confirm that values are displayed on Product ID and Ve...

Page 136: ...e screen If there is no check mark on Use IC Card for Authentication the icon is not displayed H External fixture attachment NOTE Before installation be sure to turn both the operation and main power switches off and disconnect the power plug from the power outlet Make double sure that the data lamp on the operation panel does not light up or blink when per forming installation 1 Attach the operat...

Page 137: ...ncase of System setting mode User control Card area setting Importing from the setup file B Format of the setting file The format of the setting file should be as shown below Section name Key name Key value Use the template setting file change the key value make an arbitrary file name with an arbitrary extension such as ini and save the file A line started with or is treated as a comment A blank l...

Page 138: ... ByDelimiter Specifying by delimiter If the facility code has no setting of this item it is NULL If the card ID has no setting of this item all the data read from the card is made the card ID Position Start position 1 128 is specified with a decimal number Specified only when the location key value is ByPosition The head is specified with 1 and later Length Position The length of reading from the ...

Page 139: ...ance to use the remote operation panel function Let the user make the password and use SIM26 78 to set it MEMO After installation of an option upgrade all the firmware s to the latest versions 2 Remote operation panel function password setting procedures 1 Enter the SIM26 78 mode 2 Enter the password with 10 key Within 5 8 digits The entered password is displayed on the column of NEW To modify the...

Page 140: ...tem list Equipped condition Key in operation panel Display operation panel Paper feed operation Hand feed Main unit paper tray Desk unit paper feed tray With the desk unit installed Paper size detection Originals size detection Original table mode SPF mode RSPF operation two sided copy S S mode D S mode S D mode D D mode Bookbinding operation When the finisher is installed Stapling operation When ...

Page 141: ...ng Print the various setup data and the adjustment data list with SIM22 6 and keep the data In case of a memory trouble if the data are not kept all the adjustments must be made again If the data are kept the setup values and the adjustment values can be entered without adjustments shortening the servicing time ...

Page 142: ...rom the machine Large capacity tray Finisher Paper pass unit Saddle finisher 2 Remove the following consumable parts from the machine Paper Toner cartridges Development cartridge 3 Lock the following sections Scanner Optical section Paper cassette lift plate NOTE Since the hard disk drive is built in the machine use care not to exert vibrations or shocks to the machine when in transit ...

Page 143: ...Memo ...

Page 144: ...Memo ...

Page 145: ...Memo ...

Page 146: ...free solder is about 220 C which is about 40 C higher than that of conventional lead solder and its soldering capacity is inferior to conventional one it is apt to keep the soldering iron in contact with the PWB for longer time This may cause land separation or may exceed the heat resistive temperature of components Use enough care to separate the soldering iron from the PWB when completion of sol...

Page 147: ...sfara vid felaktigt batteribyte Använd samma batterityp eller en ekvivalent typ som rekommenderas av apparattillverkaren Kassera använt batteri enligt fabrikantens instruktion German Achtung Explosionsgefahr bei Verwendung inkorrekter Batterien Als Ersatzbatterien dürfen nur Batterien vom gleichen Typ oder vom Hersteller empfohlene Batterien verwendet werden Entsorgung der gebrauchten Batterien nu...

Page 148: ...ered trademark of Adobe Systems Incorporated Macintosh Mac OS AppleTalk EtherTalk Laser Writer and Safari are registered trademarks or trademarks of Apple Computer Inc IBM PC AT and Power PC are trademarks of International Business Machines Corporation Acrobat Reader Copyright 1987 2002 Adobe Systems Incorporated All rights reserved Adobe the Adobe logo Acrobat and the Acrobat logo are trademarks ...

Reviews: