7
(9)
Paper select display
This shows the size of paper loaded in each tray.
For the bypass tray, the paper type appears above the
paper size.
The selected tray is highlighted.
The approximate amount of paper in each tray is
indicated by
. Trays 1 to 5 can be touched to open
the same screen as when the [Paper Select] key is
touched.
☞
(10) Number of copies display
This shows the number of copies set.
(11) [Special Modes] key
Touch this key to select special modes such as Margin
Shift, Edge Erase, and Dual Page Copy.
☞
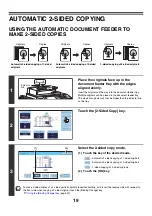
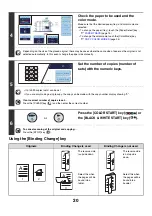
(12) [2-Sided Copy] key
Touch this key to select the 2-sided copying function.
☞
(13) [Output] key
Touch this to select an output function such as sort,
group, offset, staple sort, saddle stitch, or punch.
☞
(14) Customized keys
The keys that appear here can be changed to show
settings or functions that you prefer. The following keys
appear by factory default:
☞
(page 8)
[File] key, [Quick File] key
Touch one of these keys to use the File function or Quick
File function of document filing mode. These are the
same [File] and [Quick File] keys that appear when the
[Special Modes] key is touched. For information on the
document filing function, see the "Document Filing
Guide".
The screen explained in this section appears when a saddle stitch finisher, punch module, inserter, paper pass unit, and
large capacity tray (MX-LCX2) are installed. The image will vary depending on the equipment installed.
Summary of Contents for MX-6201N Series
Page 1: ...User s Guide MX 6201N MX 7001N MODEL ...
Page 82: ...Copier Guide MX 6201N MX 7001N MODEL ...
Page 230: ...Facsimile Guide MX FXX1 MODEL ...
Page 361: ...Scanner Guide MX 6201N MX 7001N MODEL ...
Page 483: ...Printer Guide MX 6201N MX 7001N MODEL ...
Page 555: ...Document Filing Guide MX 6201N MX 7001N MODEL ...
Page 604: ...System Settings Guide MX 6201N MX 7001N MODEL ...


