background image

128

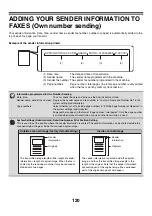
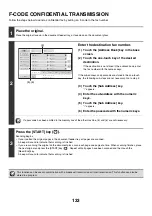
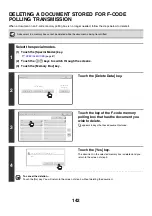
PRINTING A DOCUMENT STORED IN THE PUBLIC BOX

To check a document stored in the Public Box for polling transmission, follow the steps below to print the document.

Document data in the Public Box cannot be printed while the Public Box is in use for communication.

1

Select the special modes.

(1) Touch the [Special Modes] key.

SPECIAL MODES

 (page 87)

(2) Touch the 

 keys to switch through the screens.

(3) Touch the [Memory Box] key.

2

Touch the [Print Data] key.

3

Touch the [Public Box] key.

When nothing is stored in the Public Box, the [Public Box] key will be grayed out.

4

Press the [START] key (

).

The stored document is printed.

To cancel printing...

Touch the [Cancel] key in the touch panel.

Polling


Memory

Con

f

idential

Reception

Print


Data

Delete


Data

Data


Store

Memory


Box

Print


Data

Exit

Memory


Box


-


Print


Data

Public


Box

Back

1

2

Box


1

Box

 3

Box


5

Box


7

Box


9

Box


11

Box


2

Box


4

Box


6

Box


8

Box


10

Box


12

Summary of Contents for MX-M1100

Page 1: ...Image Send Guide MX M850 MX M950 MX M1100 MODEL ...

Page 2: ...VING A DESTINATION FROM A GLOBAL ADDRESS BOOK 30 USING THE RESEND FUNCTION 33 ENTERING FAX NUMBERS 34 ENTERING A FAX NUMBER WITH THE NUMERIC KEYS 34 CHAIN DIALING 35 3 TRANSMITTING AN IMAGE SENDING AN IMAGE IN SCAN MODE 36 CHANGING THE SUBJECT FILE NAME REPLY TO AND BODY TEXT 40 SENDING AN IMAGE IN USB MEMORY MODE 43 ENTERING A FILE NAME 47 SENDING A FAX IN INTERNET FAX MODE 48 CHANGING THE SUBJEC...

Page 3: ...ITIATING POLLING RECEPTION MANUALLY 124 SENDING A FAX WHEN ANOTHER MACHINE POLLS YOUR MACHINE Polling Memory 125 RESTRICTING POLLING ACCESS Polling security 125 SCANNING A DOCUMENT INTO POLLING MEMORY 126 PRINTING A DOCUMENT STORED IN THE PUBLIC BOX 128 DELETING A DOCUMENT FROM THE PUBLIC BOX 129 F CODE COMMUNICATION 130 HOW F CODES WORK 130 CREATING MEMORY BOXES IN THE MACHINE FOR F CODE COMMUNIC...

Page 4: ...161 JOB QUEUE SCREEN AND COMPLETED JOB SCREEN 162 OPERATION WHEN A JOB IN THE JOB QUEUE IS COMPLETED 165 CHECKING A RESERVED JOB OR THE JOB IN PROGRESS FAX MODE 166 CHECKING COMPLETED JOBS 167 CANCELING A JOB IN PROGRESS OR A RESERVED JOB 168 GIVING PRIORITY TO A RESERVED JOB 169 CHECKING THE ACTIVITY LOG Image Sending Activity Report 170 IMAGE SENDING ACTIVITY REPORT 170 INFORMATION APPEARING IN ...

Page 5: ...pection procedures In the unlikely event that a defect or other problem is discovered please contact your dealer or nearest SHARP Service Department Aside from instances provided for by law SHARP is not responsible for failures occurring during the use of the product or its options or failures due to incorrect operation of the product and its options or other failures or for any damage that occurs...

Page 6: ...paper misfeeds Manual name Contents User s Guide This manual explains the basic procedures for using the machine such as how to load paper Copier Guide This manual provides detailed explanations of the procedures for using the copy function Printer Guide This manual provides detailed explanations of the procedures for using the print function Image Send Guide This manual This manual provides detai...

Page 7: ... of the location of the file This is called Scan to FTP Hyperlink Scan to Desktop The scanned file is sent to a specified folder on your computer To use Scan to Desktop software must be installed from the Sharpdesk Network Scanner Utilities CD ROM that accompanies the network scanner expansion kit For the system requirements of the software see the manual PDF format or the Readme file on the CD RO...

Page 8: ... security of communication An extension phone can be connected to allow use as a telephone 7 METADATA DELIVERY page 156 Metadata delivery The application integration module can be combined with the network scanner function to append a metadata file to a scanned image file This is called metadata delivery Information entered using the touch panel or automatically generated by the machine can be sen...

Page 9: ...ct date and time are set in the machine The date and time are set in the system settings of the machine When the SYSTEM SETTINGS key is pressed the system settings menu screen appears on the touch panel Select Default Settings Clock Adjust and Clock Adjust and set the year month day hour and minute When the POWER SAVE key indicator light is blinking the machine is in auto power shut off mode If th...

Page 10: ...Settings and then Service Settings in the Web page menu Administrator rights are required Network scanner settings To configure the network scanner settings click Application Settings and then Network Scanner Settings in the Web page menu Administrator rights are required Internet Fax settings To configure the network scanner settings click Application Settings and then Internet Fax Settings in th...

Page 11: ...lder in Address Type and store an address Scan to E mail Click Address Book in the Web page menu and then click the Add button Select E mail in Address Type and store an address Addresses can also be stored in the system settings Scan to Desktop See STORING A DESTINATION FOR SCAN TO DESKTOP page 12 Scan to Desktop destinations can also be stored in the Web pages Click Address Book in the Web page ...

Page 12: ...ected in My Profiles C will be the name of the one touch key The profile name is determined by the combination of the text entered in Prefix A and the profile The one touch key is assigned to an index tab in the address book screen based on the text entered in Initial B This defines how an image sent to your computer is processed For more information see profile explanation D ADDING DESTINATIONS F...

Page 13: ...e line Be sure to use the provided telephone line cord to connect the machine to the wall telephone jack Connect the end of the line cord that has the core to the LINE jack on the machine Insert the other end the end without the core into a telephone line jack Click Core LINE jack Insert the end of the cord with the core into the LINE jack ...

Page 14: ...ect dialing will not be possible Touch the Auto Select key in Dial Mode Setting in the system settings administrator The machine will automatically set the dial mode to the type of line you are using You can also set the Dial Mode Setting manually After setting the dial mode do not change the setting unless you have a specific reason for changing it ...

Page 15: ...tings Administrator Default Display Settings One of the following screens can be selected for the initial screen that appears when the IMAGE SEND key is touched Base screen of each mode scan Internet fax fax or data entry mode Address book screen MANUAL FINISHING Auto Auto Auto File Quick File Address Review Send Settings Address Entry Address Book Data Entry Fax Internet Fax Special Modes Color M...

Page 16: ...to show settings or functions that you prefer Customizing displayed keys page 18 Click a key in the screen to jump to an explanation of the key Auto Auto Auto File Quick File Address Review Send Settings Address Entry Address Book Data Entry Fax Internet Fax Resend Special Modes Color Mode File Format Resolution Exposure Original Scan Scan Send Text 200X200dpi PDF Mono2 PDF Ready to send IMAGE SEN...

Page 17: ... a file name when storing a file to USB memory ENTERING A FILE NAME page 47 14 I Fax Manual Reception key Touch this key to receive an Internet fax manually RECEIVING INTERNET FAXES MANUALLY page 149 15 Direct TX key Touch this key to send a fax by direct transmission When the Direct TX key is not highlighted normal transmission memory TX mode is selected DIRECT TRANSMISSION MODE page 57 16 Sub Ad...

Page 18: ...es To close the screen touch the OK key Displaying a program key in the base screen will enable you to retrieve the program by simply touching the key STORING FAX OPERATIONS Program page 90 The functions that can be selected for the customized keys vary depending on the mode System Settings Administrator Customize Key Setting Registration is performed in System Settings Operation Settings Customiz...

Page 19: ...his key to enter the selected destination one touch key RETRIEVING A DESTINATION page 26 This key only appears when the network scanner function or Internet fax function has been added 10 Cc key When using Scan to E mail touch the Cc key when you wish to send a Carbon copy of the e mail to an additional destination 11 Bcc key When using Scan to E mail touch the Bcc key when you wish to send a Blin...

Page 20: ...r of one touch keys displayed in the address book screen System Settings Administrator Bcc Setting This setting enables or disables Bcc delivery When enabled the Bcc key appears in the address book screen System Settings Administrator Address Book Default Selection The following settings are available for the method of sorting the addresses that appear in the address book Index type alphabetical c...

Page 21: ...in the system settings allowing you to create groups of one touch keys that can be easily recognized System Settings CUSTOM INDEX page 177 This setting is used to store custom index names The custom index where a one touch key appears is specified when the transmission destination is stored in the key System Settings Administrator Disable Switching of Display Order This is used to disable switchin...

Page 22: ... BOOK page 25 RETRIEVING A DESTINATION FROM A GLOBAL ADDRESS BOOK page 30 Address Entry key ENTERING AN ADDRESS MANUALLY page 29 key USING A SEARCH NUMBER TO RETRIEVE A DESTINATION page 28 Resend key USING THE RESEND FUNCTION page 33 Numeric keys fax mode ENTERING A FAX NUMBER WITH THE NUMERIC KEYS page 34 Change the mode Select the image send mode that you wish to use BASE SCREEN page 15 Resend S...

Page 23: ...en scanned 5 Touch the Read End key When transmission ends image settings and convenient special mode settings are cleared To cancel scanning Press the STOP key to cancel the operation System Settings Administrator Default Display Settings The settings can be kept in effect a fixed period of time after scanning is completed 8 x11 Auto Auto Auto File Quick File Address Review Send Settings Address ...

Page 24: ...40 mm height x 140 mm width 11 height x 31 1 2 width 297 mm height x 800 mm width Using the document glass 11 height x 17 width 297 mm height x 432 mm width Selections Standard sizes detected original sizes Document glass Document feeder tray automatic document feeder Inch 1 11 x 17 8 1 2 x 14 8 1 2 x 11 8 1 2 x 11 R 5 1 2 x 8 1 2 11 x 17 8 1 2 x 14 8 1 2 x 11 8 1 2 x 11 R 5 1 2 x 8 1 2 5 1 2 x 8 ...

Page 25: ...JJJ JJJ HHH HHH FFF FFF DDD DDD BBB BBB ABCD Frequent Use EFGHI JKLMN OPQRST UVWXYZ 1 2 5 15 10 Global Address Search Address Review Address Entry Sort Address Condition Settings To Cc Auto Reception Fax Memory 100 Icon Mode Fax Scan to E mail Internet Fax Group key containing multiple destinations Scan to FTP Scan to Network Folder Scan to Desktop Icon Mode For information on storing addresses in...

Page 26: ...ng Scan to E mail you can select a one touch key and then touch the Cc key or the Bcc key to send Cc or Bcc copies of the e mail Fax mode If the network scanner expansion kit and Internet fax expansion kit are not installed the To key and Cc key will not appear System Settings Administrator Settings to Disable Transmission This is used to prohibit the selection of destinations of modes that are pr...

Page 27: ...tion Touch the one touch key of the destination that you wish to cancel A message appears to confirm the cancelation Touch the Yes key AAA AAA BBB BBB To Cc ABCD Frequent Use EFGHI JKLMN OPQRST UVWXYZ 1 2 5 15 10 Global Address Search Address Entry Sort Address Address Review Condition Settings III III GGG GGG EEE EEE CCC CCC JJJ JJJ HHH HHH DDD DDD FFF FFF Auto Reception Fax Memory 100 To 001 003...

Page 28: ...tion is stored in the address book If you do not know the search number print the one touch address list using Sending Address List in the system settings When entering search numbers such as 001 and 011 0 can be omitted For example to enter 001 enter 1 and touch the key or the Next Address key If an incorrect search number is entered Press the CLEAR key to clear the number and enter the correct n...

Page 29: ... the system settings administrator If you wish the destination to be a Bcc destination touch the Bcc key When Internet fax mode is selected the base screen appears after the destination address is entered However if I Fax Reception Report On Off Setting is enabled in the system settings administrator the reception report request screen will appear If you wish to receive a report touch the Yes key ...

Page 30: ...n Enter search characters for the destination and touch the Search key The search results will appear after a brief interval For the procedure for entering text see 7 ENTERING TEXT in the User s Guide How to search Enter the search characters maximum of 64 characters The system will look for names starting with the entered letters An asterisk can be used as follows XXX Names beginning with XXX XXX...

Page 31: ...ch again using more search letters To check the information stored in a destination Touch the key of the destination and then touch the Detail key The information stored for the selected destination will appear Check the information and then touch the OK key to return to the search results screen If a screen for selecting the item of the destination to be used appears If the selected destination c...

Page 32: ... the custom index in which the address will appear You can also select whether or not the destination will be included on the Frequent Use tab of the address book Scan to E mail File Format key Set the format for Scan to E mail Default format settings have already been configured however selecting format settings when you store a destination saves you the trouble of selecting the settings each tim...

Page 33: ...le destinations are stored group key Scan to FTP Scan to Desktop and Scan to Network Folder addresses Broadcasting destinations Addresses used only for BCC delivery Destinations transmitted to using a program Fax mode If numeric keys were pressed during the previous transmission the Resend key may not dial the correct number System Settings Administrator Settings to Disable Transmission When Disab...

Page 34: ... incorrect number is entered Press the CLEAR key to clear the number and then enter the correct number Touch the Pause key A hyphen is entered when the Pause key is touched once System Settings Administrator Pause Time Setting This is used to set the length of pauses The default setting is 2 seconds Auto Auto Auto File Quick File Address Review Direct TX Sub Address Address Book Data Entry Fax Int...

Page 35: ... and or area code are stored separately in one touch keys Example Using chain dialing to dial an international number System Settings Administrator Pause Time Setting This is used to set the length of pauses The default setting is 2 seconds XXX 010 00 XX XXXX XXX 010 Number to access international telephone service Country code Area code Number of other party Using a one touch key Using the numeri...

Page 36: ...n below To place a large portrait oriented original place it as shown above in Landscape orientation and specify the placement orientation in step 4 Place 5 1 2 x 8 1 2 A5 size originals in portrait vertical orientation If placed in landscape horizontal orientation an incorrect size will be detected For a 5 1 2 x 8 1 2 R A5R size original enter the original size manually Originals cannot be scanne...

Page 37: ...TERING DESTINATIONS page 25 System Settings Administrator Bcc Setting This setting enables or disables Bcc delivery When enabled the Bcc key appears in the address book screen 3 Display the original settings screen 1 Make sure that scan mode is selected If scan mode is not selected touch the Scan tab 2 Touch the Original key The current settings for Original Exposure Resolution File Format and Col...

Page 38: ...If the original was inserted in the document feeder tray a beep will sound when scanning is completed and transmission will take place If the color expansion kit is installed and the color mode is set to Auto the color used in the original is automatically detected and scanning takes place in full color grayscale or mono2 If the color expansion kit is not installed scanning takes place in mono2 If...

Page 39: ...les tend to be large When sending a multi page file or other large file it may be necessary to reduce the number of scanned pages or reduce the send size Storing a mail signature A signature can be automatically appended to the end of the body text of e mail This is convenient when you wish to have a corporate policy or other preset text appear at the bottom of e mail messages To store the text fo...

Page 40: ...n the User s Guide 1 Touch the Send Settings key in the base screen BASE SCREEN page 16 If you are sending to a Scan to FTP Scan to Desktop or Scan to Network Folder destination go to step 4 2 To change the subject touch the Subject key 3 Enter the subject 1 Touch a pre set text key 2 Touch the OK key If you wish to directly enter the text touch the Direct Entry key to open the text entry screen E...

Page 41: ... Address Entry key to directly enter an e mail address To specify the return address you can touch the key and enter a user number that has been previously stored using User List in the system settings administrator A key can only be selected for the return address if an e mail address has been stored for that user in User List in the system settings administrator Send Settings OK Subject File Nam...

Page 42: ...for the subject and file name in the Web pages up to 80 characters can be entered System Settings Administrator The Number of File Name Subject Body Keys Displayed Setting The setting for the number of subject keys and file name keys displayed in one screen can be changed to 6 12 or 18 System Settings Administrator Default Sender Set This is used to store the sender name and e mail address that is...

Page 43: ...he originals orient them as shown below To place a large portrait oriented original place it as shown above in Landscape orientation and specify the placement orientation in step 4 Place 5 1 2 x 8 1 2 A5 size originals in portrait vertical orientation If placed in landscape horizontal orientation an incorrect size will be detected For a 5 1 2 x 8 1 2 R A5R size original enter the original size man...

Page 44: ...DE ORIGINAL IMAGE TYPE page 76 CHANGING THE RESOLUTION page 78 CHANGING THE FILE FORMAT page 81 CHANGING THE COLOR MODE page 85 4 SPECIAL MODES page 87 4 Specify the orientation in which the original is placed To enable the original to be scanned in the correct orientation the orientation in which the top edge of the original appears at the top of the display specify the orientation in which the o...

Page 45: ...s and touch the OK key The recipient must use the password entered here to open the encrypted PDF file To cancel encrypted PDF touch the Cancel key The format settings screen will appear to let you change the file type Select a new file type and press the START key to begin transmission 6 If the original was placed on the document glass replace it with the next original and press the START key Rep...

Page 46: ...he scanned data will not be stored However if the file format is set to JPEG and the Specified Pages per File checkbox is selected files for which scanning is completed will be stored in USB memory To cancel scanning Press the STOP key to cancel the operation To cancel scanning to USB memory While scanned data is being stored in the USB memory the message Sending data and the Cancel key appear in ...

Page 47: ...le name is not entered the settings in the Web page are used For the procedure for entering text see 7 ENTERING TEXT in the User s Guide To edit the entered file name touch the File Name key once again Data Entry Fax Internet Fax Scan Auto Auto Scan Send Auto Text 200X200dpi PDF Mono2 PDF Special Modes Color Mode File Format Resolution Exposure Original File Name USB Mem Scan File Name Planning me...

Page 48: ...n a single transmission System Settings Administrator Rotation Sending Setting This is used to select whether or not a scanned original image is rotated before transmission The factory default setting is rotate 8 1 2 x 11 to 8 1 2 x 11 R and 5 1 2 x 8 1 2 R to 5 1 2 x 8 1 2 A4 to A4R B5R to B5 and A5R to A5 2 Specify the destination 1 Touch the Address Book key in the base screen 2 Touch the key o...

Page 49: ... the top edge of the original is to the left touch the key 2 Touch the OK key You will return to the screen of step 3 The original orientation is initially set to If the original was placed with the top edge up this step is not necessary 5 Press the START key Scanning begins If the original is placed on the document glass the Read End key appears in the touch panel If the original is only one page...

Page 50: ...oring a mail signature A signature can be automatically appended to the end of the body text of e mail This is convenient when you wish to have a corporate policy or other preset text appear at the bottom of e mail messages To store the text for the mail signature click Application Settings Network Scanner Settings and then Administration Settings in the Web page menu Administrator rights are requ...

Page 51: ...ch the Subject key 3 Enter the subject 1 Touch a pre set text key 2 Touch the OK key If you wish to directly enter the text touch the Direct Entry key to open the text entry screen Enter the text and touch the OK key The text in a pre set text key can be edited by touching the pre set text key and then the Direct Entry key The text entry screen will appear with the selected pre set text entered Wh...

Page 52: ... clear all entered text touch the Clear All key This key clears not only the selected line but also the entire message Each line of the entered text can be selected with the keys To edit the selected line touch the Edit key The text entry screen will appear with the selected text entered Send Settings OK Subject File Name Body Text Sub Schedule coordination meeting Sub Schedule coordination meetin...

Page 53: ...nistrator The Number of File Name Subject Body Keys Displayed Setting The setting for the number of subject keys and file name keys displayed in one screen can be changed to 6 12 or 18 Sub Schedule coordination meeting Material for planning meeting Thank you for your continuous support We have attached sca Send Settings OK Subject File Name Body Text ...

Page 54: ...egrees and transmitted in 8 1 2 x 11 R or 5 1 2 x 8 1 2 A4R B5 or A5 orientation 8 1 2 x 11 R and 5 1 2 x 8 1 2 A4R B5 and A5 originals cannot be rotated for transmission Originals cannot be scanned in succession from both the automatic document feeder and the document glass and sent in a single transmission System Settings Administrator Rotation Sending Setting This is used to select whether or n...

Page 55: ...urn to the screen of step 3 The original orientation is initially set to If the original was placed with the top edge up this step is not necessary 5 Press the START key Scanning begins If the original is placed on the document glass the Read End key appears in the touch panel If the original is only one page go to step 7 To scan more pages go to the next step If the original was inserted in the d...

Page 56: ...ment glass is being used for a transmission Quick Online transmission will not operate In the following situations the transmission will be automatically reserved memory transmission When the line is busy or a communication error occurs and automatic resending is enabled WHEN THE LINE IS BUSY page 62 WHEN A COMMUNICATION ERROR OCCURS page 62 The machine is already using the line to send or receive...

Page 57: ...he document glass and sent in a single transmission System Settings Administrator Rotation Sending Setting This is used to select whether or not a scanned original image is rotated before transmission The factory default setting is rotate 8 1 2 x 11 to 8 1 2 x 11 R and 5 1 2 x 8 1 2 R to 5 1 2 x 8 1 2 A4 to A4R B5R to B5 and A5R to A5 2 Enter the destination fax number 1 Touch the Address Book key...

Page 58: ...istrator a destination confirmation message will appear For more information see FAX DESTINATION CONFIRMATION MODE page 61 To cancel transmission While Dialing Press to cancel appears in the display press the STOP key The following functions cannot be used with direct transmission Program Timer 2in1 Card Shot Job Build Original Count Polling Memory File Quick File 2 Sided Original Scanning Global ...

Page 59: ...cannot be scanned in succession from both the automatic document feeder and the document glass and sent in a single transmission System Settings Administrator Rotation Sending Setting This is used to select whether or not a scanned original image is rotated before transmission The factory default setting is rotate 8 1 2 x 11 to 8 1 2 x 11 R and 5 1 2 x 8 1 2 R to 5 1 2 x 8 1 2 A4 to A4R B5R to B5 ...

Page 60: ...you can touch the Speaker Volume key to adjust the volume of the speaker The speaker volume changes each time the Speaker Volume key is touched Adjust the volume to the desired level 5 Wait until the connection is made and then press the START key Transmission begins To cancel transmission Touch the Speaker key before the START key is pressed The line will be disconnected and transmission will be ...

Page 61: ...nd re enter the destination If an incorrect number is entered for confirmation 3 times in a row the screen will revert to the base screen Functions that cannot be used When the fax destination confirmation function is enabled only one destination is allowed and thus the following functions cannot be used Broadcast transmission to multiple destinations including fax destinations Group keys and prog...

Page 62: ... status screen CANCELING A JOB IN PROGRESS OR A RESERVED JOB page 168 System Settings Administrator Recall in Case of Line Busy This is used to set the number of recall attempts and the interval between attempts when the connection cannot be established because the line is busy The factory default setting is 2 attempts at an interval of 3 minutes To cancel transmission Cancel the transmission from...

Page 63: ...n be selected in one broadcast operation If you frequently use broadcasting to send images to the same group of destinations it is convenient to store those destinations in a group key To store group keys see ADDRESS CONTROL page 174 When a group key is used the number of destinations is the number of destinations stored in the group key When 10 destinations are stored in a group key the number of...

Page 64: ...not be used for broadcast transmission are grayed out to prevent selection If a Scan to FTP Hyperlink address is specified in a broadcast transmission hyperlink e mail transmission will not take place System Settings Administrator Must Input Next Address Key at Broadcast Setting This setting is used to prohibit omission of the Next Address key when entering destinations for broadcast transmissions...

Page 65: ... with the next page and press the START key Repeat until all pages have been scanned and then touch the Read End key A beep will sound to indicate that scanning is finished If Internet fax or fax destinations are included in the broadcast transmission scanning will take place in Mono2 To cancel scanning Press the STOP key to cancel the operation A broadcast transmission can be used in combination ...

Page 66: ...sion mode will be changed to the compression mode set in Compression Mode at Broadcasting in the system settings administrator Color scanning Scanning will take place in Mono2 regardless of the color mode setting Special modes 2in1 This cannot be selected in scan mode however if selected in Internet fax mode or fax mode it will also be applied to scan destinations Scan file size If a broadcast tra...

Page 67: ...with the unsuccessful destinations entered Perform the document filing resend procedure There is no need to rescan the original Fax mode If the job was stored in a confidential folder or was stored as confidential file a password entry screen will appear after you touch the Retry key Enter the password For more information see the Document Filing Guide If the All Destinations tab is touched in 1 a...

Page 68: ...ch this key to change the format file type of the scanned image file CHANGING THE FILE FORMAT page 81 5 Color Mode key Touch this key to select the color mode for scanning The Color Mode key will only appear if the color expansion kit has been installed This key does not appear in Internet fax mode CHANGING THE COLOR MODE page 85 Click a key in the screen to jump to an explanation of the key Auto ...

Page 69: ...ided Tablet key A book and a tablet are bound as shown below 2 Touch the appropriate Image Orientation key If this setting is not correct a suitable image may not be transmitted 3 Touch the OK key To cancel 2 sided scanning touch the highlighted key so that it is no longer highlighted 2 sided scanning automatically turns off after the transmission operation is completed Fax mode When direct transm...

Page 70: ...ion Only standard original sizes can be automatically detected Standard Sizes page 24 When the original size is a non standard size or if the size is not detected correctly manually specify the original scan size Specifying the original scan size by paper size page 71 Specifying the original scan size by numerical values page 72 8 x11 Auto Auto Auto File Quick File Address Review Send Settings Add...

Page 71: ... 2 Touch the OK key If you are sending a long original touch the Long Size key Use the automatic document feeder to scan a long original The maximum width that can be scanned is 31 1 2 800 mm the maximum height is 11 297 mm When Long Size is selected the 2 sided scanning setting and send size cannot be changed Scanning will take place in mono2 To specify an AB size for the scan size touch the AB I...

Page 72: ...ut key 4 Enter the scan size original size 1 Touch the X key and enter the X horizontal dimension with the keys 2 Touch the Y key and enter the Y vertical dimension with the keys 3 Touch the OK key Touch the OK key next to the Cancel key to complete the setting and return to the screen of step 3 System Settings Administrator Original Size Detector Setting This is used to set the size entry screen ...

Page 73: ...e specified When the automatic document feeder is used an original longer than 17 432mm can be scanned maximum width 31 1 2 800mm In this case touch the Long Size key in the screen of step 3 Specifying the original scan size by paper size page 71 Scan Original OK Auto X17 Y11 Scan Size 2 Sided Tablet 2 Sided Booklet Send Size Image Orientation ...

Page 74: ...ngs screen 1 Touch the tab of the mode that you wish to use 2 Touch the Original key IMAGE SETTINGS page 68 2 Touch the Send Size key 3 Specify the send size 1 Touch the desired send size key 2 Touch the OK key Depending on the paper size specified for the Scan Size it may not be possible to select some sizes for the Send Size Size keys that cannot be specified for the Send Size are grayed out to ...

Page 75: ...is setting is not correct when sending an image with a changed ratio a suitable image may not be transmitted 2 Touch the OK key The ratio used for reduction or enlargement of the original will appear between the Scan Size and the Send Size Scan Original OK 11x17 Auto 8 x11 Scan Size 2 Sided Tablet 2 Sided Booklet Send Size 129 Image Orientation 1 2 ...

Page 76: ...aphs such as a magazine or catalogue Text Photo This mode provides the best balance for scanning an original which contains both text and photographs such as a text document with a photo pasted on Text Use this mode for regular text documents Photo Use this mode to scan photos Printed Photo This mode is best for scanning printed photographs such as photos in a magazine or catalogue Map This mode i...

Page 77: ... image type is set to Printed Photo Photo or Map Auto will not appear To reduce the occurrence of line patterns moiré effect when scanning printed matter touch the Moiré Reduction checkbox so that a checkmark appears When using the document glass to scan multiple original pages the exposure setting can be changed each time you change pages When using the automatic document feeder the exposure sett...

Page 78: ...Resolution key IMAGE SETTINGS page 68 2 Scan mode USB memory mode Internet fax mode Select the resolution 1 Touch the key of the desired resolution 2 Touch the OK key In Internet fax mode the Half Tone key can be touched to select halftone except when 200X100dpi is selected When the original has many gradations of light and dark such as a photo or color illustration halftone provides a more attrac...

Page 79: ...e size CHANGING THE FILE FORMAT page 81 Specifying the send size of the image page 74 When using the document glass to scan multiple original pages the resolution setting can be changed each time you change pages When using the automatic document feeder the resolution setting cannot be changed once scanning has begun However when Job Build is used in the special modes the resolution can be changed...

Page 80: ...tem Settings Administrator Initial Resolution Setting This is used to change the default resolution setting Resolution When to select Standard Select this setting when your original consists of normal sized text like the text in this manual Fine Select this setting when your original has small text or diagrams with fine lines The original will be scanned at twice the resolution of the Standard set...

Page 81: ...the number of pages per file can be changed This function cannot be used in fax mode The file format for sending a scanned image is specified when the destination is stored in a one touch key however you can change the format at the time of transmission 1 Select the mode and display the image settings screen 1 Touch the tab of the mode that you wish to use 2 Touch the File Format key IMAGE SETTING...

Page 82: ...ly appears The format setting of B W mode is the file format when the color mode is set to Mono2 If the color expansion kit is not installed this file format will be used The format setting of Color Gray mode is the file format when the color mode is set to Auto Full Color or Grayscale The file type of B W mode and the file type of Color Gray mode are linked The file type cannot be set separately ...

Page 83: ...ted for each page a file cannot be created for multiple pages For this reason the Specified Pages per File checkbox does not appear When Encrypt PDF is selected a password entry screen will appear when the START key is pressed to begin scanning and transmission Touch the Entry key in the displayed screen to open the keyboard screen Enter a password maximum of 32 characters and touch the OK key Sca...

Page 84: ...s selected after 200X400dpi 400X400dpi or 600X600dpi is selected the resolution automatically changes to 200X200dpi Send size Always 8 1 2 x 11 R A4R If TIFF S is selected after the send size is changed the send size is automatically changed to 8 1 2 x 11 R A4R If a size larger than 8 1 2 x 11 A4 is scanned the size will automatically be reduced to 8 1 2 x 11 R A4R When this format is included in ...

Page 85: ...he tab of the mode that you wish to use 2 Touch the Color Mode key IMAGE SETTINGS page 68 2 Read the displayed message and touch the OK key A message does not appear in USB memory mode Go to the next step When a broadcast transmission is performed using mixed send modes the image is sent in Mono2 3 Select the color mode 1 Touch the key of the desired color mode If Auto is selected select whether o...

Page 86: ...software application Image data for transmission will be created and sent as a fax For the procedures for using the PC I Fax and PC Fax functions see the PC Fax driver Help To use the PC Fax function the PC Fax driver must be installed For more information see the Software Setup Guide The PC Fax driver is on the CD ROM that accompanies the printer expansion kit To obtain the PC Fax driver when the...

Page 87: ...h this to use the File function of document filing mode For more information on File see the Document Filing Guide 12 Quick File key 1 Touch this to use the Quick File function of document filing mode For more information on Quick File see the Document Filing Guide 13 Verif Stamp key 4 page 113 1 Does not appear in USB memory mode 2 Does not appear in data entry mode 3 Does not appear when the col...

Page 88: ... Memory Box key page 125 17 Polling key page 122 Does not appear when the stamp unit is not installed 2in1 Internet Fax Special Modes OK Transaction Report 2 2 Internet Fax Special Modes Card Shot OK Dual Page Scan Slow Scan Mode Quick File Mixed Size Original Erase Job Build Original Count File Program Timer 1 2 Verif Stamp 1 2 3 4 5 6 7 8 9 10 11 12 13 14 Click a key in the screen to jump to an ...

Page 89: ...n to the special modes menu screen Touch this key when you wish to continue selecting other special mode settings C During selection of special mode settings this key returns you to the special modes menu screen without saving the settings When settings have been completed this cancels the settings and returns you to the special modes menu screen Scan Special Modes OK Erase Edge 1 2 0 1 inch Cente...

Page 90: ... When a program is used settings are selected with ease by simply pressing the stored key In addition transmission takes place based on the stored settings so there are no chances for mistakes Programs are stored edited and deleted using Address Control in the system settings See ADDRESS CONTROL page 174 Programs can also be stored in the Web pages Click Job Programs and then Image Send in the Web...

Page 91: ...vary depending on the destination stored in the program The mode cannot be changed here Functions stored in the program cannot be canceled here 5 Press the START key Scanning begins If you inserted the original pages in the document feeder tray all pages are scanned A beep will sound to indicate that scanning is finished If you are scanning the original on the document glass scan each page one pag...

Page 92: ...unction Shadows appear in the image No shadows appear Shadows at the edges of the original can also be erased when the automatic document feeder is used When using USB memory mode connect the USB memory device to the machine before performing the procedure below 1 Place the original Place the original face up in the document feeder tray or face down on the document glass 2 Specify the destination ...

Page 93: ...heckbox of the edge that you wish to erase and make sure that a checkmark appears When performing two sided scanning set the erase edge on the reverse side If you touch the Same Side as Side 1 key the edge in the same position as on the front side will be erased If you touch the Different Side from Side 1 the edge in the position opposite to the erased edge on the front side will be erased When yo...

Page 94: ...inished To cancel scanning Press the STOP key to cancel the operation When the erase function is used erase takes place at the edges of the original image If you also use a reduction or an enlargement setting the erase width will change according to the selected ratio For example if the erase width setting is 1 20 mm and the image is reduced to 50 the erase width will be 1 2 10 mm To cancel the er...

Page 95: ...eparate pages Original scan size Transmitted image 11 x 17 A3 x 1 page 8 1 2 x 11 A4 x 2 pages When using dual page scan the original must be placed on the document glass The send size cannot be changed When using USB memory mode connect the USB memory device to the machine before performing the procedure below 1 Place the original face down on the document glass Align the center of the original w...

Page 96: ... return to the base screen after specifying the destination the base screen of the mode of the specified destination appears 4 Select Dual Page Scan 1 Touch the Dual Page Scan key so that it is highlighted 2 Touch the OK key 5 Press the START key to scan the first original To cancel scanning Press the STOP key to cancel the operation 6 If you have more pages to scan change pages and then press the...

Page 97: ... binding of a book or other bound document use the erase function Note however that Center Erase and Edge Center Erase cannot be used When the scan size of the original is specified by numerical values this function cannot be used To cancel the dual page scan setting Touch the Dual Page Scan key in the screen of step 4 so that it is no longer highlighted and touch the OK key Place next original Pr...

Page 98: ...nned at the specified time of transmission Settings selected for a timer transmission exposure resolution special modes etc are automatically cleared after the transmission is finished However when the document filing function is used the scanned original and settings are stored on the built in hard drive For more information on the document filing function see the Document Filing Guide This funct...

Page 99: ...Read End key A beep will sound to indicate that scanning is finished To cancel scanning Press the STOP key to cancel the operation The time can be specified up to a week in advance Up to 94 timer transmissions can be stored at once If another transmission is in progress when the specified time arrives the timer transmission will begin after that transmission is finished Other transmissions can be ...

Page 100: ...ng USB memory mode connect the USB memory device to the machine before performing the procedure below 1 Place the original Place the original face up in the document feeder tray or face down on the document glass 2 Specify the destination 2 ENTERING DESTINATIONS page 25 When scanning to USB memory in USB memory mode there is no need to specify the destination Go to step 3 The lightness level at wh...

Page 101: ... background 2 Touch the OK key 5 Press the START key Scanning begins If you inserted the original pages in the document feeder tray all pages are scanned A beep will sound to indicate that scanning is finished If you are scanning the original on the document glass scan each page one page at a time When scanning finishes place the next original and press the START key Repeat until all pages have be...

Page 102: ...ory mode connect the USB memory device to the machine before performing the procedure below 1 Place the original face down on the document glass 2 Specify the destination 2 ENTERING DESTINATIONS page 25 When scanning to USB memory in USB memory mode there is no need to specify the destination Go to step 3 Transmission Front Back Transmitted image Originals Example of an 8 1 2 x 11 A4 size portrait...

Page 103: ...the default size touch the Size Reset key B To automatically enlarge or reduce the image to fit the send size touch the Fit to Send Size key If you wish to scan the original at the entered original size there is no need to touch this key 2 Touch the OK key The send size will be selected automatically based on the entered original size After selecting Card Shot you can touch the Original key in the...

Page 104: ...key to cancel the operation 7 Touch the Read End key If you will continue by scanning the front of the card you can touch the Configure key to change the exposure resolution scan size and send size The ratio cannot be specified and Rotation Sending Setting cannot be selected Fax mode This function cannot be used in direct transmission mode or when the speaker is used to dial To cancel Card Shot To...

Page 105: ...he machine before performing the procedure below 1 Insert the originals face up in the document feeder tray Insert the originals all the way into the document feeder tray Multiple originals can be placed in the document feeder tray The stack of originals must not be higher than the indicator line on the tray 2 Specify the destination 2 ENTERING DESTINATIONS page 25 When scanning to USB memory in U...

Page 106: ...exposure resolution scan size and send size for each original page scanned However when Job Build is used in combination with 2in1 in the special modes only the exposure can be changed when scanning each even numbered page of the original pages If the memory becomes full during scanning a message will appear and the transmission will be canceled Fax mode This function cannot be used in direct tran...

Page 107: ...sing USB memory mode connect the USB memory device to the machine before performing the procedure below 1 Insert the originals face up in the document feeder tray Insert the originals with the corners aligned together in the far left corner of the document feeder tray 2 Specify the destination 2 ENTERING DESTINATIONS page 25 When scanning to USB memory in USB memory mode there is no need to specif...

Page 108: ...shed To cancel scanning Press the STOP key to cancel the operation If an original scan size is specified after selecting the Mixed Size Original setting the original scan size setting will be enabled and the Mixed Size Original setting will be cleared Mixed Size Original cannot be enabled when an original scan size is set To enable Mixed Size Original the scan size must be set to Auto Mixed Size O...

Page 109: ...erted with too much force they may crumple and misfeed 2 Specify the destination 2 ENTERING DESTINATIONS page 25 When scanning to USB memory in USB memory mode there is no need to specify the destination Go to step 3 3 Select the special modes If the base screen is not displayed touch the Condition Settings key 1 Make sure that the desired mode is selected If the desired mode is not selected touch...

Page 110: ... this function is selected automatic 2 sided scanning is not possible To cancel slow scan mode Touch the Slow Scan Mode key in the screen of step 4 so that it is not highlighted System Settings Administrator Original Feeding Mode This is used to have scanning always take place in slow scan mode Slow Scan Mode Scan Special Modes Card Shot OK Dual Page Scan Quick File Mixed Size Original Erase Job B...

Page 111: ...f originals must not be higher than the indicator line on the tray 2 Specify the destination 2 ENTERING DESTINATIONS page 25 3 Select the special modes If the base screen is not displayed touch the Condition Settings key 1 Make sure that the desired mode is selected If the desired mode is not selected touch the tab of that mode 2 Touch the Special Modes key SPECIAL MODES page 87 When you return to...

Page 112: ...ed automatically and the image will not be reserved for transmission If the displayed number of original sheets is different from the actual number of sheets Touch the Cancel key and then touch the OK key in the message screen to clear all scanned data Scan settings and destination settings will not be cleared Insert the original sheets in the automatic document feeder again and press the START ke...

Page 113: ...ent feeder tray The stack of originals must not be higher than the indicator line on the tray 2 Specify the destination 2 ENTERING DESTINATIONS page 25 When scanning to USB memory in USB memory mode there is no need to specify the destination Go to step 3 3 Select the special modes If the base screen is not displayed touch the Condition Settings key 1 Make sure that the desired mode is selected If...

Page 114: ...s stamped twice If an error occurs during scanning an orignial that was not scanned may be stamped When the O mark that is stamped on originals starts to become faint replace the stamp cartridge For the procedure for replacing the stamp cartridge see REPLACING THE STAMP CARTRIDGE in the Maintenance Guide To cancel the stamp function Touch the Verif Stamp key in the screen of step 4 so that it is n...

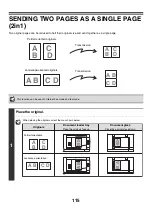
Page 115: ...ode and fax mode 1 Place the original When placing the originals orient them as shown below A B C D A B C D A B C D A B C D Portrait oriented originals Landscape oriented originals Transmission Transmission A B A B A B A B A B C D A B C D Document feeder tray Place the originals face up Portrait orientation Landscape orientation Document glass Place the originals face down Originals ...

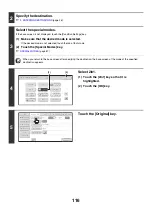
Page 116: ...tion the base screen of the mode of the specified destination appears 4 Select 2in1 1 Touch the 2in1 key so that it is highlighted 2 Touch the OK key 5 Touch the Original key 1 2 2in1 Internet Fax Special Modes Card Shot OK Dual Page Scan Slow Scan Mode Quick File Mixed Size Original Erase Job Build File Program Timer Original Count 2 1 Auto Auto Auto File Quick File I Fax Manual Reception Address...

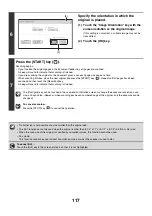
Page 117: ...nning is finished The Configure key can be touched in the scan end confirmation screen to change the exposure resolution scan size and send size However when scanning each even numbered page of the original only the exposure can be changed To cancel scanning Press the STOP key to cancel the operation Transmission is not possible at a size smaller than the original size The 2in1 function cannot be ...

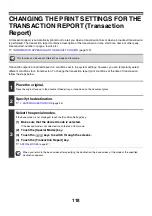
Page 118: ...action report print conditions at the time of transmission follow the steps below This function can be used in Internet Fax mode and fax mode 1 Place the original Place the original face up in the document feeder tray or face down on the document glass 2 Specify the destination 2 ENTERING DESTINATIONS page 25 3 Select the special modes If the base screen is not displayed touch the Condition Settin...

Page 119: ... press the START key Repeat until all pages have been scanned and then touch the Read End key A beep will sound to indicate that scanning is finished To cancel scanning Press the STOP key to cancel the operation For a broadcast transmission changes to the transaction report print conditions apply to all destinations To cancel the transaction report setting Touch the Cancel key in the screen of ste...

Page 120: ...Receiver in the system settings administrator Page numbers appear in the format page number total pages Only the page number is printed when manual transmission or quick online transmission is used System Settings Administrator Date Own Number Print Position Setting This is used to set the position where the sender information is printed The sender information can be printed outside the scanned or...

Page 121: ...s 4 Touch the Own Name Select key SPECIAL MODES page 87 2 Select the sender information 1 Touch the desired sender information key 2 Touch the OK key 3 Touch the OK key System Settings Administrator Registration of Own Name Select This is used to store sender information for Own Name Select Own Name Select Cancel OK 1 2 AAAAA CCCCC EEEEE GGGGG IIIII KKKKK BBBBB DDDDD FFFFF HHHHH JJJJJ LLLLL 1 2 Tr...

Page 122: ...hat machine Because the receiving machine initiates reception of a document this is called Polling Reception 5 SPECIAL FAX FUNCTIONS Make sure that an original is not placed in the machine when using the polling reception function 1 Select polling reception 1 Touch the Special Modes key SPECIAL MODES page 87 2 Touch the keys to switch through the screens 3 Touch the Polling key so that it is highl...

Page 123: ...n the fax destination confirmation function is selected in the system settings administrator multiple destinations cannot be entered 3 Press the START key Your machine will call the other machine and initiate reception of the fax Polling reception can be used in combination with the timer function to poll at any specified time such as at night or when you are not present This function can only be ...

Page 124: ...ouching the Speaker key you can touch the Speaker Volume key to adjust the volume of the speaker The speaker volume changes each time the Speaker Volume key is touched Adjust the volume to the desired level 2 Receive the fax 1 Touch the Special Modes key SPECIAL MODES page 87 2 Touch the keys to switch through the screens 3 When you hear the fax tone touch the Polling key The fax is received 1 2 I...

Page 125: ...hine you can restrict polling to machines whose programmed sender fax number matches a fax number stored in your machine as a polling passcode number This is called Polling Security To use this function first store polling passcode numbers the sender fax numbers programmed in the other machines in the machine s system settings and then enable polling security Up to 10 fax numbers can be stored as ...

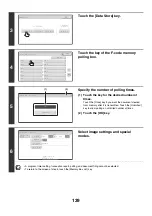
Page 126: ...to switch through the screens 3 Touch the Memory Box key 3 Touch the Data Store key 4 Touch the Public Box key 5 Specify the number of polling times 1 Touch the key for the desired number of times Touch the Once key if you want the document cleared from memory after it is transmitted Touch the Unlimited key to allow polling an unlimited number of times 2 Touch the OK key Polling Memory Confidentia...

Page 127: ... page at a time When scanning finishes place the next original and press the START key Repeat until all pages have been scanned and then touch the Read End key To cancel scanning Press the STOP key while the original is being scanned If another document remains in the memory box Public Box the newly scanned document is added to the previous document In this case the number of polling times will be...

Page 128: ...e 87 2 Touch the keys to switch through the screens 3 Touch the Memory Box key 2 Touch the Print Data key 3 Touch the Public Box key When nothing is stored in the Public Box the Public Box key will be grayed out 4 Press the START key The stored document is printed To cancel printing Touch the Cancel key in the touch panel Polling Memory Confidential Reception Print Data Delete Data Data Store Memo...

Page 129: ... Touch the Delete Data key 3 Touch the Public Box key When nothing is stored in the Public Box the Public Box key will be grayed out 4 Touch the Yes key The document is deleted and you return to the screen of step 3 To cancel the deletion Touch the NO key You will return to the screen of step 3 Polling Memory Confidential Reception Print Data Delete Data Data Store Memory Box Print Data Exit Memor...

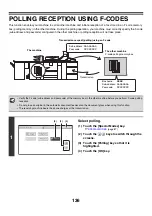
Page 130: ... the F code sent by the transmitting machine does not match the F code in the receiving machine reception will not take place The products of other manufacturers may use different terms for sub address and passcode If you need to contact the operator of another machine regarding sub addresses and passcodes refer to the terms used by the ITU T in the table below The machine ITU T F code polling mem...

Page 131: ...store an F code together with the fax number in a one touch key or group key When the following F code functions are used your machine dials the other machine F code confidential transmission F code polling reception F code relay request transmission When the following F code functions are used the other machine dials your machine F code confidential reception F code polling memory F code relay br...

Page 132: ... F code confidential fax the print passcode must be entered The F code sub address and passcode of the memory box to be used should be verified by the sender and the recipient before the fax is sent System Settings F CODE MEMORY BOX page 179 This is used to create memory boxes for F code confidential communication confidential reception A memory box name sub address passcode and print passcode are...

Page 133: ... has been omitted in the memory box of the other machine 5 and 6 are not necessary 3 Press the START key Scanning begins If you inserted the original pages in the document feeder tray all pages are scanned A beep will sound to indicate that scanning is finished If you are scanning the original on the document glass scan each page one page at a time When scanning finishes place the next original an...

Page 134: ...he Special Modes key SPECIAL MODES page 87 2 Touch the keys to switch through the screens 3 Touch the Memory Box key 3 Touch the Print Data key 4 Touch the key of the memory box containing the confidential fax appears in the keys of memory boxes that have received faxes The keys of memory boxes that have not received faxes are grayed out and cannot be selected Beep Exit Polling Memory Confidential...

Page 135: ...he fax is automatically cleared from the memory box after printing If you forget the print passcode There is no way to check a forgotten passcode on the machine Take care not to forget the passcode In the event that you forget the passcode or need to verify the passcode contact your dealer or nearest SHARP Service Department System Settings Administrator Transaction Report Print Select Setting Fax...

Page 136: ...olling reception Do not place an original in the automatic document feeder or on the document glass when using this function The receiving machine bears the phone charges of the transmission 1 Select polling 1 Touch the Special Modes key SPECIAL MODES page 87 2 Touch the keys to switch through the screens 3 Touch the Polling key so that it is highlighted 4 Touch the OK key Transmission The other m...

Page 137: ... the other machine 5 and 6 are not necessary 3 Press the START key Your machine will call the other machine and initiate reception of the fax Polling multiple machines serial polling is not possible F code polling reception can be used in combination with a timer setting Only one polling reception operation with a timer setting can be stored at a time SENDING A FAX AT A SPECIFIED TIME Timer page 9...

Page 138: ...ling transmission System Settings F CODE MEMORY BOX page 179 This is used to create memory boxes polling memory for F code polling memory transmission A memory box name sub address and passcode are programmed in each box Transmission The machine F code polling memory box The other machine Box name BBBB Sub address AAAAAAAA Passcode XXXXXXXX Sub address AAAAAAAA Passcode XXXXXXXX Transmission reque...

Page 139: ...cial modes A program timer setting transaction report polling and document filing cannot be selected To return to the screen of step 4 touch the Memory Box List key Polling Memory Confidential Reception Print Data Delete Data Data Store Memory Box Print Data Exit Memory Box Data Store Public Box Back 1 2 Box 1 Box 3 Box 5 Box 7 Box 9 Box 11 Box 2 Box 4 Box 6 Box 8 Box 10 Box 12 Unlimited Once OK M...
Page 140: ... original and press the START key Repeat until all pages have been scanned and then touch the Read End key To cancel scanning Press the STOP key while the original is being scanned If other documents have already been stored in the memory box the document is added to the previously stored documents The factory default setting for the number of polling times is Once after the document is transmitte...

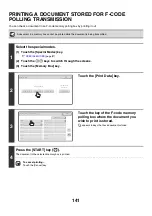
Page 141: ...gh the screens 3 Touch the Memory Box key 2 Touch the Print Data key 3 Touch the key of the F code memory polling box where the document you wish to print is stored appears in keys that have documents stored 4 Press the START key The document in the selected memory box is printed To cancel printing Touch the Cancel key Polling Memory Confidential Reception Print Data Delete Data Data Store Memory ...

Page 142: ...Data key 3 Touch the key of the F code memory polling box that has the document you wish to delete appears in keys that have documents stored 4 Touch the Yes key The document in the selected memory box is deleted and you return to the screen of step 3 To cancel the deletion Touch the No key You will return to the screen of step 3 without deleting the document Polling Memory Confidential Reception ...

Page 143: ...do not need to support F code communication This function can be used in combination with a broadcast transmission or timer transmission This function can also be stored in a program Your machine the machine that requests a relay broadcast transmission only bears the cost of sending the fax to the relay machine The relay machine bears the cost of sending the fax to each of the end receiving machin...

Page 144: ...in the document feeder tray all pages are scanned A beep will sound to indicate that scanning is finished If you are scanning the original on the document glass scan each page one page at a time When scanning finishes place the next original and press the START key Repeat until all pages have been scanned and then touch the Read End key A beep will sound to indicate that scanning is finished When ...

Page 145: ...t memory box when you create the box in your machine F CODE MEMORY BOX page 179 The end receiving machines do not need to support F code communication The machine that requests a relay broadcast transmission only bears the cost of sending the fax to your machine the relay machine Your machine bears the cost of sending the fax to each of the end receiving machines The other machine Transmission The...

Page 146: ... that party You can also press the START key when an original is not placed to receive a fax Connect the extension phone as shown below Connect an extension phone that has a modular jack Use standard phone line cable to connect the phone If other than a standard phone line cable is used the connection may not work correctly If the plug on the telephone line cord does not fit into the jack on your ...

Page 147: ...normal on your extension phone A phone call can also be made by dialing on the machine 1 When you hear ringing answer the call on the extension phone 2 Signal the machine to start fax reception Press on the keypad of the extension phone 3 Replace the extension phone The machine sounds a beep when reception ends System Settings Receive Setting Fax Settings To use remote fax reception set this setti...

Page 148: ... paper or there is no paper that matches the size of the received fax a message will appear in the touch panel Follow the instructions in the message to load an appropriate size of paper System Settings FAX DATA RECEIVE FORWARD I Fax Settings page 181 When printing is not possible because the machine has run out of paper or toner received Internet faxes can be forwarded to and printed by another p...

Page 149: ...ettings FAX DATA RECEIVE FORWARD I Fax Settings page 181 This setting is used to hide the I Fax Manual Reception key that appears in the base screen of Internet Fax mode When the I Fax Manual Reception key is hidden manual reception is initiated by touching the Reception Start key in the screen that appears when Fax Data Receive Forward I Fax Settings is selected Auto Auto Auto File Quick File I F...

Page 150: ...talled the number of copies printed the output tray and stapling can be selected For more information see the Administrator s Guide If printing of a copy job or print job is in progress when a fax is received the fax will not be printed until the previously reserved job is completed If the machine is out of paper or there is no paper that matches the size of the received fax a message will appear ...

Page 151: ...der placed the original System Settings Receive Setting Use this setting to select the fax reception mode FAX DATA RECEIVE FORWARD Fax Settings page 181 System Settings Administrator Anti Junk Fax Setting This setting is used to enter fax numbers from which you wish to block reception When a call is answered by touching the Speaker key you will be able to hear the other party however you will not ...

Page 152: ...r when you touch the blinking key or change modes The received faxes will be retained in memory regardless of whether they were received automatically or manually If a transaction report is set to print when a fax is received the transaction report will also be retained in memory If Fax Data Receive Forward is enabled in the system settings so that received faxes are forwarded to another machine f...

Page 153: ...dential reception 1 Enabling the inbound routing function 1 In the Web page menu click Application Settings Inbound Routing Settings and then Administration Settings 2 Select Enable in Inbound Routing and click the Submit button Users without administrator rights can be prohibited from storing editing and deleting forwarding tables in this screen and from specifying which table is used To do so se...

Page 154: ... the address in Address to be Entered and click the Delete button 3 Store a forwarding table Follow the steps below to store a forwarding table that combines a specified sender and forwarding address 1 Click Inbound Routing Settings in the Web page menu and click the Add button 2 Enter a Table Name 3 Select the sender whose faxes will be forwarded To forward all received faxes select Forward All R...

Page 155: ...hat you wish to use from among the stored tables 1 Click Inbound Routing Settings in the Web page menu 2 Select the Forward Activated checkbox of each forwarding table that you wish to use 3 Click Submit To delete a forwarding table click the checkbox next to the table name so that it is selected and click Delete ...

Page 156: ...metadata file is created in XML format By linking the metadata with applications such as document management software a workflow application or an encryption server a sophisticated document solution environment can be built Using the application integration module information on a generated image file can be entered at the touch panel and transmitted along with the image as an XML file 7 METADATA ...

Page 157: ... unique extension the date etc in the generated file name If the file name setting is left blank the machine will automatically generate a file name that is unique Addresses specified in Address Type Allowing Metadata Entry when a metadata set is stored can be selected as transmission destinations at the time of transmission using one touch keys manual entry and or a global address book search Add...

Page 158: ...t you want to enter If you accidentally selected the wrong metadata set or wish to use a different metadata set when a default metadata set has been set touch the Metadata Set key Touch the Yes key in the message screen that appears You will return to the screen of step 2 Metadata items entered to that point will be canceled Auto Auto Auto File Quick File Send Settings Address Entry Address Book D...

Page 159: ...d To perform transmission without sending metadata switch to a different mode by touching the tab of that mode and then perform transmission Before configuring metadata settings you can specify addresses in all modes to be used After metadata settings have been configured only addresses in modes that are allowed in the selected metadata set can be specified When metadata settings have been configu...

Page 160: ...on in the related items of the send settings Name entered in metadata field Description Where entered fromName Name of the user who sent the job If the name is not entered as metadata the sender name determined by the usual rules for determining the sender name will be applied as metadata Reply To Sender name of selected sender replyTo E mail address to which the transmission result will be sent R...

Page 161: ... OF TRANSMISSION RECEPTION JOBS The job status display is in the lower left corner of the touch panel The job status display can be touched to display the job status screen Print Job Fax Job Internet Fax Scan to Address Set Time Pages Status Broadcast0001 1 2 3 4 10 00 04 04 020 003 Connecting AAA AAA BBB BBB CCC CCC 10 05 04 04 000 001 Waiting 10 22 04 04 000 004 Waiting 10 30 04 04 000 010 Waiti...

Page 162: ...163 7 Completed jobs screen Detail key This shows detailed information on the results of completed broadcast transmissions and jobs that used the document filing function Select the key of the desired job in the completed jobs screen 9 and then touch the Detail key From the details screen it is possible to resend the fax to destinations to which transmission was not successful CHECKING COMPLETED J...

Page 163: ...k was selected 2 This appears when the fax number was directly entered with the numeric keys or was selected from a global address book 4 Time reserved Time started In the job queue screen the date and time the job was reserved In the completed jobs screen the date and time the job was started 5 Number of pages Shows the number of pages transmitted total number of original pages 6 Status Shows the...

Page 164: ...was requested for a transmission the transmission was completed normally and the receive report was received from the destination NG Report A receive report was requested for a transmission however the transmission did not take place correctly and a transmission failed report was received No Report An e mail was received without an attached file and thus printing was not possible Received An e mai...

Page 165: ...queue screen Report Wait appears in the status column When the receive report is received from the destination or if the report is not received within the timeout time the job moves to the completed jobs screen Reception jobs when Inbound Routing Settings are enabled When Inbound Routing Settings are enabled reception jobs are handled as follows depending on the print setting FORWARDING RECEIVED F...

Page 166: ... of pages Fax Waiting This shows information on the destinations that are waiting A broadcast control number 3 digits appears in front of each destination Address The name of the other destination Status The status of communication Failed This shows information on destinations for which communication failed A broadcast control number 3 digits appears in front of each destination Address The name o...

Page 167: ...e it touch the Call key Failed This shows information on destinations for which communication failed A broadcast control number 3 digits appears in front of each destination Address Address name or number Start time Time at which communication began Status Description of failure error The Retry key can be touched to re attempt transmission to that address All Destinations Shows all addresses speci...

Page 168: ...ived fax print jobs Internet fax jobs being received or waiting for a send confirmation jobs being forwarded by inbound routing and F code relay broadcast transmission jobs cannot be canceled FORWARDING RECEIVED FAXES TO AN E MAIL ADDRESS Inbound Routing Settings page 153 JOB STATUS Broadcast0001 1 2 4 10 00 04 04 020 003 Connecting AAA AAA CCC CCC 10 05 04 04 000 001 Waiting 10 30 04 04 000 010 W...

Page 169: ...g the job in progress The job will be executed when the job in progress is completed Fax mode If the job in progress is a broadcast transmission job or a serial polling job the priority job will be transmitted between destinations of the broadcast transmission or serial polling job However if the priority job is a broadcast transmission job or a serial polling job it will be executed after the cur...

Page 170: ...ty Report Print Select Setting I Fax Settings Fax Settings This is used to set the conditions for printing activity reports The factory default setting is not to print The Image Sending Activity Report can be set to print each time the number of transactions reaches 200 or at a specified time once a day only Message Explanation OK The transaction was completed normally OK REPORT A receive report w...

Page 171: ...s broken because the sub address for F code polling memory was not valid F POLL PASS NG The connection was broken because the passcode for F code polling memory was not valid BOX NO NG Your machine broke the connection because the specified sub address for an F code memory box does not exist F PASS NG Your machine broke the connection because the other machine sent an incorrect passcode for F code...

Page 172: ...For the procedure for configuring each setting see the explanation of the setting The following settings are explained ADDRESS CONTROL page 174 FAX DATA RECEIVE FORWARD page 181 9 SYSTEM SETTINGS System Settings Admin Password Exit Total Count Paper Tray Settings Printer Condition Settings Document Filing Control Address Control Fax Data Receive Forward USB Device Check Default Settings List Print...

Page 173: ... peripheral devices installed it may not be possible to use some settings Item Factory default setting Page ADDRESS CONTROL 174 ADDRESS BOOK 174 CUSTOM INDEX 177 PROGRAM 177 F CODE MEMORY BOX 179 Item Factory default setting Page FAX DATA RECEIVE FORWARD 181 I FAX SETTINGS 181 X Reception Start X Manual Reception Key in Initial Screen Enabled X Forward Received Data FAX SETTINGS 182 X Receive Sett...

Page 174: ...G III III BBB BBB DDD DDD FFF FFF HHH HHH JJJ JJJ If Disable Registering Destination from Operation Panel is enabled for any of the modes destinations for those modes cannot be stored To store addresses for Scan to FTP Scan to Network Folder and Scan to Desktop Store Scan to FTP and Scan to Network addresses in the Web pages Store Scan to Desktop addresses using Network Scanner Tool A combined max...

Page 175: ...le to be generated and the compression mode for black white mode and color mode File Type Set the format of the file to be generated JPEG will not appear if the color expansion kit is not installed Compression Mode Black White Select the compression mode for black white transmission Compression Ratio Color Grayscale Select the compression ratio for color grayscale transmission Does not appear when...

Page 176: ...n Mode Set the transmission speed and the International Correspondence Mode Selecting appropriate settings for these items may help eliminate communication errors Transmission Speed 33 6 kbps 14 4 kbps 9 6 kbps or 4 8 kbps can be selected for the transmission speed Higher numbers are higher transmission speeds Set the transmission speed only when you know what speed is most suitable such as when y...

Page 177: ...play This displays a list of the currently stored programs A program can be selected to open an edit delete screen for the program Storing a program Touch the Add New key in the above screen to open a registration screen Up to 48 programs can be stored For more information see Settings page 178 Editing and deleting programs A program can be selected from the list in the above screen to open an edi...

Page 178: ... destinations can be stored in one program If a Scan to Network Folder destination is selected only one destination can be stored Address Book screen This displays a list of the currently stored addresses Address Review This displays a list of the selected addresses Addresses can be deleted from this list if needed Condition Settings Select the mode in which the address is used Internet fax scan e...

Page 179: ...ory box Touch the Add New key in the above screen to open a registration screen A total of 100 F code memory boxes for all functions polling memory confidential and relay broadcast can be stored For more information see Settings page 180 Editing and deleting a memory box A memory box can be selected from the list in the above screen to open an edit delete screen for the box For more information se...

Page 180: ... box Sub Address Passcode Enter a sub address and passcode Separate a sub address and passcode by a slash Touch the Passcode key in the screen to enter A maximum of 20 digits each can be entered for the sub address and passcode for a total of 41 digits including the slash Items displayed when storing a confidential memory box Print PIN Set a Print PIN for confidential reception Enter a 4 digit num...

Page 181: ...ttings must be configured Configure these settings in the screen that appears when Application Settings Internet Fax Settings is selected in the Web page menu A forwarding address is stored in Set Address for Data Forwarding in the system settings administrator If forwarding was not successful because the transmission was canceled or a communication error occurred the faxes that were to be forward...

Page 182: ...alled Paper sizes to be folded are selected in Fax Output Settings in the system settings administrator Forward Received Data When the machine cannot print because it is out of paper or out of toner received faxes can be forwarded to another previously stored fax machine If some pages of a fax that is being forwarded were successfully printed only those pages that were not printed will be forwarde...

Page 183: ...kes a long time 186 Cannot write to USB memory When using USB Memory Scan 187 PROBLEMS RELATED TO SCAN RESULTS The scanned image is clipped 187 The quality of the scanned image is poor 187 The scanned image is blank 187 The scanned image is upside down or on its side 188 The scanned image is black and white 188 JPEG was selected for the file type but the file was created as a TIFF file 188 PROBLEM...

Page 184: ...apter Example System Settings Administrator Copy Settings Other Settings Rotation Copy Setting This is an abbreviated description of the procedure for selecting the setting indicates the setting sequence and indicates the state of the setting after it has been enabled Use these descriptions as a quick manual to help you configure the settings For detailed explanations of the system settings admini...

Page 185: ...r again and rescan Does a message appear notifying you that the original size was not detected Place the original again If the original size is still not detected correctly specify the original size manually A destination cannot be specified Have functions been disabled by the administrator Some functions may have been disabled in the system settings administrator Check with your administrator Whe...

Page 186: ...set to Auto the machine detects whether the original is black and white or color when the START key is pressed however in the cases at left automatic detection may not give the correct result In this event specify the color mode manually The received image file cannot be opened Does the viewer program used by the recipient support the format of the received image data The recipient may be able to ...

Page 187: ... can be selected to reduce the moiré effect only in scan mode and USB memory scan mode It may also be possible to reduce the moiré effect by changing the resolution setting or shifting the original or changing its angle slightly on the document glass When scanning a color or grayscale original is the color mode set to Mono2 Setting the color mode to Mono2 replaces the colors in the original with e...

Page 188: ...to check Solution A one touch individual key or group key cannot be stored Has the maximum number of keys been stored Delete one touch keys and group keys that are not being used Have functions been disabled by the administrator Some functions may have been disabled in the system settings administrator Check with your administrator A one touch individual key or group key cannot be edited or delete...

Page 189: ...does not take place after reception Does a message appear in the display instructing you to add toner or paper Printing is not possible when this screen appears Restore printing capability as instructed by the message Does a password entry screen appear Hold Setting for Received Data Print is enabled Enter the correct password with the numeric keys If you do not know the password check with your a...

Page 190: ... the key of the job that you wish to cancel and then touch the Stop Delete key A message appears to confirm the cancelation Touch the Yes key Did a communication error occur If an error occurs that prevents transmission the transmission is temporarily canceled and then automatically re attempted after a brief interval Factory default setting 3 min intervals System Settings Administrator Image Send...

Page 191: ...r Transmission is not possible using the speaker The transmitted fax prints out blank at the receiving side Is the original placed face up or face down correctly When using the document glass the original must be placed face down When using the automatic document feeder the original must be placed face up Place the original correctly and send the fax again If the receiving machine is using thermal...

Page 192: ...ning Free memory by printing faxes received by confidential reception and other received data that is protected by a password and by deleting data stored in memory boxes Problem Point to check Solution A one touch individual key or group key cannot be edited or deleted Is the key that you wish to edit or delete stored as a relay destination of an F code relay broadcast transmission An individual o...

Page 193: ...ar the voice of the other party but he or she will not hear your voice Use the extension phone When the extension phone is not installed you cannot talk to the other party Problem Point to check Solution The sound is too soft or cannot be heard Speaker Ringer Volume Line Monitor Fax Receive Complete Signal Fax Send Complete Signal Fax Communication Error Signal Is the volume set to Small or No Sou...

Page 194: ...mage Send Guide MX M850 MX M950 MX M1100 MODEL SHARP ELECTRONICS CORPORATION 1 Sharp Plaza Mahwah New Jersey 07430 1164 www sharpusa com SHARP ELECTRONICS OF CANADA LTD 335 Britannia Road East Mississauga Ontario L4Z 1W9 ...

Reviews: