4.2.4 Deleting data records
To delete a record, select the appropriate entry in the list field by clicking on it once with the
mouse and then select ‘Clear’ in the ‘Edit’ menu or press the <Delete> key.
4.2.5 Using categories
In some applications (e.g. ‘Telephone’, ‘User’, ‘To Do’) it is possible to assign individual records to
specific categories and thereby create data groups. Records are generally assigned to the individual
categories when they are entered as a new entry in the editor. In addition to the menu just described,
the editor also contains the button
. Clicking on this button displays a dialogue box in which
you can rename the categories.
Alternatively, as from Version 2.0 of Organizer Link 4, the category allocation can be changed for
one or more data sets marked in the list field via the menu item ‘Allocate new category’ (see
chapter 4.1.3).
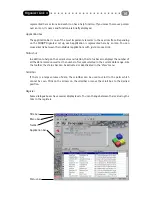
You can filter out specific groups of records in the application window of the main window. To
specify which category or whether all categories are to be displayed, you simply have to select an
appropriate category in the selection field (text field located on the right-hand side between the
view field and the list field.
4.2.6 Searching in the application window
The simplest and quickest way of finding a specific record is to search for it in the alphabetically
sorted list field. However, you should remember that there are often more records (lines) than can
be displayed in the list. For this reason there is a scroll bar on the right-hand side of the list field
with which you can scroll through the list.
However, you can also enter search text in the text field between the view field and the list field.
Organizer Link 4 will then search in the respective data range. It should be noted that every letter
of the search text is interpreted when it is entered which means you do not always have to enter
all the search text.
Furthermore, Organizer Link 4 has a global search function which can search in all data ranges at
the same time. Chapter 4.3.5 contains a description of this search function.
4.2.7 Secret data
Like the SHARP Organizer, Organizer Link 4 enables you to classify individual records as secret and
to display them only with a personal password.
Setting up and deleting a password
You can enter your personal password when you register the SHARP Organizer in Organizer
Link 4 (see Chapter 3.3.2) or subsequently under ‘File’, ‘Settings’ (‘General’ tab). We strongly
recommend that you use the same password for the SHARP Organizer and Organizer Link 4,
otherwise data transfer is not possible.
If you use a password on your SHARP Organizer but have not yet defined a password in
Organizer Link 4, the software asks you to enter a password the first time you transfer data.
Organizer Link 4
20
Summary of Contents for Organizer Link 4
Page 1: ......

