background image

11

E

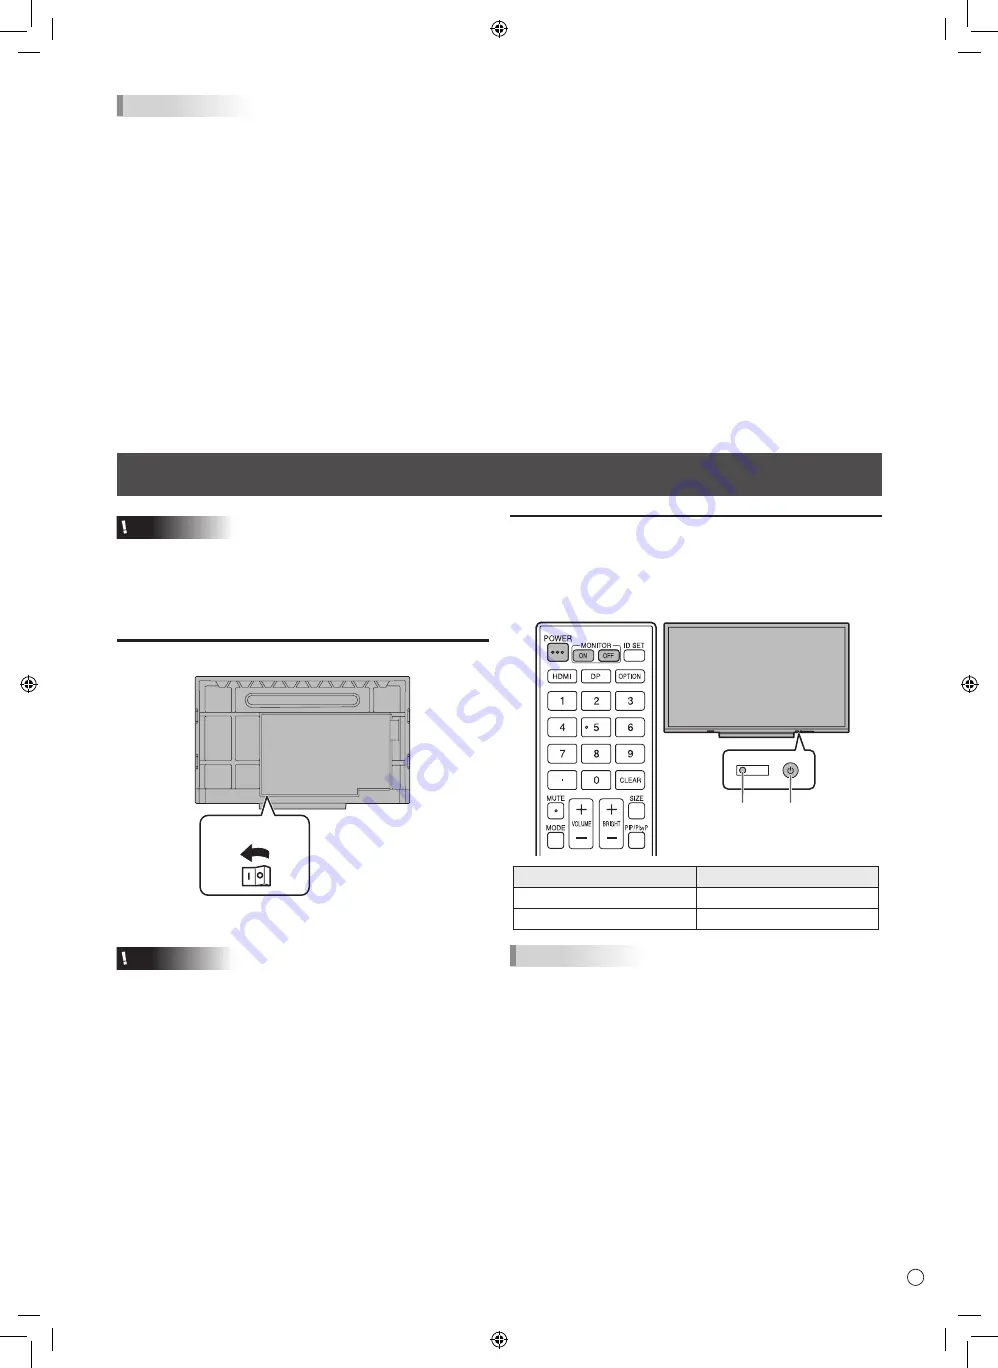
Turning Power On/Off

TIPS

•  To use the touch panel, connect the USB cable (supplied) to your computer.

•  The touch panel operates with the standard driver of each operating system. On the Mac, operation is only possible in mouse 

mode.

•  Install Pen Software from the supplied CD-ROM.


When the Information Display Downloader is installed, you can check and download the most recent versions of the software 

programs and operation manuals. 

To install the software, see the manual for each.

•  Apple, Mac and macOS are trademarks of Apple Inc., registered in the U.S. and other countries.

•  The terms HDMI, HDMI High-Definition Multimedia Interface, and the HDMI Logo are trademarks or registered trademarks of 

HDMI Licensing Administrator, Inc.

•  Adobe, Acrobat, and Acrobat Reader are either registered trademarks or trademarks of Adobe Systems Incorporated in the 

United States and/or other countries.

•  VESA is either registered trademark or trademark of Video Electronics Standards Association in the United States and/or 

other countries.

•  All other brand and product names are trademarks or registered trademarks of their respective holders.

Caution

•  Turn on the monitor first before turning on the computer or 

playback device.

•  When switching the main power switch or the POWER 

button off and back on, always wait for at least 5 seconds. 

A short interval may result in a malfunction.

Turning on the main power

Main power switch

When you turn on the main power, the monitor enters standby 

mode.

Caution

•  The main power must be turned on/off with the main power 

switch. Do not connect/disconnect the power cord or turn 

the breaker on/off while the main power switch is on.

•  For a complete electrical disconnection, pull out the main 

plug.

Turning power on/off

Press the POWER button to turn the power ON/OFF.

You can also turn the power ON/OFF by pressing the 

MONITOR ON button/MONITOR OFF button on the remote 

control unit.

Power LED POWER button

Status

Status of the monitor

Blue lit

Power on

Red lit

Power off (Standby mode)

TIPS

•  When the monitor is turned on for the first time after being 

shipped from the factory, the settings screen appears. In 

some cases it may take time for the settings screen to 

appear, however, continue waiting until the screen appears.

•  When the main power switch is off, the monitor cannot be 

turned on.

Summary of Contents for PN-C751H

Page 1: ...PN C861H PN C751H LCD MONITOR SETUP MANUAL Read the manuals in the provided CD ROM Adobe Acrobat Reader is required to view the manuals ...

Page 2: ......

Page 3: ... device must accept any interference received including interference that may cause undesired operation Responsible Party SHARP ELECTRONICS CORPORATION 100 Paragon Drive Montvale NJ 07645 TEL 1 800 BE SHARP www sharpusa com U S A ONLY IMPORTANT To aid reporting in case of loss or theft please record the product s model and serial numbers in the space provided The numbers are located in the rear of...

Page 4: ...MEMO ...

Page 5: ... INFORMATION WARNING FCC Regulations state that any unauthorized changes or modifications to this equipment not expressly approved by the manufacturer could void the user s authority to operate this equipment NOTE This equipment has been tested and found to comply with the limits for a Class A digital device pursuant to Part 15 of the FCC Rules These limits are designed to provide reasonable prote...

Page 6: ... covers can expose you to high voltage and other dangerous conditions Request a qualified service person to perform servicing 14 Repair If any of the following conditions occurs unplug the power cord from the power outlet and request a qualified service person to perform repairs a When the power cord or plug is damaged b When a liquid was spilled on the product or when objects have fallen into the...

Page 7: ...e power plug with wet hands Doing so could result in electric shock Unplug the power cord if it is not used for a long time Do not attempt to repair the power cord if it is broken or malfunctioning Refer the servicing to the service representative Wireless LAN This monitor cannot be used in other than the country or region where you purchased it The channels and frequencies that can be used for wi...

Page 8: ...event heat from accumulating inside Unit inch mm 7 7 8 200 2 50 2 50 2 50 1 7 16 35 If it is difficult to provide sufficient space for any reason such as the installation of the monitor inside a housing or of several units side by side or if the ambient temperature may be outside of the range of 41 F 5 C to 95 F 35 C install a fan or take other measures to keep the ambient temperature within the r...

Page 9: ...Crystal Display Monitor 1 Remote control unit 1 Cable clamp affixing type 3 Power cord 1 Remote control unit battery 2 CD ROM Utility Disk for Windows 1 Setup Manual this manual 1 Touch pen 2 Tray 1 Tray mounting screws M3x15 5 USB cable 1 Cover SHARP logo 1 Place this sticker onto the SHARP logo to cover the logo Wireless Adapter 1 SHARP Corporation holds authorship rights to the Utility Disk pro...

Page 10: ...als may cause malfunctions and other problems nFront view 1 2 3 4 HDMI 3 input terminal 5 HDMI 2 input terminal 6 LAN terminal 7 TOUCH PANEL terminal 2 for touch panel 8 RS 232C input terminal 9 Audio output terminal 10 Audio input terminal 11 D sub input terminal VGA 12 Digital audio output optical terminal 13 Mini AV input terminal 14 Mini Component input terminal YPBPR 15 AC input terminal nRea...

Page 11: ...mes are trademarks or registered trademarks of their respective holders Caution Turn on the monitor first before turning on the computer or playback device When switching the main power switch or the POWER button off and back on always wait for at least 5 seconds A short interval may result in a malfunction Turning on the main power Main power switch When you turn on the main power the monitor ent...

Page 12: ...monitor is secure and not able to come loose from the wall or mount Do not use any screw holes other than those for mounting brackets located on the rear of the monitor for installation Model PN C861H PN C751H Power requirement AC 100 240 V 5 9 A 50 60 Hz AC 100 240 V 5 2 A 50 60 Hz Operating temperature 1 2 41 F to 95 F 5 C to 35 C Operating humidity 2 20 to 80 no condensation Power consumption 3...

Page 13: ...13 E nAttaching the Tray Secure the tray using 5 tray mounting screws M3x15 supplied ...

Page 14: ...MEMO ...

Page 15: ......

Page 16: ...0SN8100238451 1 081 0023 8451 Printed in China ...

Reviews: