background image

45

E

n

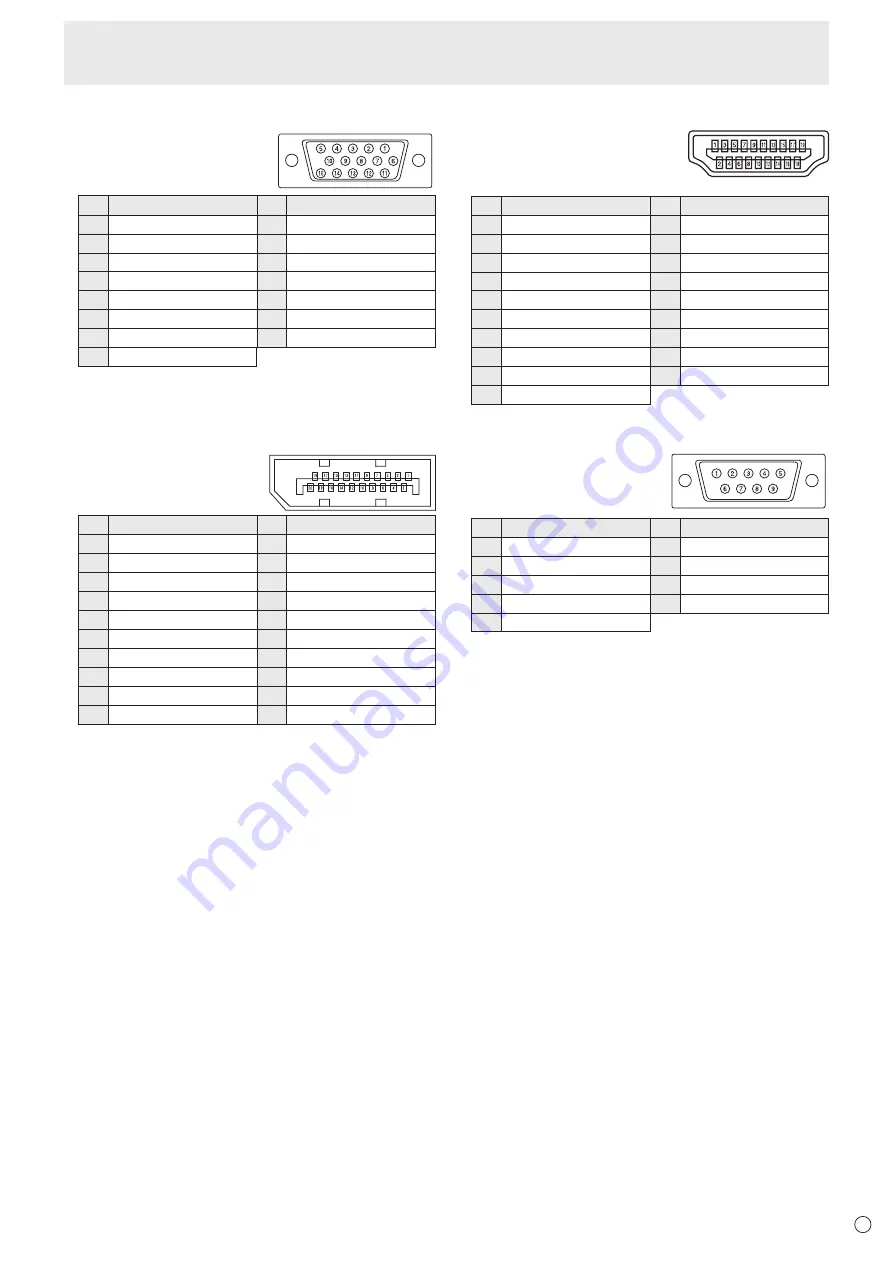
D-sub input terminal pins

(Mini D-sub 15 pin)

No.

Function

No.

Function

1 Red video signal input

9 +5V

2 Green video signal input

10 GND

3 Blue video signal input

11 N.C.

4 N.C.

12 DDC data

5 GND

13 Hsync signal input

6 GND for red video signal

14 Vsync signal input

7 GND for green video signal 15 DDC clock
8 GND for blue video signal

n

DisplayPort input terminal pins

(DisplayPort 20 pin)

No.

Function

No.

Function

1 MainLane 3-

11 Gnd 

2 Gnd 

12 MainLane 0+ 

3 MainLane 3+ 

13 Gnd 

4 MainLane 2- 

14 Gnd 

5 Gnd 

15 Aux + 

6 MainLane 2+ 

16 Gnd 

7 MainLane 1-

17 Aux - 

8 Gnd 

18 Hot-plug detection 

9 MainLane 1+ 

19 Gnd 

10 MainLane 0- 

20 3.3V

n

HDMI input terminal pins

(HDMI Connector)

No.

Function

No.

Function

1 TMDS data 2+

11 TMDS clock shield

2 TMDS data 2 shield

12 TMDS clock-

3 TMDS data 2-

13 CEC

4 TMDS data 1+

14 N.C.

5 TMDS data 1 shield

15 SCL

6 TMDS data 1-

16 SDA

7 TMDS data 0+

17 DDC/CEC GND

8 TMDS data 0 shield

18 +5V

9 TMDS data 0-

19 Hot-plug detection

10 TMDS clock+

n

RS-232C input terminal pins

(D-sub 9 pin)

No.

Function

No.

Function

1 N.C.

6 N.C.

2 Transmitted data

7 N.C.

3 Received data

8 N.C.

4 N.C.

9 N.C.

5 GND

Specifications

Summary of Contents for PN-L501C

Page 1: ...PN L501C LCD MONITOR OPERATION MANUAL ...

Page 2: ...ORTANT To aid reporting in case of loss or theft please record the product s model and serial numbers in the space provided The numbers are located in the rear of the product Model No Serial No U S A ONLY ...

Page 3: ...ctions in the literature accompanying the product WARNING FCC Regulations state that any unauthorized changes or modifications to this equipment not expressly approved by the manufacturer could void the user s authority to operate this equipment NOTE This equipment has been tested and found to comply with the limits for Class A digital device pursuant to Part 15 of the FCC Rules These limits are d...

Page 4: ...nt people from stepping on them or objects from resting on them 10 The screen used in this product is made of glass Therefore it can break when the product is dropped or applied with impact Be careful not to be injured by broken glass pieces in case the screen breaks 11 Overloading Do not overload AC outlets or extension cords Overloading can cause fire or electric shock 12 Entering of objects and...

Page 5: ...ase the user may be required to take adequate measures An apparatus with CLASS I construction shall be connected to a MAIN socket outlet with a protective earthing connection To maintain compliance with EMC regulations use shielded cables to connect to the following terminals HDMI input terminal D sub input terminal DisplayPort input terminal and RS 232C input terminal If a monitor is not position...

Page 6: ...e the screen with a hard or pointed object such as a fingernail or pencil Depending on the application used the touch pen may not function If another USB device is connected to the computer to which the touch panel is connected do not operate the USB device during touch panel input Input may not take place correctly Do not allow a cable to come near the screen This may cause the touch panel to mal...

Page 7: ... block any ventilation openings If the temperature inside the monitor rises this could lead to a malfunction Do not place the monitor on a device which generates heat Adhere to the following when installing the monitor in its portrait orientation Failing to adhere to the following may cause malfunctions Install the monitor such that the power LED is located on the bottom side Set the PORTRAIT LAND...

Page 8: ...ch action modes 21 Touch action 21 Other functions 23 Cautionary points 24 Eraser 24 Menu Items 25 Displaying the menu screen 25 Menu item details 26 Adjustments for computer screen display 30 Controlling the Monitor with a computer RS 232C 31 Computer connection 31 Communication conditions 31 Communication procedure 31 RS 232C command table 33 Controlling the Monitor with a computer LAN 36 Settin...

Page 9: ...he Information Display Downloader is installed you can check and download the most recent versions of the software programs To install and use the software see the manual for each Download the setup program for the SHARP Display Connect and Touch Viewer with the Information Display Downloader Liquid Crystal Display Monitor 1 Remote control unit 1 Cable clamp 3 Power cord 1 Remote control unit batt...

Page 10: ...AN terminal See page 12 15 RS 232C input terminal See page 12 16 D sub input terminal See page 12 17 DisplayPort input terminal See page 12 18 HDMI1 input terminal See page 12 19 HDMI2 input terminal See page 12 20 Expansion slot This section is used to connect optional hardware for function expansion Offering this attachment location is not a guarantee that future compatible hardware attachments ...

Page 11: ...11 E Part Names 2 1 1 Signal transmitter 2 Operation buttons See pages 18 and 19 n Remote control unit ...

Page 12: ...lows Input mode Audio input terminal Factory setting DisplayPort DisplayPort input terminal HDMI1 HDMI1 input terminal HDMI2 HDMI2 input terminal D SUB Audio input terminal OPTION Expansion slot When you have used the expansion slot to expand the functions 1 HDMI1 input terminal 2 HDMI2 input terminal Use a commercially available HDMI cable conforming to the HDMI standard Select the audio input te...

Page 13: ...essed When connecting a USB storage device set USB PORT SELECTION to EXTERNAL or OPTION depending on the connected device to fix the connection Or set to MANUAL change the input mode and then make sure the USB storage device is not being accessed before switching the connection manually 9 USB port for touch panel To use the touch panel connect to your computer with the provided USB cable 10 USB po...

Page 14: ...h the supplied cable clamp Cable Cable clamp Affixing point Attaching the logo sticker Binding Cables You can attach the supplied logo sticker on the monitor Landscape orientation Portrait orientation TIPS If the tray is not attached you can see a center mark on the undersurface of monitor ...

Page 15: ...ox 16 4 feet 5 m at an angle of approx 10 from the center to the top bottom right left of the remote control sensor Remote control sensor 10 10 10 10 16 4 feet 5 m TIPS Do not expose the remote control unit to shock by dropping or stepping on it This could lead to a malfunction Do not expose the remote control unit to liquids and do not place it in an area with high humidity The remote control uni...

Page 16: ...orientation Portrait orientation It is possible to mount a commercially available web camera in the following positions 1 Attach the web camera commercially available to the camera mount with the supplied camera screw inch thread x1 2 Attach the supplied camera mount with the supplied camera mount screws x2 ...

Page 17: ...plete electrical disconnection pull out the main plug Turning Power On Off Turning power on off Press the POWER button to turn the power ON OFF You can also turn the power ON OFF by pressing the MONITOR ON button MONITOR OFF button on the remote control unit TOUCH MENU Power LED POWER button Status Status of the monitor Green lit Power on Orange lit Power off Standby mode Green flashing Input sign...

Page 18: ...volume If you do not press any buttons for approx 3 seconds the VOLUME menu automatically disappears 6 INFORMATION Displays monitor information INPUT MODE SIZE COLOR MODE BRIGHT VOLUME MODEL MAIN VER LAN VER TPC VER S N STATUS SIGNAL INFORMATION D SUB WIDE STD PC 31 15 PN L501C X X X X X XX XX XX XXXXXXXX 0000 000000 00 0000 XXXXxXXXX XXXKHz XXHz RS 232C LAN SELECT DHCP CLIENT IP ADDRESS SUBNET MA...

Page 19: ... you have used the expansion slot to expand the functions 2 Select the terminal for AUDIO SELECT of the AUDIO menu which is used for audio input See page 27 18 MENU Displays and turns off the menu screen See page 25 19 Cursor These buttons are used to perform operations such as selecting items changing adjustment values and moving the cursor Basic Operation 20 RETURN Returns to the previous screen...

Page 20: ... commercial or public viewing in establishments like cafes or hotels may infringe on the rights of the creators as protected by Copyright Law so please be careful The appearance of the original video may change if you select a screen size with a different aspect ratio than the original image e g TV broadcast or video input from external equipment When 4 3 video is viewed with the whole screen usin...

Page 21: ...n The functions of touch actions are also different For details check operating system Help and the application s support documentation Operating system Touch action Windows 8 1 10 Windows 7 Chrome OS Single tap Yes Yes Yes Double tap Yes Yes Yes Swipe Yes Yes Yes Swipe from edge of screen Yes No Yes Drag and drop Yes Yes Yes Flicks Yes Yes Yes Press and hold Yes Yes Yes Slide to pan Yes Yes Yes Z...

Page 22: ...e edge of the monitor with your finger touch pen move horizontally without releasing your finger touch pen and then stop Drag and drop Same action as drag and drop with a mouse Touch the screen with your finger touch pen and move without lifting When you have finished the movement lift your finger touch pen Flicks Flick your finger touch pen in the direction of the function you want to use Flick y...

Page 23: ...irection of rotation TIPS The screen may not respond correctly in the following cases Touch gesture is too quick The distance between the two points is too short The two points intersect Operation with the touch pen is not possible Other functions In Windows 8 1 10 input panel functions can be used In Windows 7 touch pointer and input panel functions can be used For information on these functions ...

Page 24: ...may not operate correctly if there is an inverter fluorescent light nearby If there is dirt or foreign matter on the tip of the touch pen remove it Foreign matter may damage the screen The touch pen position may occasionally deviate in the login screen In this case use the keyboard or mouse If the USB cable becomes disconnected the touch panel may not operate correctly after the USB cable is recon...

Page 25: ...reen appears SCREEN AUTO CLOCK PHASE H POS V POS BACKLIGHT OFF SIZE RESET 50 50 50 50 OFF WIDE OFF OFF 2 Press the or button to select PICTURE and press the ENTER button 3 Press the or button to select CONTRAST PICTURE BRIGHT CONTRAST SHARPNESS COLOR MODE WHITE BALANCE COLOR ADJUSTMENT GAMMA RESET 31 50 50 100 100 100 STD PC THRU MODE1 OFF RED GREEN BLUE 4 Press the or button to adjust the setting...

Page 26: ...l unit See page 19 CONTRAST Adjusts the difference between the bright and dark portions of the image SHARPNESS Adjusts the sharpness of the image COLOR MODE Changes the color mode on the screen The color mode on the screen can also be changed using a remote control unit See page 18 WHITE BALANCE THRU Displays the input signal level as is USER Used for adjusting of each of red component green compo...

Page 27: ...pplication software of Crestron Electronics Inc This monitor supports application software RoomView from Crestron Electronics Inc This is a function to connect a system developed by Crestron Electronics Inc which manages and controls multiple system devices connected to the network For details of Crestron Connected refer to the Crestron Electronics Inc website Provided only In English http www cre...

Page 28: ... however that the startup time from standby mode becomes longer OFF IF NO OPERATION Determines whether or not to set the monitor to go into standby mode when there is no operation from the remote control unit RS 232C commands or LAN for over 4 hours nPIP PIP MODES Sets the display method OFF Displays one screen PIP Displays a sub screen inside a main screen PbyP Displays a main screen and a sub sc...

Page 29: ...toration ON Turn on screen restoration Note that this will increase power consumption in the input signal waiting mode TOUCH PANEL MODE HDMI D SUB DisplayPort OPTION Setting this to ON improves touch panel tracking Some input signals may also cause screen distortion If the screen becomes distorted set to OFF OPTION Set whether or not the expansion slot is used MONITOR LOCK You can disable operatio...

Page 30: ...you change the setting of the computer use the automatic screen adjustment 1 Switch the input to D SUB and display the adjustment pattern See the description below 2 Press the TOUCH MENU or MENU button 3 Press the or button to select SCREEN and press the ENTER button 4 Press the or button to select AUTO 5 Press the or button to select ON and press the ENTER button The automatic adjustment is compl...

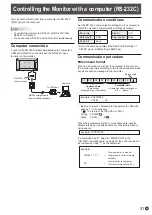
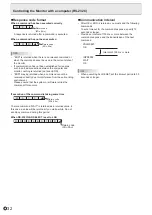
Page 31: ...setting of SETUP menu Initial setting 38400 bps Communication procedure nCommand format When a command is sent from the computer to the monitor the monitor operates according to the received command and sends a response message to the computer C1 C2 C3 C4 P1 P2 P3 P4 Return code Command field 4 prescribed alphanumerical characters Parameter field 4 character string comprised of 0 9 space Example V...

Page 32: ...m the surrounding environment Please ensure that the system or software retries the command if this occurs If execution of the command is taking some time I W T A Return code 0DH 0AH There is command WAIT is returned as a returned value In this case a value will be returned if you wait a while Do not send any command during this period When RS 232C LAN SELECT is set to LAN U N S E L E C T E D Retu...

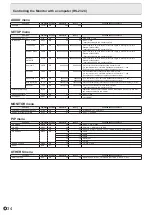
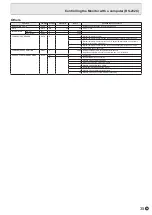
Page 33: ...selection Function Command Direction Parameter Reply Control Response contents POWER CONTROL POWR W 0 Switches to standby mode 1 Enters the power ON state R 0 Standby mode 1 Normal mode 2 Input signal waiting mode INPUT MODE SELECTION INPS W 0 Toggle change for input mode 2 D SUB 10 HDMI1 13 HDMI2 14 DisplayPort 21 OPTION R 2 D SUB 10 HDMI1 13 HDMI2 14 DisplayPort 21 OPTION SCREEN menu Function Co...

Page 34: ...width alphanumeric characters and _ The field can be left blank but spaces cannot be entered Monitor name MNTR WR XXXXXXXX XXXXXXXX XXXXXXXX XXXXXXXX X 16 characters or less half width alphanumeric characters and _ The field can be left blank but spaces cannot be entered Auto logout time LOTM WR 00000 65535 00000 65535 Set the time that display terminate a network connection automatically by minut...

Page 35: ...bnormal turn off the main power 3 Internal temperature abnormal has occurred and backlight brightness is dimmed 4 Temperature sensor abnormal Temperature acquisition ERRT R Value Returns the temperature at the temperature sensors Indicates a temperature sensor abnormality when 126 is returned CAUSE OF LAST STANDBY MODE STCA W 0 Initialization R 0 No detectable error has occurred 1 Standby mode by ...

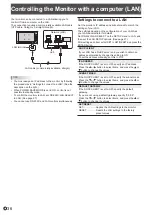
Page 36: ... of your LAN Ask your LAN administrator for details Set RS 232C LAN SELECT on the SETUP menu to LAN and then set the LAN SETUP options See page 27 After setting each item select SET in SET RESET and press the ENTER button DHCP CLIENT If your LAN has a DHCP server and you wish to obtain an address automatically change this setting to ON To set the address manually set this to OFF IP ADDRESS If the ...

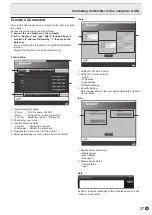
Page 37: ...er ON OFF Mute Turns off the volume temporarily Vol Vol Adjust the volume of the sound 2 Change the input mode 3 Operate below functions Contrast Adjusts the contrast Sharpness Adjusts the sharpness 4 Operates the menu screen for the monitor 5 Switches the pages to tools information and help tab Tools 1 2 3 1 Setting for Crestron Control 2 Setting for monitor network DHCP IP Address Subnet Mask De...

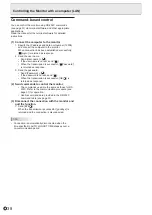
Page 38: ... set send When the transmission is successful Password is returned as response 3 Send the password Send Password If the password is not set send When the transmission is successful OK is returned as response 2 Send commands to control the monitor The commands used are the same as those for RS 232C Refer to the communication procedure see page 31 for operation Usable commands are provided in the RS...

Page 39: ...43 Video color is strange Is the PICTURE menu setting correct You can execute RESET to return to the factory default settings See page 26 Control buttons do not work There is no picture Load noises from outside may be interfering with normal operation Turn off the main power and turn it on after waiting at least 5 seconds and then check the operation See page 17 Turn on the monitor first before tu...

Page 40: ...to normal display turn the power switch off and then back on again The monitor however will enter standby mode again if the cause of the temperature rise is not eliminated See page 7 Check whether the monitor is placed at a location where a quick rise in temperature is likely Internal temperature rises quickly if the vents on the monitor are blocked Internal temperature rises quickly if dust accum...

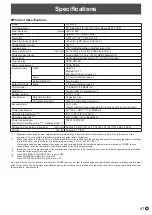
Page 41: ...ion input signal waiting mode 4 5 standby mode 6 105 W 2 W 2 W Dimensions excluding protrusions inch mm Approx 45 5 16 W x 2 11 16 D x 27 H 1151 x 68 5 x 686 Weight lbs kg Approx 61 7 28 1 Brightness will depend on input mode and other picture settings Brightness level will decrease over time Due to the nature of the equipment it is not possible to precisely maintain a constant level of brightness...

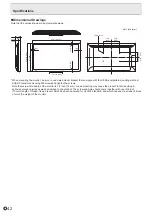
Page 42: ...nt bracket that complies with the VESA compatible mounting method SHARP recommends using M6 screws and tighten the screws Note that screw hole depth of the monitor is 1 2 inch 12 mm Loose mounting may cause the product to fall resulting in serious personal injuries as well as damage to the product The screw and hole should come together with over 3 8 inch 10 mm length of thread Use a bracket which...

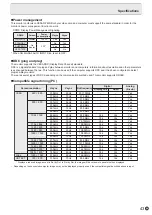
Page 43: ...Vsync Dot frequency Digital 640 480 800 600 1024 768 1152 864 1280 800 1280 960 1280 1024 1360 768 1400 1050 1440 900 1600 1200 1920 1200 1920 1080 720 400 31 5kHz 37 9kHz 37 5kHz 35 1kHz 37 9kHz 48 1kHz 46 9kHz 48 4kHz 56 5kHz 60 0kHz 67 5kHz 49 7kHz 60 0kHz 64 0kHz 80 0kHz 47 7kHz 65 3kHz 55 9kHz 75 0kHz 74 0kHz 67 5kHz 31 5kHz 60Hz 72Hz 75Hz 56Hz 60Hz 72Hz 75Hz 60Hz 70Hz 75Hz 75Hz 60Hz 60Hz 60H...

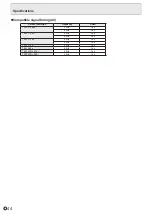
Page 44: ...timing AV Screen resolution Frequency HDMI 1920 1080p 50Hz Yes 60Hz Yes 1920 1080i 50Hz Yes 60Hz Yes 1280 720p 50Hz Yes 60Hz Yes 720 576p 50Hz Yes 720 480p 60Hz Yes 720 1440 576i 50Hz Yes 720 1440 480i 60Hz Yes Specifications ...

Page 45: ... 3 MainLane 3 13 Gnd 4 MainLane 2 14 Gnd 5 Gnd 15 Aux 6 MainLane 2 16 Gnd 7 MainLane 1 17 Aux 8 Gnd 18 Hot plug detection 9 MainLane 1 19 Gnd 10 MainLane 0 20 3 3V nHDMI input terminal pins HDMI Connector No Function No Function 1 TMDS data 2 11 TMDS clock shield 2 TMDS data 2 shield 12 TMDS clock 3 TMDS data 2 13 CEC 4 TMDS data 1 14 N C 5 TMDS data 1 shield 15 SCL 6 TMDS data 1 16 SDA 7 TMDS dat...

Page 46: ...RIBUTORS AS IS AND ANY EXPRESS OR IMPLIED WARRANTIES INCLUDING BUT NOT LIMITED TO THE IMPLIED WARRANTIES OF MERCHANTABILITY AND FITNESS FOR A PARTICULAR PURPOSE ARE DISCLAIMED IN NO EVENT SHALL THE INSTITUTE OR CONTRIBUTORS BE LIABLE FOR ANY DIRECT INDIRECT INCIDENTAL SPECIAL EXEMPLARY OR CONSEQUENTIAL DAMAGES INCLUDING BUT NOT LIMITED TO PROCUREMENT OF SUBSTITUTE GOODS OR SERVICES LOSS OF USE DAT...

Page 47: ...ource code must retain the above copyright notice this list of conditions and the following disclaimer Redistributions in binary form must reproduce the above copyright notice this list of conditions and the following disclaimer in the documentation and or other materials provided with the distribution Neither the name of ARM LIMITED nor the names of its contributors may be used to endorse or prom...

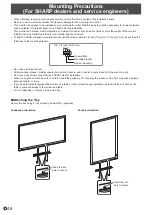
Page 48: ...of the mounting bracket Screws M6 Mounting bracket Monitor mounting 3 8 1 2 inch 10 12 mm Do not use an impact driver After mounting please carefully ensure the monitor is secure and not able to come loose from the wall or mount Do not use any screw holes other than VESA holes for installation When moving the monitor be sure to hold it around the periphery Do not grasp the screen or tray This may ...

Page 49: ...PN L501C M EN17M 1 ...

Reviews: