background image

®

Important Safety Instructions

E-1

Installation Instructions

E-3

Oven Diagram

E-4

Operation of Touch Control Panel

E-4

Control Panel Display

E-4

Touch Control Panel Layout

E-5

Before Operating

E-6

Getting Started

E-6

Stop/Clear

E-6

To Cancel a Programme During Cooking E-6
Heating without Food

E-6

Clock Setting

E-7

Manual Operations

E-8

Microwave Cooking Techniques

E-8

Microwave Time Cooking

E-9

Sequence Cooking

E-10

Instant Cook

E-10

Slow Cook

E-11

Preheating

E-12

*Convection Cooking

E-13

(1)To Cook by Convection

E-13

(2)To Preheat and Cook by Convection E-14

*Grill Cooking

E-16

*Mix Cooking

E-17

(1)To cook by Mix Cooking

E-17

(2)To Preheat and Cook with Mix (Convection) E-18

Automatic Operations

E-20

Notes for Automatic Operations

E-20

Pizza

E-21

Crispy Snack

E-23

Auto Grill

E-25

Auto Roast

E-27

Auto Bake

E-29

Sensor Rice Menu

E-32

Sensor Reheat Dish

E-34

Sensor Steam Menu

E-35

Easy Defrost

E-38

Other Convenient Features

E-40

Help Feature (INFO)

E-40

(1) Auto Start

E-40

(2) Child Lock

E-41

(3) Demonstration mode

E-42

(4) Language

E-42

(5) Help

E-42

Alarm

E-42

Less/More Setting

E-43

Adjust Time During Cooking

E-43

Care and Cleaning

E-44

Service Call Check

E-45

Specifications

E-45

(*Cookbook section attached.)

CONTENTS

Pages

DOUBLE GRILL

CONVECTION

MICROWAVE OVEN

OPERATION MANUAL

AND

COOKING GUIDES

MODEL

R-880D

Thank you for buying a Sharp Microwave Oven.
Please keep this operation manual handy, as it describes all the
features of your oven and will enable you to cook many varieties
of foods.

Please take some time to read your operation manual carefully,
paying particular attention to the warnings, the automatic cook-
ing menus programmed into your new oven have been carefully
developed to give optimum results when the step by step
instructions are followed.
When selecting another home appliance, please again consid-
er our full range of Sharp products.

Downloaded from: 

http://www.usersmanualguide.com/

Summary of Contents for R-880D

Page 1: ...at Dish E 34 Sensor Steam Menu E 35 Easy Defrost E 38 Other Convenient Features E 40 Help Feature INFO E 40 1 Auto Start E 40 2 Child Lock E 41 3 Demonstration mode E 42 4 Language E 42 5 Help E 42 Alarm E 42 Less More Setting E 43 Adjust Time During Cooking E 43 Care and Cleaning E 44 Service Call Check E 45 Specifications E 45 Cookbook section attached CONTENTS Pages DOUBLE GRILL CONVECTION MICR...

Page 2: ...eck the settings after you start the oven to ensure the oven is operating as desired 20 Do not put things on top or cover the outer cabinet 21 To avoid overheating and fire special care must be taken when cooking or reheating foods with a high sugar or fat content for example Sausage rolls Pies or christmas pudding Warning 1 Do not operate the oven if it is damaged or malfunctioning Check the foll...

Page 3: ...facturer nor the dealer can accept any liability for damage to the oven or personal injury resulting from failure to observe the correct electrical connection procedure 3 Water vapour or drops may occasionally form on the oven walls or around the door seals and sealing surfaces This is a normal occurrence and is not an indication of leaking of microwaves or a malfunction 4 The clock of the oven wo...

Page 4: ...5 The oven should not be installed in any area where heat and steam are generated for example next to a conventional oven unit The oven should be installed so as not to block ventilation openings Allow at least 40 cm on top of the oven for free air space 6 The A C voltage and frequency must be single phase 230 240V 50Hz 7 WARNING THIS APPLIANCE MUST BE EARTHED If the socket outlet in your house is...

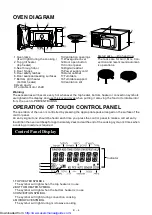
Page 5: ... pads arranged on the surface of the control panel An entry signal tone should be heard each time you press the control panel to make a correct entry In addition theoven will beep for approximately 2secondsat theend of thecooking cycle or 4timeswhen a cooking procedure is required Control Panel Display Warning The accessories will become very hot whenever the top heater bottom heater or convection...

Page 6: ...en during cooking Press twice to cancel cooking program me CLOCK PAD Press to set clock time PIZZA PAD Press to select 3 pizza menus AUTO BAKE PAD Press to select 3 popular baking menus SENSOR STEAM MENU PAD Press to steam fish meat or dumpling SENSOR REHEAT DISH PAD Press to reheat dish INFO PAD Press to select auto start child lock language or demonstration modes Press to get cooking in formatio...

Page 7: ... the beginning of GRILL MIX PREHEAT CONVECTION or automatic operations except SENSOR COOK and EASY DEFROST but the oven is not out of order To remove the cause of the smoke and odor operate the oven without food for 20 min on Grill using top and bottom heaters before the first use and after cleaning Heating without Food Step Procedure Pad Order Display Ensure that no food is in the oven Press the ...

Page 8: ...OP CLEAR pad and re enter the time of day Ex 1 45 The clock of the oven works based on the frequency of power source So it may gain or lose in some area where the frequency varies It is recommended that you should adjust the time occasionally If you wish to know thetimeof day during thecooking mode presstheCLOCKpad Aslong asyour finger is pressed the CLOCK pad the time of day will be displayed 1 4...

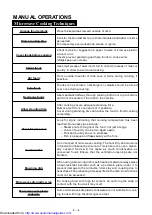
Page 9: ...ing ensure adequate standing time Remove food from oven and stir if possible Cover during standing time can allow the food to finish cooking completely Look for signs indicating that cooking temperature has been reached Doneness signs include Steam emits throughout the food not just at edge Joints of poultry can be torn apart easily Pork and poultry show no pinkness Fish is opaque and flakes easil...

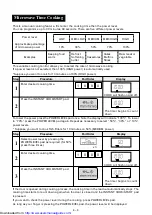
Page 10: ...er to 70 press the POWER LEVEL pad again Repeat as necessary to select 50 30 or 10 power levels Suppose you want to cook Fish Fillets for 10 minutes on 50 MEDIUM power Press the INSTANT COOK START pad If the door is opened during cooking process the cooking time in the readout automatically stops The cooking time starts to count down again when the door is closed and the INSTANT COOK START pad is ...

Page 11: ...time For second sequence select microwave cooking and power level for 100 press the POWER LEVEL pad once the second sequence will appear and the timer will begin counting down to zero again The timer begins to count down to zero When it reaches zero 4 Instant Cook Step Procedure Pad Order Display Press the INSTANT COOK START pad Within one minute of closing the door 0 0 0 1 5 0 0 Press the INSTANT...

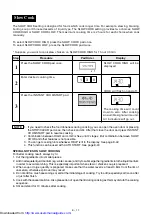
Page 12: ...ress INSTANT COOK START pad to resume cooking 2 Combination between HIGH and LOW is free until 2 stages But combination between SLOW COOK and other features is not possible 3 You can get cooking hints whenever HELP is lit in the display See page E 42 4 This function can be used with AUTO START See page E 40 SPECIAL NOTES ON SLOW COOKING For better cooking result always try to 1 Cut the ingredients...

Page 13: ...re press the CONVECpad until the de sired temperature appears in the display COOK Enter desired cooking time 6 PRESS CONVEC OR MIX will be displayed 5 Press the INSTANT COOK START pad COOK The timer begins to count down 7 After preheating supposeyou want to cookwith Mix Convection PresstheMIX pad onceor twiceinstead of the CONVEC pad in Step 5 then continue with Step 6 If you are in the process of...

Page 14: ...ired for 180 C press five times 0 0 0 2 Enter desired cooking time 1 2 You can programme up to 99 minutes 99 seconds Suppose you want to cook for 20 minutes at 180 C COOK COOK will flash on and off Press the INSTANT COOK START pad COOK Helpful Hints 1 Foods may be cooked either directly on turntable or using the high or low racks 2 Do not cover high rack or low rack with aluminum foil It interfere...

Page 15: ...y hold at the preheat temperature for 30 minutes COOK Enter desired cooking time 0 0 0 2 COOK 1 3 COOK COOK will flash on and off will be displayed When preheat is over the oven will beep 4timesand ADDFOOD will be displayed Open the door Place food in the oven Close the door Press the INSTANT COOK START pad PRESS START will be displayed and COOK will flash on and off COOK The timer begins to count...

Page 16: ... on Convec MixLow180 C 7 Cool before icing Icing 1 Beat cream cheese until smooth 2 Add icing sugar and lemon juice beat until smooth BlueberryMuffins make 12 muffins Ingredients 80g blueberries A 180g all purpose flour sifted 60g bran 3 tbsp sugar 1 2 tsp salt 1 tsp baking powder B 120ml milk 2 eggs beaten 90g butter melted Method 1 Preheat oven to 200 C 2 Mix ingredient A together 3 Make a well ...

Page 17: ...ss the INSTANT COOK START pad When the timer reaches about 2 3 of the way through the cooking time open the door and turn over the steak And then close the door COOK will flash on and off 3 2 The timer begins to count down 0 0 0 2 4 Press the INSTANT COOK START pad COOK COOK COOK The timer begins to count down again When it reaches zero all indicators will go off and the oven will beep The cooling...

Page 18: ...tting removing the food or turntable into from the oven to PREVENT BURNS Mix Cooking 1 To cook by Mix Cooking Convec Mix High Microwave Convection C Once 30 250 C Convec Mix Low Microwave Convection C Twice 10 250 C Grill Mix High Microwave Grill Top Heater Three times 50 Grill Mix Low Microwave Grill Top Heater Four times 10 Setting Mode Convection temperature Microwave power The times pressing M...

Page 19: ...the oven to 250 C and cook for 20 minutes on Convec Mix High Press the INSTANT COOK START pad When ADD FOOD is displayed the oven is preheated If the oven door is not opened the oven will automatically hold at the preheat temperature for 30 minutes COOK 0 0 0 2 COOK M IX COOKING 1 COOK will flash on and off COOK will flash on and off PREHEAT COOK Select desired M ix setting by pressing the Mix pad...

Page 20: ...and cook for 10 30 12 00 Turn over and rearrange skewers every 3 minutes NOTE To remove food easily from wooden skewers soak the skewers in water for 30 minutes prior to using them Ingredients 4 wooden skewers 450g chicken fillets cubed Seasonings 1 tbsp groundnut oil 1 tbsp lemon juice 2 tbsp satay sauce 1 clove garlic crushed Tabasco sauce to taste Method 1 Combine A mix well 2 Pour mixture into...

Page 21: ...ard setting press the MORE or LESS pad prior to pressing each automatic operation pad See page E 43 6 The final cooking result will vary according to the food condition e g initial temperature shape quality Check the food after cooking and if necessary continue cooking manually 7 You can get cooking hints whenever HELP is lit in the display See page E 42 SPECIAL NOTE FOR SENSOR COOKING 1 Wipe off ...

Page 22: ...zen Pizza 18 C Frozen temperature 0 1 0 5 kg 1 pizza Remove from package Place directly onto turntable After cooking stand KG AUTO HELP 20 25 C Room temperature 20 25 C Room temperature Fresh Pizza thin crust Fresh Pizza thick crust 0 6 1 3 kg 1 pizza 0 8 1 6 kg 1 pizza AUTO COOK HELP The cooking time will begin counting dow n to zero when it reaches zero an audible signal will sound and STAND wil...

Page 23: ...e the edge with the thumb to form a rim then put the sheet of dough onto the turntable brushed with oil 3 Drain the canned tomatoes and cut into pieces mix well with tomato paste and the spices varieties Spread the mixture onto the sheet of dough Then add grated cheese followed by the topping varieties Sprinkle with grated cheese again before baking 4 The Pizza function enables you to make differe...

Page 24: ...and especially the bottom heater will become very hot use thick oven gloves when putting removing the food or turntable into from the oven to PREVENT BURNS 2 The cooking time will begin counting down to zero when it reaches zero an audible signal will sound and STAND will be displayed AUTO COOK HELP COOK will flash on and off AUTO COOK HELP The cooking time will begin counting down When the audibl...

Page 25: ...ture 20 25 C Room temperature 20 25 C Room temperature 280 330 g 18 C Frozen temperature Convenient Food Crispy Frozen Food eg Oven Chips Fish Fingers Potato Balls Fish Fillets in Batter Fried Shrimp Creamy Corn Croquette NOTE If the frozen food is small in size it is recommended to turn it over or stir manu ally during the final stage before finish Spread the garlic spread evenly on the French br...

Page 26: ... the door Press the INSTANT COOK START pad PRESS START will be displayed repeatedly The cooking time will begin counting down When the audible signals sound the oven will stop and TURN OVER will flash on and off KG stops flashing and re mains on display COOK will flash on and off AUTO GRILL will automatically compute the cooking mode and cooking time for the 3 listed menus Follow the details provi...

Page 27: ...where necessary 0 1 0 6kg Chicken breast Remove chicken fat and tendons Cut the chicken into 2 cm Cubes add salt pepper and red paprika Put the meat cubes on wooden barbecue skewers You may add onions between the chicken cubes Place the barbecue skewers on the plate Do not cover the food Wash fish thoroughly and remove scales Make a few slits on the skin of fish pierce the eyes of fish Pat dry the...

Page 28: ...e the door Press the INSTANT COOK START pad The cooking time will begin counting down When the audible signals sound the oven will stop and TURN OVER will be displayed KG stops flashing and re mains on display COOK will flash on and off AUTO ROAST will automatically compute the cooking mode and cooking time for the 3 listed menus Follow the details provided in Auto Roast Menu Guide on next page KG...

Page 29: ...rack uncovered When oven stops cover thinner part or end of legs with foil Discard excess oil on the turntable where necessary Turn it over and continue to cook Note Make sure the foil does not touch each other and the oven wall After cooking stand for 10 15 mins You can adjust doneness by pressing the pad MORE LESS Cannot be used and ERROR will be displayed You can adjust doneness by pressing the...

Page 30: ... cooking time for the 3 listed menus There is one recommended serving for each menu refer to the Auto Bake Menu Guide on next page COOK will flash on and off 3 4 AUTO COOK HELP Press the INSTANT COOK START pad When the audible signals sound the oven will stop and ADD FOOD will be displayed AUTO COOK HELP Open the door Place the pie plate on the turntable Close the door PRESS START will be displaye...

Page 31: ...31 Place turntable with pie in the oven after preheating After cooking stand Remove turntable before preheating Preheat is automatic for this menu Prepare the cookies as in the recipe on page E 31 Place turntable with cookies in the oven after preheating After cooking stand Menu Initial Temperature 20 25 C Room temperature Apple Pie 1 layer Make 13 cookies Make one 22 cm round pie 20 25 C Room tem...

Page 32: ...y and let cool Chocolate Chip Cookies Ingredients 60g butter soften 100g caster sugar 1 4 tsp vanilla essence 1 egg medium 180g self raising flour sifted 40g chocolate chips 30g walnut pieces Ingredients Filling 5 900g apples medium 60g sugar 1 1 2 tbsp plain flour 2 tsp lemon juice few cinnamon few nutmeg Pastry 360g plain flour 60g sugar 185g butter 5 tbsp cold water 1 egg white lightly beaten I...

Page 33: ...nction plain congee or porridge without any ingredients is instructed If you want to include ingredients follow the Sensor Rice Menu menu guide in page E 33 for ingredi ents quantity and procedure 2 If you select CONGEE you can have comparatively thick and soupish one If you select PORRIDGE you can have more watery and thin one 3 This function can be used with Auto Start See page E 40 COVER and CO...

Page 34: ...g 750ml 2 serves 3 5 persons 80g 1400ml Menu Variation eg Congee with Pallock Fish and Peanuts Ingredients 100g Pallock fish fried chopped 3 5 persons 50g Peanuts 1 slice Salted Turnip chopped 3 Spring onions chopped NOTE The ingredients can be added just after finish with Salted Turnip and Spring onions as garnish and sprinkles on top Congee with salted pork and preserved duck eggs Ingredients ap...

Page 35: ... SENSOR COOK HELP SENSOR COOK HELP 1 Dish 0 2 0 45kg Sensor Reheat Dish Menu Guide Take out the dish from the refrigera tor Cover with microwave wrap Leave around 2 5cm gap on two edges to allow steam escape After reheating stir and stand cov ered for 1 minute Procedure Quantity Dish Lunch Dinner plate Meat Dish Fried Noodles Plate of Rice Menu Initial Temperature 4 12 C Refrigerated temperature C...

Page 36: ...de on next page Press the INSTANT COOK START pad When the sensor detects the vapour from the food the remaining time will appear eg remaining cooking time is approx imately 2 min 40 sec COVER and COOK will flash on and off Press the SENSOR STEAM MENU pad until the desired m enu num ber is displayed for fish press once SENSOR COOK HELP SENSOR COOK HELP x 1 1 2 The cooking time will begin counting d...

Page 37: ...e on the low rack After cooking stand covered for 1 minute Cut both ends of package Sprinkle with water Placethepackageon thelow rack After cooking stand covered for 3 minutes Quantity Initial Temperature 8 12 C 1 3 serves 180 520g Meat eg Pork patty Beef patty Spare rib cubes Chicken pieces etc Dumpling 1 Ready made cooked 8 12 C 1 2 serves 100 370g 2 Frozen cooked 1 2 serves 100 370g below 10 C ...

Page 38: ...arch 1 1 2 tsp Sesame oil Method 1 Marinate the ground beef and preserved vegetables with seasonings and mix well Press into patty shape 2 Cut the salted Egg Yolk into dices and place on the patty for decoration 3 Cover with microwave wrap and press STEAM MENU pad twice to Meat Method 1 Marinate the chicken pieces and soaked mushrooms with seasonings Then mix together with ginger and green onion s...

Page 39: ... mains on display COOK will flash on and off Press the INSTANT COOK START pad Press the EASY DEFROST pad Press number pads to enter weight AUTO COOK DEFROST HELP KG will flash on and off When the cooking time reaches zero audible signal will sound and STAND COVERED WITH FOIL will be displayed repeatedly Step Procedure Pad Order Display 2 3 5 The Easy Defrost feature allows you to defrost meats by ...

Page 40: ...edges When oven has stopped remove defrost ed portions turn over and shield edges with foil strips Press start to continue defrosting After defrost time stand covered with alu minium foil for 5 30 minutes Shield theedgewith foil stripsabout 2 5cm wide Place joint with lean side face upwards if possible on the defrost rack When oven has stopped turn over and shield the warm portions Press start to ...

Page 41: ...start automatically Auto Start can be used for manual cooking Slow Cook or Sensor Rice Menu Suppose you want to start cooking a casserole for 20 minutes on 50 MEDIUM power at 4 30 in the afternoon Check that the correct time of day is displayed 1 Auto Start 1 Auto start 2 Child Lock 3 Demonstration Mode 4 Language 5 Help Enter the desired start time 3 2 4 0 3 Press the INFO pad Press the number 1 ...

Page 42: ...Auto Start on page E 40 Display Step Procedure Pad Order Press the number 2 pad 2 Child Lock 2 PresstheINSTANTCOOK STARTpad The control panel is now locked each time a pad is pressed the display will show LOCK To unlock the control panel After step 2 above Display Step Procedure Pad Order Press the STOP CLEAR pad The time of day will appear in the display The oven is ready to use The time of day w...

Page 43: ...Order Press the STOP CLEAR pad 4 Language The oven comes set for English You can change the language to Malay and Russian by pressing the number 4 pad To change press the INFO pad and the number 4 pad Continue to press the number 4 pad until your choice is selected Then press INSTANT COOK START pad 5 Help Each setting of Automatic Operations and Slow Cook has a cooking hint If you wish to check pr...

Page 44: ...se time by two minutes 2 4 Select power level by pressing the POWER LEVEL pad as required for 50 press three times Enter desired cooking time 5 0 0 COOK COOK COOK Step Procedure Display Pad Order x 2 KG will flash on and off Step Procedure Display Pad Order Press the MORE pad Press number pads to enter weight 4 3 Press the EASY DEFROST pad 1 KG AUTO DEFROST HELP AUTO COOK DEFROST HELP Press the IN...

Page 45: ...ing liquid on a soft damp cloth for hygienic reasons For heavier stains inside the oven cavity only use a mild stainless steel cleaner applied with a soft damp cloth Do not apply to the inside of the door Wipe clean ensuring all cleaner is removed After use wipe the waveguide cover in the oven with a soft damp cloth to remove any food splashes Built up splashes may overheat and begin to smoke or c...

Page 46: ...oven and programme the oven for 3 minutes on GRILL mode using top and bottom heaters A Do the top and bottom heater symbols and COOK indicator light Yes No B After 3 minutes do the both heaters become red Pay special attention to prevent burns when checking the bottom heater Yes No If NO is the answer to any of the above questions please check your wall socket and the fuse in your meter box If bot...

Page 47: ... tv dvd and othes Manual users user manuals user guide manual owners manual instruction manual manual owner manual owner s manual guide manual operation operating manual user s manual operating instructions manual operators manual operator manual product documentation manual user maintenance brochure user reference pdf manual Downloaded from http www usersmanualguide com ...

Reviews: