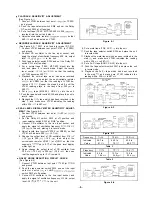
Figure 3-l
Figure 3-2
REMOVAL OF FRONT PANEL CHASSIS
(See Figures 3-2 and 3-3)
Pull out two record level control knobs
Remove one nut from the record level control,
Remove two screws.
Remove eight screws.
Remove one screw. Then the front panel chassis can be
separated from the set.
n
REMOVAL OF METER P.W. BOARD
(See Figure 3-3)
Push outward six tabs on the meter
board holder,
and remove the meter P.W. board.
Figure 3-3
(Use of
The unit is designed to operate from
or
AC mains.
Check the voltage selector setting on the rear panel before
connecting with the AC supply cord.
Adjust the voltage selector to match your local AC power
The voltage selector is located on the rear panel of the unit.
If adjustment is necessary, use a screwdriver in order to turn
the selector in either direction until the correct voltage in the
window next to the adjusting screw.
Figure 3-4
CAUTION
If any one of the nylon bands shown in the Figure 3-5 is
once removed for some reason, be sure to reprise it to the
original place in the same appearance as before.
Figure 3-5


