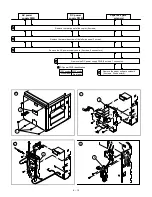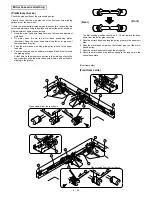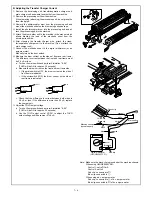
Mirror base wire tension adjustment
1
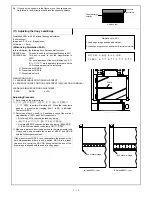
Manually turn the mirror base drive pulley to shift mirror base B
which is at the mirror base positioning plate 20 to 30mm to the
paper exit side.
2
Turn the mirror base wire tension adjustment screw clockwise to
apply tension to the wire until the wire tension spring edge makes
contact with the projection of mirror base B.
3
Manually turn the mirror base pulley to make mirror base B per-
form full scan a few times, and check that the mirror base wire
spring edge is in contact with the projection of mirror base B. If
they are not in contact with each other, adjust by turning the
tension adjustment screw again. In this case, check also that
there is no slack in the wire on the mirror base pulley.
4
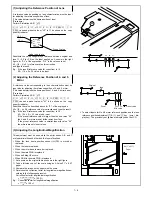
Turn the mirror base wire tension adjustment screw 6 turns
counterclockwise. (Then the distance between the mirror base
wire spring and the projection of mirror base B will be about
4mm.)
(Perform the same procedures for the front frame side and the rear
frame side.)
Copy lamp unit installing position
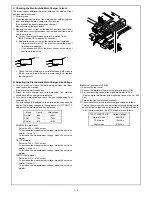
1
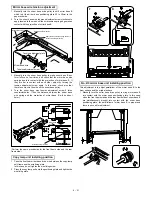
Pass the front/rear mirror base drive wire between the copy lamp
unit frame and the wire fixing plate.
In this case, do not tighten the wire fixing screw.
2
Press the copy lamp unit onto the positioning plate and tighten the
wire fixing plate.
No. 2/3 mirror base unit installing position
This adjustment is to adjust parallelism of the mirror base B to the
drum surface and the original surface.
1
Manually turn the mirror base drive pulley to bring mirror base B
into contact with the mirror base positioning plate. In this case,
when the front frame side and the rear frame side of mirror base B
are simultaneously brought into contact with the mirror base
positioning plate, the parallelism of mirror base B is proper and
there is no need for adjustment.
4.0mm
Mirror base B projection
Mirror base
wire
F
R
A
Tension adjustment plate
Tension adjustment screw
Mirror base wire
Wire tension spring
Mirror base B projection
Apply tension until the spring comes in
contact with the projection.
6 – 21
Summary of Contents for SF-2040
Page 27: ...9 Desk unit SF D23 11 12 16 17 13 18 10 9 8 7 6 2 5 4 3 1 23 21 22 19 20 14 15 4 10 ...
Page 63: ...5 5 C F 10 D 7 6 11 G E 8 9 H 12 6 2 ...
Page 65: ...3 B 3 E 13 C 4 5 6 7 8 F 14 D 10 11 9 6 4 ...
Page 67: ...2 1 3 A D 9 8 11 10 B 4 5 E 12 13 14 C 7 6 6 6 ...
Page 69: ...A a 1 1 D 4 4 B 1 b 1 1 E 5 5 7 6 8 9 8 5 C 2 3 3 F 5 11 12 6 8 ...
Page 71: ...1 2 3 3 4 5 A D 13 11 10 7 6 6 7 B E 14 8 12 9 C F 15 G 16 16 6 10 ...
Page 73: ...A a 1 D 11 10 10 9 8 B 4 2 3 E 13 12 12 C 5 7 6 7 6 12 ...
Page 75: ...C 4 F 9 9 9 10 9 5 6 D G 11 E 8 7 6 14 ...
Page 78: ...Volume PWB 8 9 10 10 6 17 ...
Page 80: ...C 5 F 11 P D F R 7 6 6 12 13 G 12 13 E 8 9 a 8 H 14 6 19 ...


