[7] ADJUSTMENTS
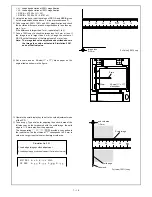
1. Developing Unit
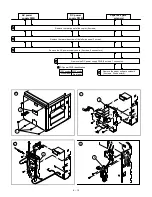
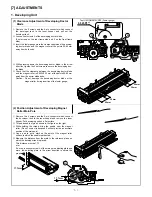
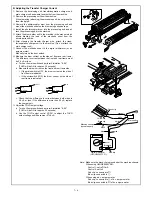
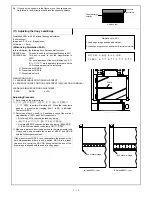
(1) Clearance Adjustment of Developing Doctor
Blade
1
Remove the 4 screws and the 5-pin connector which connect
the developer tank to the toner hopper, and pull out the
developer tank.
2
Loosen 4 setscrews A of the developing doctor blade.
(2 setscrews on the rear frame side and 2 on the front frame
side).
3
Insert the feeler gauges into the clearance between the develop-
ing doctor blade and the magnet roller at the points 50-80 mm
away from both ends.
4
While pressing down the developing doctor blade in the arrow
direction, tighten the 4 setscrews to secure the developing doc-
tor blade.
5
Check that the clearance between the developing doctor blade
and the magnet roller is 0.525
±
0.03 mm at the points 50-80 mm
away from the doctor blade ends.
Caution: Do not damage the developing doctor blade or the
magnet roller during insertion of the feeler gauge.
Tool: UKOGM0075CSZZ (Feeler gauge)
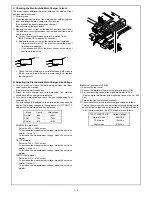
(2) Position Adjustment of Developing Magnet
Roller Main Pole
1
Remove the 4 screws and the 5-pin connector which connect
the developer tank to the toner hopper and remove the toner
hopper. Put developing unit on a flat surface.
2
Thread a needle or pin as shown in the figure on the right.
3
While holding the thread, bring the needle near the magnet
roller. (Do not use a clip because it will not provide an accurate
position of the main pole).
4
Use a pen to put a mark on the point of the magnet roller
surface to which the needle is attracted.
5
Measure the distance from the mark to the reference plane on
which the developer tank is placed.
This distance must be 17.7
mm.
If not so, loosen setscrew A of the main pole adjusting plate and
move the adjusting plate in the arrow direction to obtain the
proper distance.
0.525
0.03
0.03
A
A
50mm
50mm
30mm
30mm
A
17.7mm
17.7mm
7 – 1
Summary of Contents for SF-2040
Page 27: ...9 Desk unit SF D23 11 12 16 17 13 18 10 9 8 7 6 2 5 4 3 1 23 21 22 19 20 14 15 4 10 ...
Page 63: ...5 5 C F 10 D 7 6 11 G E 8 9 H 12 6 2 ...
Page 65: ...3 B 3 E 13 C 4 5 6 7 8 F 14 D 10 11 9 6 4 ...
Page 67: ...2 1 3 A D 9 8 11 10 B 4 5 E 12 13 14 C 7 6 6 6 ...
Page 69: ...A a 1 1 D 4 4 B 1 b 1 1 E 5 5 7 6 8 9 8 5 C 2 3 3 F 5 11 12 6 8 ...
Page 71: ...1 2 3 3 4 5 A D 13 11 10 7 6 6 7 B E 14 8 12 9 C F 15 G 16 16 6 10 ...
Page 73: ...A a 1 D 11 10 10 9 8 B 4 2 3 E 13 12 12 C 5 7 6 7 6 12 ...
Page 75: ...C 4 F 9 9 9 10 9 5 6 D G 11 E 8 7 6 14 ...
Page 78: ...Volume PWB 8 9 10 10 6 17 ...
Page 80: ...C 5 F 11 P D F R 7 6 6 12 13 G 12 13 E 8 9 a 8 H 14 6 19 ...


