Welcome to PocketMail™ Service
2. Composing Your First Message
1.
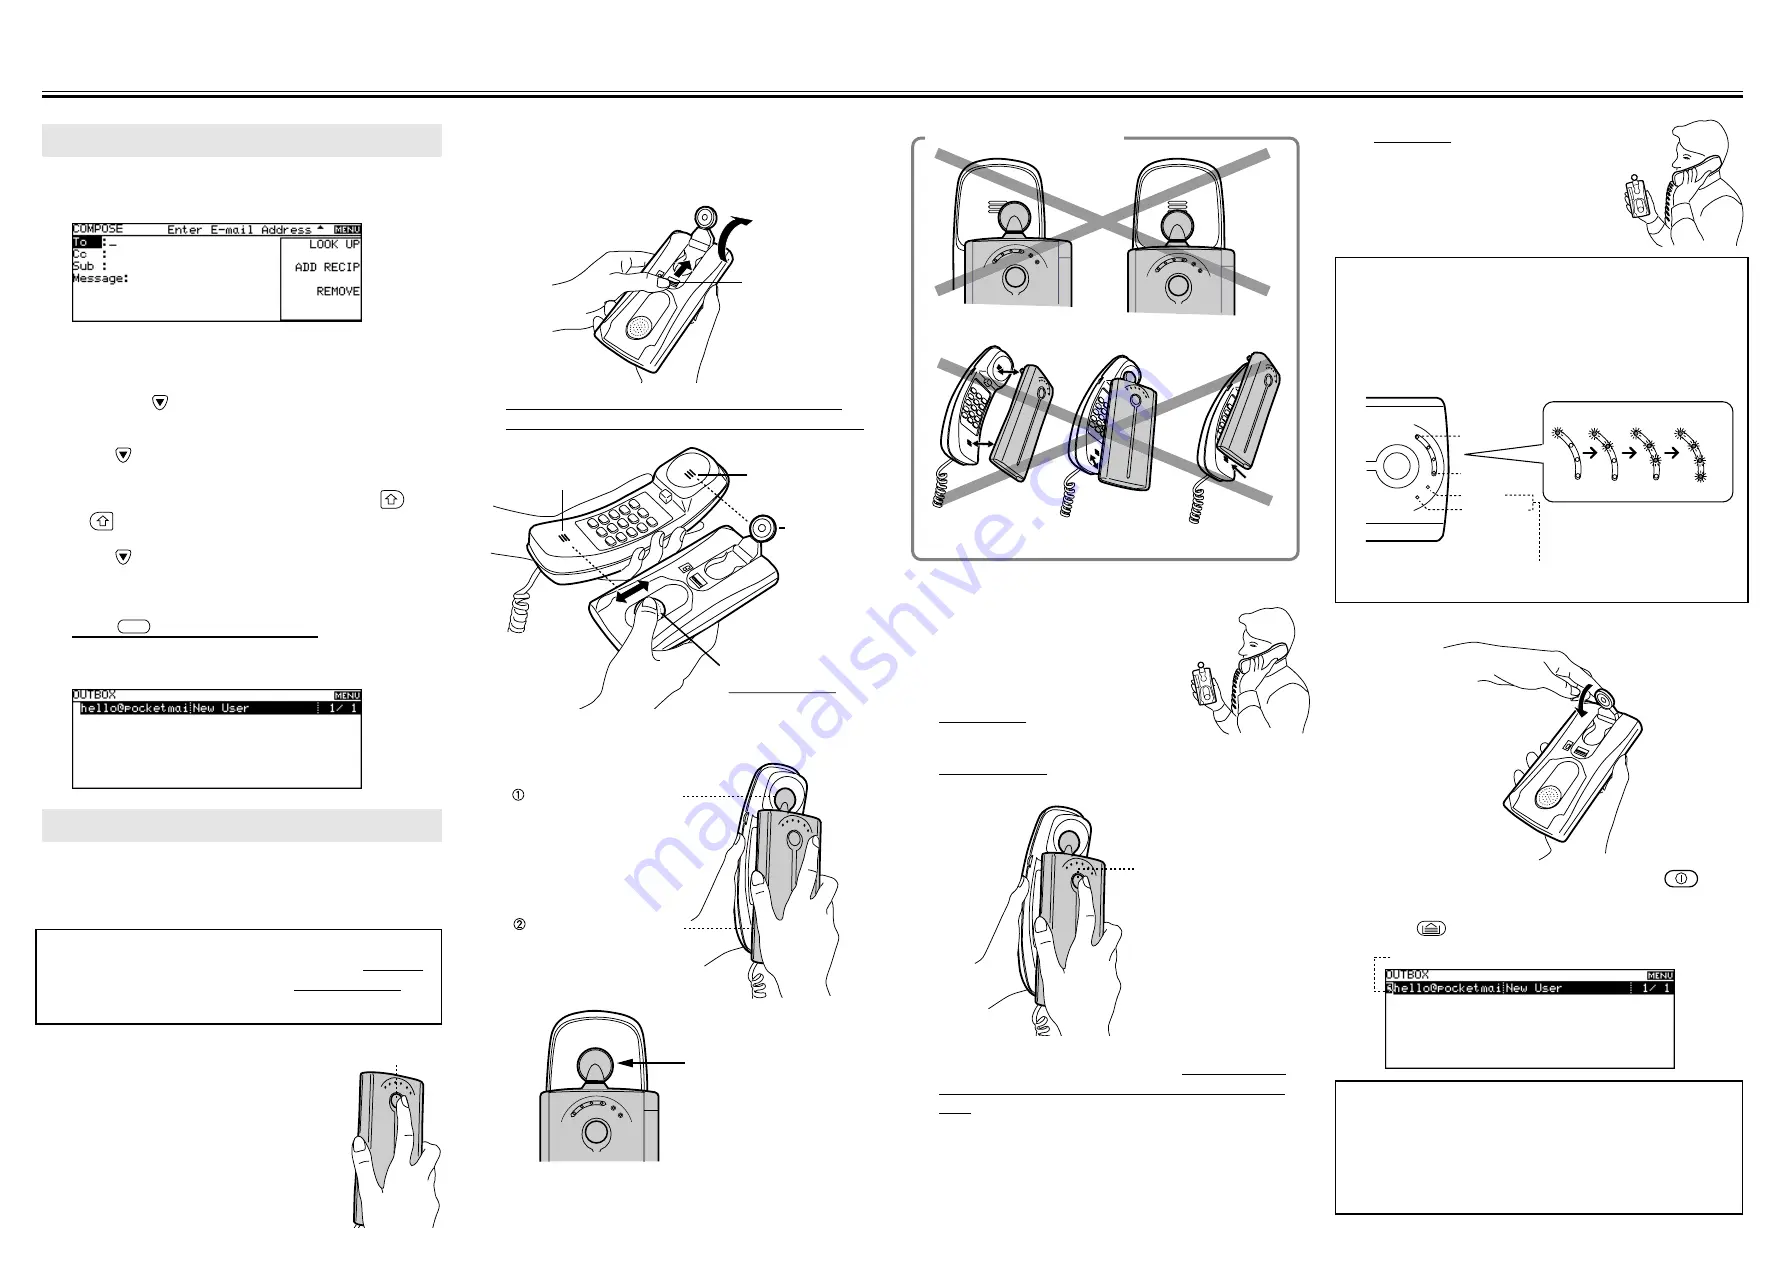
After you sign up for service, the compose message
screen appears.
2.
Enter the E-mail addresses in the To field.
Type:
hello@pocketmail.com
3.
Then press
to move the cursor to the Cc field.
For now let's leave it blank.
4.
Press
to move the cursor to Sub (Subject) field.
Type:
New User
• Capital letters are made by pressing SHIFT key (
CAPS
or
) once, letting go, then pressing the letter.
5.
Press
to move the cursor to Message field.
For now let's leave it blank or experiment by typing a brief
message.
6.
Press
DONE
to save your message.
The OUTBOX appears, where your outgoing mail is stored
until you dial into the PocketMail Network to send it.
3. Sending & Receiving Messages
Preparation
Before using your TM-20 for the first time, familiarize yourself with
the sounds that your TM-20 makes.
Note:
After every transmission, you will hear either dual tone
for a successful transmission or a low pitched tone if the
transmission failed.
Close the unit. It doesn't matter whether the power
is ON or OFF.
To familiarize yourself, try pressing and holding the
PocketMail button until START light is ON and
listen to the sound pattern.
The unit will emit a low pitched tone to indicate an
error. Repeat this procedure until you can
recognize the distinctive error sound at the end of
the communication procedure.
When the transmission is successful, the unit will emit dual tone.
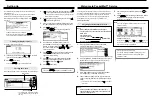
1.
Push the Microphone release switch in the direction of
the arrow until the Microphone pops up.
Microphone
release switch
2.
Adjust the Microphone and Speaker position to
align with the handset’s earpiece and mouthpiece.
Microphone
Earpiece
Speaker
(Be sure to adjust)
Mouthpiece
3.
Align the unit to a telephone* so that:
the rubber cup of the
unit microphone fits
snugly over the
telephone earpiece.
the unit speaker is as
close to the telephone
mouthpiece as
possible.
S
T
A
R
T
FINISH
SE
ND
R
E
C
E
IV
E
Rubber cup should cover
all holes in telephone
earpiece
* Does not work with Digital Cellular and PCS Telephones.
Refer to corresponding page in the Operation Manual.
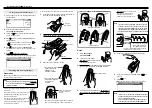
Off-center of earpiece
Too much space
Improper Alignments
S
T
A
R
T
FINISH
SE
ND
R
E
C
E
IV
E
S
T
A
R
T
FINISH
SE
ND
R
E
C
E
IV
E
Detail
1.
Dial 1-800-762-5386
(1-800-POCKETM).
2.
Listen to the voice prompt.
Immediately place unit into position
over the telephone receiver.
3.
Press and hold the PocketMail button until the START
light is on and then release the PocketMail button.
PocketMail button
4.
Unit talks to the PockeMail Network. Do not remove
the unit until you hear dual tone or a low pitched
tone.
Immediately after one of these tones,
listen to the recorded telephone
message. It will tell you if your
transmission was successful or not.
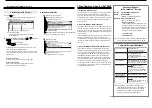
Note:
• If you have received messages, repeating beeps will
sound for 10 seconds. You can remove the unit from
the phone at the “Received Messages” beeps. (Press-
ing the POWER key at anytime can stop the beeps.)
• The lights indicate how much progress has been made.
START
FINISH
START
FINISH
RECEIVE
SEND
Two of the lights indicate whether the device
is sending or receiving messages.
The progress bar lights move
from START to FINISH for
each SEND or RECEIVE.
5.
Hang up the telephone and close the microphone.
6.
Open your unit and press the POWER key (
) to
power up.
7.
Press
OUTBOX
.
"S" indicates that the message was sent successfully.
Note:
• If there is no “S”, check the microphone and speaker
position according to Preparation Section and repeat
steps 1-7 of this Detail section.
• Your unit sends and receives PocketMail messages
each time you connect to the PocketMail Network.
PocketMail
button


