background image

V L - A H 5 0 H / p p .   0 2 4 - 0 4 1 ;   0 0 / 3 / 2 9 / 1 8 : 0 0

G. K .   A s s o c i a t e s ,   To k y o

Useful Features

24

5

Press the 


button to select “SELECT”.

6

Press the SET button (

B

) to select

“DATE+TIME” or “DATE”.

When “DATE+TIME” is selected,

 both the

date and the time are displayed and
recorded.

When “DATE” is selected,

 only the date

is displayed and recorded.

7

Press the DISPLAY button to turn off the
menu screen, and then press the REC
START/STOP button to begin recording.

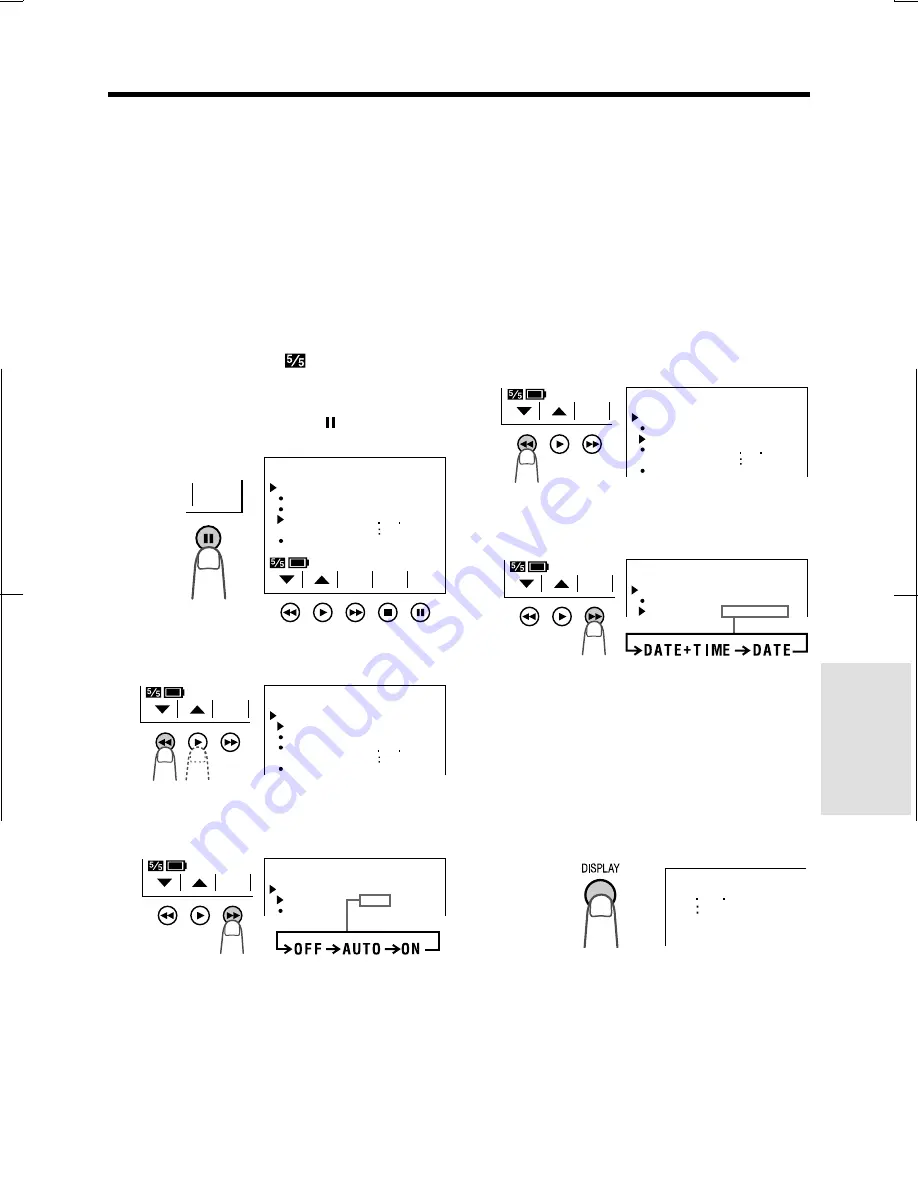
Recording the Date and Time

Follow the procedure shown below to record
the date and time, or the date only, along with
the subject.

Note:

• Before performing the procedure below, make

sure that the date and time have been correctly
set (see page 16).

1

In Recording Standby mode, press the
MENU button until 

 (MENU 1)

appears.

2

Press the PAGE button ( ) until MENU 3
appears.

3

Press the


or 


button to select

“DISPLAY”.

S E T

MENU

DA T E

D I S P L A Y

O F F

S E T T I NG

1 2 H 2 4 H

S E L E C T

DA T E T I ME

+

T I ME

/

/

3

2 4H

2

1 0 3 0

6 2 0 0 1

MENU

DA T E

D I S P L A Y

O F F

S E T T I NG

1 2 H 2 4 H

S E L E C T

DA T E T I ME

+

T I ME

/

/

3

PAGE

TURE

P I C -

S E T

5

P A G E

2 4H

2

1 0 3 0

6 2 0 0 1

4

Press the SET button (

B

) to select

“AUTO”, “ON”, or “OFF”.

S E T

MENU

DA T E

D I S P L A Y

O F F

S E L E C T

DA T E T I ME

+

T I ME

/

3

When “AUTO” is selected,

 the date/time

is displayed and recorded for 10
seconds at the beginning of the first
recording of each day.

When “ON” is selected,

 the date/time is

continuously displayed and recorded.

When “OFF” is selected,

 the date/time is

neither displayed nor recorded.

Note:


In “AUTO”, if you wish to record the

date/time a second time that day, repeat the
procedure above and re-select “AUTO”.

S E T

MENU

DA T E

D I S P L A Y

AUTO

S E T T I NG

1 2 H 2 4 H

S E L E C T

DA T E T I ME

+

T I ME

/

/

3

2 4H

2

1 0 3 0

6 2 0 0 1

S E T

MENU

DA T E

D I S P L A Y

AUTO

S E L E C T

DA T E T I ME

+

T I ME

/

3

2

1 0 3 0

6 2 0 0 1

Summary of Contents for ViewCam VL-AH50H

Page 1: ...c Operations Camera Recording Advanced Features Please read this operation manual carefully before using the VIEWCAM If you require any advice or assistance regarding your Sharp product please visit our web site www sharp co uk support Customers without Internet access may telephone 08705 274277 during office hours or 01 676 0648 if telephoning from Ireland ...

Page 2: ...ng uppfyller kraven enligt riktlinjerna 89 336 EEC och 73 23 EEC så som kompletteras av 93 68 EEC Dette produktet oppfyller betingelsene i direktivene 89 336 EEC og 73 23 EEC i endringen 93 68 EEC Tämä laite täyttää direktiivien 89 336 EEC ja 73 23 EEC vaatimukset joita on muutettu direktiivillä 93 68 EEC WARNING TO PREVENT SHOCK HAZARD DO NOT EXPOSE THIS APPLIANCE TO RAIN OR MOISTURE This equipme...

Page 3: ...e plug terminal which is marked N or coloured black The wire which is coloured brown must be connected to the plug terminal which is marked L or coloured red Ensure that neither the brown nor the blue wire is connected to the earth terminal in your three pin plug Before replacing the plug cover make sure that If the new fitted plug contains a fuse its value is the same as that removed from the cut...

Page 4: ...ded image Avoid placing the VIEWCAM in close proximity to lighting equipment The heat from incandescent lights may deform the VIEWCAM or cause it to malfunction Always respect prohibitions or restrictions on the use of electronic equipment on commercial flights or in other sensitive areas Be aware of the temperature and humidity You can use your VIEWCAM at 0 C to Ⳮ40 C and at 30 to 80 relative hum...

Page 5: ...Video equipment not for use with Hi8 is unable to play back a tape recorded in Hi8 format If you want to record with a Hi8 tape in normal 8 mm format set the menu item to OFF on the MENU 2 screen Camera mode before recording See page 23 for operation of the menu screen LCD Monitor Screen The VIEWCAM is equipped with a large LCD monitor screen that allows you to record scenes while comfortably hold...

Page 6: ...iii Supplied Accessories Battery pack BT H22 AC adapter Infrared remote control CR2025 type lithium battery Shoulder strap Lens cap AA battery for remote control 2 Audio video cable Power cord Sun hood ...

Page 7: ...iv Optional Accessories Extended type battery pack BT H32 Standard type battery pack BT H22 Accessory shoe adapter VR 30AD Soft case Tripod adapter for 180 recording VR 33FA ...

Page 8: ... Removing a Cassette 11 Installing the Lithium Memory Battery 12 Setting the Date and Time 13 Using the Hand Strap and the Lens Cap 14 Attaching the Shoulder Strap 14 Using the Sun Hood 15 Camera Recording Easy Camera Recording with Full Auto Mode 16 Zooming 17 Tips on Recording Positions 17 Remaining Recording Time Display 18 Remaining Battery Power Display 18 Playback Playback 19 Volume Control ...

Page 9: ...f Recording 35 Setting the VIEWCAM to Full Auto Mode 37 Program Search 38 Tape Counter Feature 39 Using the Remote Control 41 Useful Features References Preparation Basic Operations Playback Useful Features Basic Operations Camera Recording Advanced Features Operation Summary Advanced Features Digital Picture Effects 42 Scene Menu Program AE 43 Superimposing a Title 44 Changing the Preset Titles 4...

Page 10: ...tte compartment door is open Operation Summary Terminal cover Microphone Zoom lens Speaker VIDEO jack pp 20 53 DC IN jack pp 9 10 Shoulder strap loop p 14 Lithium battery holder p 12 Cassette holder p 11 Lens hood p 34 Cassette compartment door release p 11 Cassette compartment door p 11 Operation Summary AUDIO jack pp 20 53 ...

Page 11: ...ntrol p 19 DISPLAY button p 22 Operation buttons p 22 CHARGE indicator p 9 MENU button p 22 Remote sensor p 41 LCD monitor screen RECord START STOP button p 16 Shoulder strap loop p 14 DUAL SNAP button pp 27 49 50 Hand strap p 14 Tripod socket Battery compartment door release p 8 Power switch CAMERA VCR select switch pp 16 19 ...

Page 12: ...ME 3 MENU 2 MENU D I S DUAL SNAP OFF DGTL ZOOM OFF EXTEND 2X DUAL 1 PAGE TURE P I C SET FADE REMOTE NORMAL ON DEMO MODE OFF AUTO 24H 1 0 00 1 2 0 00 On screen Display Index For details on the use of each function refer to the page number indicated p 42 p 44 p 46 p 31 p 38 p 21 VCR Mode Camera Mode Note See pages 22 and 23 for the procedure to display the desired screen p 26 p 28 p 29 p 30 p 39 p 4...

Page 13: ... mode See page 31 Edit Search To record a backlit subject See page 32 Gamma Brightness Compensation or page 48 Manual Exposure To record in a dark or poorly illuminated location See page 33 Gain up To record yourself while monitoring the shot See page 35 Self Recording To record a short video message for somebody See page 36 Self recording Message To find the beginning of a recorded scene to be pl...

Page 14: ...ed see page 55 There is no video cassette in the VIEWCAM Insert a cassette see page 11 The erasure protect tab on the video cassette has been slid to the record protect position preventing recording see page 57 The tape is about to end Prepare a new cassette see page 11 The tape has reached the end Replace it with a new cassette see page 11 In Self Recording mode all warnings will be indicated by ...

Page 15: ...F If you remove the battery pack during recording or playback the tape will remain wound around the video head drum potentially causing damage to the tape Make sure the battery compartment door is closed firmly during operation If it is not the battery pack may fall out or VIEWCAM operation may fail because of the poor contact pressure Remove the battery pack from the VIEWCAM if the VIEWCAM will n...

Page 16: ... Terminal cover Charging time Max continuous recording time Max continuous playback time Battery pack DC IN jack CHARGE indicator Notes Using the zoom see page 17 and other functions or turning the power on and off frequently will increase power consumption This may result in a decrease of more than 50 in the actual recording time compared to the maximum continuous recording time listed above The ...

Page 17: ...pter into the DC IN jack on the VIEWCAM Cautions BEFORE REMOVING THE DC PLUG ALWAYS STOP THE TAPE AND TURN THE POWER OFF If you remove the DC plug during recording or playback the tape will remain wound around the video head drum potentially causing damage to the tape Remove the DC plug from the VIEWCAM if you will not use the VIEWCAM for a long period of time When removing the plugs grasp the plu...

Page 18: ...cassette holder in step 3 the VIEWCAM s cassette protection mechanism might eject the cassette If this happens repeat the insertion procedure Do not attempt to pick up the VIEWCAM by the cassette compartment door Notes If the battery power is too low you may not be able to eject the cassette Replace the battery pack with a fully charged one See page 57 for more information on the video cassette ta...

Page 19: ... Lithium Battery Perform steps 1 and 2 above then lift out the battery from the battery holder Note Replace the battery with a new CR2025 battery when the date and time indicator starts to fall behind the correct time Notes on the Use of the Lithium Battery Cassette compartment door release Lithium battery holder j mark CAUTION Danger of explosion if battery is incorrectly replaced Replace only wi...

Page 20: ...button B W to select 12H Notes The date and time once set are stored in memory The menu screen automatically turns off if no settings are made within 5 minutes Power switch 1 Hold down the Lock button and slide the Power switch to CAMERA 2 Press the MENU button until MENU 3 appears If MENU 1 appears on the screen press the PAGE button until MENU 3 appears 3 Press the SET button B When changing the...

Page 21: ...ttaching or removing the lens cap press both tabs on the sides of the cap Press both tabs Grip strap Hand strap flap Notes Always replace the lens cap on the lens when the VIEWCAM is not in use Attach the lens cap to the hand strap so it will not get in the way during recording Attaching the Shoulder Strap 1 Hold one end of the strap and thread it through the loop on the left side of the LCD scree...

Page 22: ...damaged Do not leave the sun hood in an unventilated car in direct sunlight The high temperature may cause a deformation of the casing Opening the Sun Hood Open the sun hood by lifting the top cover in the direction of the arrow The side covers will open automatically Note You can operate the Operation buttons below the LCD screen with the sun hood attached Top cover Side covers Using the Sun Hood...

Page 23: ...g cut off when it is played back To Pause Recording Press the REC START STOP button again Recording pauses and the VIEWCAM enters the Recording Standby mode To Turn the Power Off Slide the Power switch to OFF Notes The speaker is off in Camera mode Battery power is consumed in Recording Standby mode Turn off the power if you will not be recording again soon If the VIEWCAM is kept in Recording Stan...

Page 24: ...ps on Recording Positions The rotating LCD monitor screen lets you enjoy easy video recording in a more relaxed posture without having to hold the VIEWCAM up to your eye The LCD monitor also makes it easier to record high angle and low angle shots Holding the VIEWCAM Put the fingers of your right hand through the hand strap and place your right thumb close to the REC START STOP button and Power Zo...

Page 25: ...l reappear after a short interval to indicate the new time remaining The remaining recording time display appears 5 seconds after pressing the REC START STOP button to begin recording 10 min 8 min 8 min 6 min 6 min 4 min 4 min 2 min 2 min 1 min TA P E TA P E TA P E TA P E TA P E Approx remaining recording time On screen indicator Red Green Green 0 min The tape has reached the end 1 min 0 min Warni...

Page 26: ... button indicators on or off press the DISPLAY button The playback operation buttons will still function as indicated even after the indicators are turned off To use the infrared remote control make sure that the REMOTE menu item is set to ON see page 41 Auto Tape Rewind The tape is automatically rewound when playback reaches the end of the tape To Turn the Power Off Slide the Power switch to OFF ...

Page 27: ... be connected have been turned off before you make connections Making con nections with any of the components left turned on may cause picture noise or a malfunction Notes This VIEWCAM does not have an S video socket If your TV or VCR has a 21 pin Euro SCART connector use the RCA 21 pin Euro SCART conversion connector QSOCZ0033TAZZ available from our main parts distributor detailed on page 59 When...

Page 28: ...n makes it easy to search for a desired scene on the tape Searching for a Scene Near the Current Tape Position 1 During playback press the Forward Search B or Reverse Search C button The playback picture fast forwards or reverses 2 When you find the desired scene press the PLAY button D to return to normal playback Searching for a Scene Far from the Current Tape Position 1 During fast forward or r...

Page 29: ... the MENU button the mode menu screen changes from to in Camera mode and from to in VCR mode DISPLAY button Press the DISPLAY button to turn the mode menu screens and on screen indicators on or off Note The warning indicators and some other indicators cannot be turned off by pressing the DISPLAY button Operation buttons Press the Operation button corresponding to the indicator of the desired funct...

Page 30: ...menu item for example is set to OFF in Camera mode it will be automatically set to OFF in VCR mode The menu screen automatically turns off if no settings are made within 5 minutes 5 Press the SET button B to select the desired setting Each time you press the SET button the setting changes 6 Press the DISPLAY button to turn off the menu screen Example MENU FADE REMOTE NORMAL ON AUTO 2 SET L O D I A...

Page 31: ...ppears 3 Press the or button to select DISPLAY SET MENU DATE D I SPLAY OFF SETT I NG 12H 24H SELECT DATE T IME T IME 3 24H 2 10 30 6 2 0 01 MENU DATE D I SPLAY OFF SETT I NG 12H 24H SELECT DATE T IME T IME 3 PAGE TURE P I C SET 5 P A G E 24H 2 10 30 6 2 0 01 4 Press the SET button B to select AUTO ON or OFF SET MENU DATE D I SPLAY OFF SELECT DATE T IME T IME 3 When AUTO is selected the date time i...

Page 32: ...00 digital zoom The digital zoom allows you to record powerful close up pictures with the same operation as normal zooming Notes The digital zoom is in addition to the optical zoom giving a combined maximum zoom range of 1 400 As the image is enlarged digitally the picture quality decreases when higher digital zoom settings are used The digital zoom cannot be used with the Digital Quick Zoom or th...

Page 33: ...n ALL is selected each time you press the EXTEND button C during recording the zoom range changes as shown Note When the Digital Quick Zoom is used with the optical zoom at 16 2 increases the zoom power to 32 4 increases the zoom power to 64 10 increases the zoom power to 160 Zoom range indicator To cancel Digital Quick Zoom Press the EXTEND button again Notes The picture quality decreases when th...

Page 34: ...ll image of the subject will be recorded In SNAP and PHOTO SHOT modes the VIEWCAM returns to Recording Standby mode after recording a still image for 6 seconds SNAP PHOTO SHOT To pause recording press the REC START STOP button To cancel the still image press the DUAL SNAP button in Recording Standby mode STILL To pause recording press the REC START STOP button To cancel the still image press the D...

Page 35: ...T button B to select ON 3 Press the DISPLAY button to turn off the menu screen The indicator appears on the monitor and the VIEWCAM enters the DIS mode To return to normal recording mode Select OFF in the step 2 above The indicator will disappear Notes While the DIS function is on the image on the monitor is slightly magnified Image resolution slightly decreases in DIS mode Battery consumption is ...

Page 36: ...AYS HAPPY HOL I DA DAYS HAPPY HOL I DAYS HAPPY HOL I DAYS HAPPY HOL I DAYS HAPPY HOL I DAYS Selecting Fade Mode HAPPY B I RTHDAY HAPPY B I RTHDAY HAPPY B I RTHDAY HAPPY B I RTHDAY HAPPY B I RTHDAY HAPPY B I RTHDAY HAPPY B I RTHDAY HAPPY B I RTHDAY 1 In Recording Standby mode press the MENU button until MENU 1 appears 2 Press the PAGE button until MENU 2 appears 3 Press the SET button B to select t...

Page 37: ...unction lets you check the last 5 seconds of tape just recorded without switching to VCR mode to make sure that the recording has come out right 1 In Recording Standby mode press the MENU button until appears 2 Press the QK REW button The tape rewinds to the point of 5 seconds before the current tape position playback then starts automatically After 5 seconds of playback the VIEWCAM enters the Rec...

Page 38: ...earch button Reverse Edit Search button Forward edit search Reverse edit search Quick Return When you have been playing back what you have recorded and wish to quickly return to recording again from the end of the last recorded scene use the quick return function 1 In Recording Standby mode press the MENU button until appears 2 Press the RETURN button D QUICK RETURN flashes and the tape will begin...

Page 39: ...FF button A again The indicator appears Note When the indicator is displayed the background will become slightly brighter GAMA GAMA RE REW QK QK E FF P I C E FF GAMA REW QK E FF P I C E FF GAMMA GAMMA E F F GAMA TEND FADE FADE EX TEND FADE EX To cancel Gamma Brightness Compensation Press the GAMA EFF button until GAMMA disappears GAMMA GAMMA E F F GAMA GAMA GAMA RE REW QK QK E FF P I C E FF GAMA R...

Page 40: ... will disengage and the indicator will disappear automatically if the VIEWCAM is moved to a bright location Some picture noise appears in Gain up mode The picture noise increases when the indicator is displayed To obtain a brighter picture Press the GAMA EFF button A again The indicator appears GAMA GAMA RE REW QK E FF P I C E FF GAMA REW QK E FF P I C E FF E F F GAMA GAMMA GAMMA TEND FADE FADE EX...

Page 41: ...een mode Macro Shots This VIEWCAM lets you shoot close up images of small objects such as flowers and insects or make title frames for your videos When you want to record a magnified image of a subject which is within approximately 1 5 m of the VIEWCAM do not zoom in on it Instead zoom out all the way by pushing the Power Zoom control to the W side and then move the VIEWCAM closer to the subject u...

Page 42: ...on the screen are replaced by the flashing indicator To check the type of warning rotate the monitor back to the normal position In Self Recording mode it is not possible to record using manual recording modes change picture adjustments display menus record the date and time or use the Quick Return and some of the other functions You can play back images even while the monitor is in the self recor...

Page 43: ...n B Self recording Message In Self Recording mode you can record a short video message for somebody This feature is convenient for editing video letters Complete steps 1 to 3 of Normal Self Recording on page 35 then perform the procedure below 1 Press the MESSAGE button to display the self recording message screen 2 Press the REC START button B to begin recording Record your message while facing t...

Page 44: ... it to FOCUS 4 If EXPOSURE is displayed in yellow press the EXPOSURE button to display the exposure setting screen then press the AUTO button B The exposure setting screen turns off and EXPOSURE returns to blue 5 Press the MENU button until appears If SCENE MENU is not displayed above the A button press this button until SCENE MENU appears 6 Press the DISPLAY button The Operation button indicators...

Page 45: ...the beginning of a number of previously recorded scenes Up to 10 different scenes can be found on one tape Note This function does not work if no recording has been made since the cassette was loaded if the cassette has been removed after the recordings were made or if the power source has been interrupted 1 Press the MENU button until appears VCR mode 2 Press the SEARCH button PROG SEARCH is disp...

Page 46: ...n to begin recording You can check the recording time with the tape counter Notes The counter reading may differ slightly from the actual time This is especially noticeable when the tape has been rewound or fast forwarded a number of times in which case there can be a difference of several seconds The tape counter feature will be cancelled if the power source is interrupted To turn off the tape co...

Page 47: ...D to view the desired scene Camera mode 1 During recording press the MENU button until appears If MEMORY is not displayed press the COUNTER button 2 Perform steps 2 and 3 above 3 When you are ready to finish recording press the REC START STOP button 4 Set the Power switch to VCR then perform steps 5 and 6 above To cancel Counter Memory mode Perform step 1 above and press the MEMORY button M will d...

Page 48: ...t the remote sensor of the VIEWCAM and press the control buttons for operation 5 m 1 2 VOLUME buttons PAUSE STILL button RECord START STOP button REWind Reverse Search button STOP button PLAY button Fast Forward Forward Search button Power Zoom Telephoto Wide angle control buttons Remote sensor Approximate operating range of remote control Notes Be careful not to allow direct sunlight or bright li...

Page 49: ...of an old photograph SOLARI The contrast of the subject is enhanced creating a unique artistic image STRETCH The image is stretched horizontally to make the subject look wider SLIM EFF The image is stretched vertically to make the subject look taller NEGA EFF The blacks and whites of the image are reversed and colours of the image are inverted Advanced Features 1 In Recording Standby mode press th...

Page 50: ...s theAbutton to select the scene setting that best fits the recording situation Each time you press theAbutton the scene setting changes as shown below To cancel the scene setting Select SCENE MENU in step 2 above Notes Even after you turn off the scene setting indicator the selected scene setting will remain in effect When SPORT is selected recording under the light of fluorescent lamps mercury l...

Page 51: ...l not be displayed or recorded Superimposing a Title Use the title feature to superimpose titles on your videos when recording There are eight titles preset for your convenience which you can choose from 1 In Recording Standby mode press the MENU button until appears 2 Press the TITLE button C to display the title selection screen TLE T I EX I T SET T I T LE SUPERST AR HAPPY HOL I DAYS HAPPY B I R...

Page 52: ...ll appear at the top of the screen and the cursor will automatically move to the right Note If you input the wrong character press the button to move the cursor to that character and perform step 4 5 Repeat step 4 until you finish the title then press the SET button The new title will be displayed on the title selection screen Note To change another title perform steps 2 to 5 again 6 If you wish t...

Page 53: ... automatically focuses on what ever is in the centre of the scene Always keep the subject in the centre of the screen Notes If no subject is in the centre of the screen the focus area will expand and the subject nearest the centre will be focused on If no subject is displayed on the screen the VIEWCAM will automatically zoom out until a subject comes into the frame Manual Focus The Auto Focus may ...

Page 54: ...he WHITE BAL button A WHITE BAL changes from blue to yellow and begins flashing WHITE BAL stops flashing when the locking procedure is completed 4 Aim the lens at the desired subject and press the REC START STOP button to begin recording To cancel White Balance Lock Press the WHITE BAL button WHITE BAL returns to blue Notes If the light source changes or if you move from indoors to outdoors or vic...

Page 55: ... exposure level to allow less light through the lens 1 In Recording Standby mode press the MENU button until appears 2 Press the EXPOSURE button to display the exposure setting screen 3 Press the or button to select the desired exposure level The bar indicates the selected exposure level 4 Press the EXIT button A to turn off the exposure setting screen To cancel Manual Exposure mode Perform steps ...

Page 56: ...e up image of the subject inset within the normal image This is useful for example when you want to capture the facial expression of a musician while recording a concert 1 In Recording Standby mode press the DUAL SNAP button An inset image of the scene appears 2 Push the Power Zoom control to frame the inset subject 3 Press the REC START STOP button to begin recording To change the position of the...

Page 57: ... the screen with a still image title bar on the other half This is useful for example when you want to record an animal at the zoo with a still image description of the animal at the bottom of the screen 1 In Recording Standby mode press the DUAL SNAP button then press the DISPLAY button The upper part of the screen turns grey Note Each time you press the DISPLAY button the screen changes between ...

Page 58: ...UTO The VIEWCAM automatically switches between NORMAL and BRIGHT depending on the ambient lighting This mode is only available in Camera mode NORMAL For use indoors or under moderate lighting conditions BRIGHT For use outdoors under strong lighting conditions such as bright daylight 4 Press the EXIT button to turn off the adjustment screen Notes If you set the backlight BACKLIGHT to AUTO in Camera...

Page 59: ...yback Press the GAMA EFF button again GAMMA disappears Turning Off the LCD Monitor Backlight The LCD monitor uses a fluorescent lamp for backlighting see page 56 In order to reduce battery consumption you can turn off the lamp when backlighting is not necessary e g when you are recording a fixed scene Hold down the DISPLAY button Three seconds later LCD LAMP OFF starts flashing on the monitor Keep...

Page 60: ... Press the Pause Still button on the VCR to pause recording when the source tape reaches the beginning of the sequence to be cut 5 Press the Pause Still or Record button on the VCR to resume recording when the source tape reaches the end of the sequence to be cut To stop editing Press the Stop buttons on the VIEWCAM and the VCR Notes Some of the transitions between edited sequences may be slightly...

Page 61: ...20 cm 10 15 Candlelight Brightness Lux 100 000 10 000 1 000 100 10 Optimal lighting range Avoid backlit subjects For the best picture shoot with the light source behind you When the background is brighter than the subject the subject often becomes too dark If you have to record with this lighting use the Gamma Brightness Compensation or correct the exposure level to improve the picture see pages 3...

Page 62: ...ng the VIEWCAM W Remove the bag when the air temperature inside it reaches the temperature of the room Dew warning feature If dew forms the word DEW flashes on the LCD monitor and the power will automatically turn off in approximately 10 seconds Q If DEW flashes on the LCD monitor remove the cassette leave the cassette compartment open and wait for a few hours to allow the VIEWCAM to acclimatise t...

Page 63: ...ring a battery pack that is not fully charged put the cover upside down so that only the battery pack casing is seen through the window Caution For safety reasons put the cover on the battery pack when it is not being used If the metal parts of the battery pack come in contact with other metal items there is a danger that a short circuit may occur Battery power is consumed even when the VIEWCAM s ...

Page 64: ...lgium Switzerland Italy Spain Holland Finland Portugal Norway Hong Kong Thailand Australia New Zealand Singapore Kuwait China etc Video Cassette Tapes Use only tapes with the or mark with this VIEWCAM To protect recordings against erasure When a previously recorded cassette is used again for recording the previously recorded material is erased To protect a recording against accidental erasure slid...

Page 65: ... appears on the screen press the PAGE button to display MENU 2 4 Press 쑽 or 쒀 C or D button Q to select DEMO MODE then press the SET button B W to select ON The demonstration begins Lock button Power switch Operation buttons MENU button Cancelling Demo Mode 1 During the demonstration perform step 3 above 2 Press 쑽 or 쒀 button Q to select DEMO MODE then press the SET button B W to select OFF 3 Pres...

Page 66: ...ies p 55 Set Power switch to OFF and remove battery pack wait for 2 seconds then reinstall battery pack and turn on power p 8 Open tab or use a new cassette p 57 Set Power switch to OFF and then back to CAMERA Set to Auto Focus mode p 46 Zoom out from subject p 17 Focus manually p 46 Direct lens to some subject or set zoom to widest angle before shooting p 17 Set DEMO MODE menu item to OFF p 58 Po...

Page 67: ...ideo heads Old or worn tape Power source is not properly connected Battery pack is not charged VIEWCAM is recording Backlight has been turned off Fluorescent lamp is burned out Inappropriate picture adjustments AC adapter or battery pack may have malfunctioned Audio video cable is not properly connected Does not indicate a malfunction REMOTE menu item is set to OFF Remote control batteries have ru...

Page 68: ...hm unbalanced Audio Output Level ⳮ8 dBs impedance less than 2 2 kohms Speaker Output 200 mW Power Requirement DC 3 6 V with battery pack DC 7 0 V with AC adapter Power Consumption 5 0 W during camera recording in full auto mode with zoom motor off and backlight in normal mode Operating Temperature 0 C to Ⳮ40 C Operating Humidity 30 to 80 Storage Temperature ⳮ20 C to Ⳮ60 C Dimensions approx 183 mm ...

Page 69: ...Notes ...

Page 70: ...Notes ...

Page 71: ......

Page 72: ...Printed in Malaysia TINSE0379TAZZ T2449 A 0P06 M G SHARP CORPORATION SHARP ELECTRONICS U K LTD Sharp House Thorp Road Newton Heath Manchester M40 5BE ...

Reviews: