background image

Summary of Contents for Viewcam VL-WD450U

Page 1: ...ss of i tVIEWOAM i this product record ontheline belowthe model number and serial number which are located on the bottom of the unit i Please retain this information Model No __ _ _ Serial No _The l l_ lOgoiS _it_adematk See page 93 fQi use 0fDemo niode Theimages of tiie VIEWCAM in tliiS opefat 0i_ maiiua a e basedupon the VE WI_50U ...

Page 2: ...lated voltage within the unit that can cause dangerous electric shocks This symbol alerts the user that there are important operating and maintenance instructions in the literature accompanying this unit CAUTION applies to the supplied AC adapter TO PREVENT ELECTRIC SHOCK MATCH WIDE BLADE OF PLUG TO WIDE SLOT FULLY INSERT CAUTION If the AC adapter is misplaced or needs to be replaced obtain the sa...

Page 3: ...der This device complies with Part 15 of the FCC Rules Operation is subject to the follow ing two conditions 1 This device may not cause harmful interference and 2 this device must accept any interference received including interference that may cause undesired operation RESPONSIBLE PARTY SHARP ELECTRONICS CORPORATION Sharp Plaza Mahwah New Jersey 07430 Phone 1 800 BE SHARP CAUTION ON LITHIUM BATT...

Page 4: ...nsure reliable operation of the product and to protect it from overheat ing and these openings must not be blocked or covered The openings should never be blocked by placing the product on a bed sofa rug or other similar surface This product should not be placed in a built in installation such as a bookcase or rack unless proper ventilation is provided or the manufacturer s instructions have been ...

Page 5: ...If liquid has been spilled or objects have fallen into the product c If the product has been exposed to rain or water d If the product does not operate normally by following the operating instructions Adjust only those controls that are covered by the operating instructions as an im proper adjustment of other controls may result in damage and will often require extensive work by a qualified techni...

Page 6: ...p the viewfinder Align the mark on the side of the battery pack with the mark on the camcorder _ and slide the battery pack down completely until it locks into place _2_ Turning the Power on Media Selection switch Power switch To use the camera recording functions hold down the Lock button and set the Power switch to CAMERA Lock button To use the playback and editing functions hold down the Lock b...

Page 7: ...tor Card slot cover 2 3 Insert the cassette fully with the window facing outwards and with the erasure protect tab facing upwards Press the _ mark gently until the cassette holder clicks into place Close the compartment door by pressing the center until it clicks into place mark 3 4 Open the card slot cover in the direction of arrow Insert a SmartMedia card into the slot as shown below and push it...

Page 8: ... OPEN release button _ and open the LCD monitor to a 90 angle to the camcorder body 3 Adjust the LCD monitor to an angle that allows easy viewing on the on screen picture Set the Media Selection ml_ switch to TAPE Hold down the Lock button and set the Power switch to VCR Zooming 5 Push the Power Zoom control to T _ telephoto or W _ wide angle side Power Zoom _ 6 control Lock button Press _ or _ _ ...

Page 9: ...0 Card Playback Press the LCD monitor OPEN release button _ and open the LCD monitor to a 90 angle to the camcorder body LCD monitor OPEN release button 90 2 Adjust the LCD monitor to an angle that allows easy viewing on the on screen picture 3 Set the Media Selection I switch to CARD 4 Hold down the Lock button and set the Power switch to VCR 5 Lock button Press _ or _ _ on the Operation button t...

Page 10: ...QCNW 1957TAZZ Audio video cable RCA type QCNW 2016TAZZ PC connecting cable QCNW 2022TAZZ SmartMedia card protective case Zoom microphone RMICCOO98TAZZ Windscreen _The part numbers for the AC adapter battery charger and battery pack supplied with this camcorder are valid only in the U S and Latin America If this camcorder was purchased outside of these areas the part numbers may be different Please...

Page 11: ...attery pack BT L441 Zoom microphone VR 5MCN Note The listed model names are for U S accessories For optional and additional accessories contact your local dealer call the Sharp Accesso ries and Supply Center at 1 800 642 2122 or visit SHARP s website http www sharp usa com ...

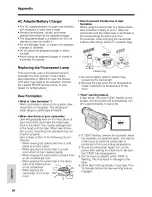
Page 12: ...void placing the camcorder in close proximity to lighting equipment The heat from incandescent lights may deform the camcorder or cause it to malfunction Always respect prohibitions or restrictions on the use of electronic equipment on commercial flights or in other sensitive areas Be aware of the temperature and humidity You can use your camcorder at 32 F to 104 F 0 C to 40 C and at 30 to 80 rela...

Page 13: ... 17 Using the Viewfinder 18 Using the LCD Monitor 19 J Basic Operations Camera Recording Easy Camera Recording on Tape in Full Auto Mode 20 Zooming 21 Tips on Recording Positions 21 Remaining Recording Time Display 22 Remaining Battery Power Display 22 r Useful Features Playback Tape Playback 23 VolumeControl 23 Watchingthe Playback on a TV 24 Video Search 25 Still 25 Selecting the Camcorder Mode ...

Page 14: ... the Shutter Speed 49 Manual Exposure 51 White Balance Lock 52 Digital Picture Effects 53 Scene Menu Program AE 54 Using the Zoom Microphone 55 Windbreak 56 Setting the Confirmation Sounds 56 World Clock 57 Selecting Daylight Saving Time 59 Playback Playback Zoom 60 Gamma Playback 61 Multiple Strobe Playback 61 Playback Effects 62 Picture Effect Playback 63 Picture Backlight Adjustments 64 Editing...

Page 15: ...Playback Card Playback 78 Slide Show Playback 79 Delete protection 80 Deleting One Stored Image 81 Deleting All Stored Images 82 Print Order 83 Transferring the Data on a SmartMedia Card to a Computer 85 Useful Information 811 Demonstration Mode 93 J Before Requesting Service 94 Specifications 9 Gufa de operaciSn r pida en espaSol 97 Visualizaciones en pantalla en espaSol 101 Affichages sur 6cran ...

Page 16: ...p 33 34 61 W B White Balance button p 52 IR Infrared LIGHT button p 35 SUPER CAT S EYE switch p 35 Lens hood AUTO ON OFF button p 28 Operation button p 27 Zoom lens Infrared light transmitter p 35 Remote sensor p 43 Stereo microphone p 68 MENU DISPLAY button p 27 Media Selection switch TAPE CARD selection switch p 26 ...

Page 17: ...5 LCD monitor p 19 LCD monitor OPEN release button p 19 Lithium battery compartment door p 13 Diopter adjustment p 18 Power source PUSH release button pp 10 11 Power source mounting surface pp 10 11 Shoulder strap loop p 17 Card slot cover Tripod socket ...

Page 18: ...5 66 Shoulder strap loop p 17 AUDIO L jack pp 24 65 66 AUDIO R jack pp 24 65 66 Power switch CAMERA VCR select switch pp 26 27 RECord START STOP button p 20 Jack cover pp 24 65 66 Cassette compartment door p 12 Cassette compartment door release p 12 connection jack p 71 DV terminal p 67 Hand strap p 17 EarPHON ESjack p 23 Jack cover pp 23 67 71 _ Speaker p 23 ...

Page 19: ...t recorded scene after playback See page 36 Quick Return To record yourself in the scene while monitoring the shot See page 42 Letting the Subject Monitor the Shot To focus on an off centered subject See page 47 Manual Focus To turn off the confirmation sounds which are made when you operate the camcorder See page 56 Setting the Confirmation Sounds To enlarge any part of the picture during playbac...

Page 20: ... 28 t Jil LIGHT _I AUro _ _ 12 bit p 22 p 31 pp 34 35 Jl_ 30iin sP p 30 p 22 F TAPE VCR mode 3 A_ sP p 30 t i Easy mode p 28 1 p 37 p 36 p 39 p 40 p 56 p 56 p 16 p p p p p p p p p p p p p p p p p p p p p p 47 49 51 53 54 37 36 31 39 40 32 3O 38 31 55 56 43 56 46 46 93 14 64 p 16 pp 15 57 p 59 p 15 p 16 Jj p 69 p 70 p 63 p 62 p 61 p 43 p 56 p 46 p 46 p 64 p 16 J ...

Page 21: ...p 22 ORMAL p 75 p 74 101901 Easy mode p 28 i p 75 p 56 p 16 _ CARD VCR mode I p 78 p_ Note See pages 26 to 29 for the procedure to display the desired screen 47 49 51 53 54 76 p 31 75 40 p 32 43 77 56 93 p 14 64 16 15 57 59 15 16 79 63 8O 81 82 83 43 56 64 16 J J 6 ...

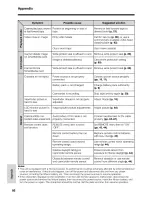
Page 22: ...Replace it with a CASSETTE TAPE END new cassette see page 12 BATT ERY I S The battery is almost depleted Replace it with a TOO LOW fully charged battery pack see page 10 Dew has formed inside the camcorder Wait for a few hours until the dew disappears see DEW bI_VV page 91 _ _ About 10 seconds after this warning appears the camcorder automatically turns off _4_ The video heads are clogged and shou...

Page 23: ... Format the card to use it with this camcorder see page 77 FORMAT The SmartMedia card has not been formatted with this camcorder MEMORY CARD Format the card see page 77 MEMORY CARD A SmartMedia card with a write protect seal is inserted Remove the PROTECTED write protect seal to record images on the card see page 89 DATA You are trying to delete a protected image Cancel the protection P ROT ECT E ...

Page 24: ...30 C The battery pack may not charge properly at temperatures too low or too high The battery pack and charger become warm during charging This is not a malfunction Using the zoom see page 21 and other functions or turning the power on and off frequently will increase power consumption This may result in a decrease of more than 50 in the actual recording time compared to the maximum continuous rec...

Page 25: ... the mark on the camcorder _ and slide the battery pack down completely until it locks into place _ Cautions BEFORE REMOVINGTHE BATTERY PACK ALWAYS STOP RECORDING OR PLAYBACK AND TURN THE POWER OFF Removing the battery pack while shooting or during playback may damage the tape by causing it to wrap around the video head drum or may destroy the SmartMedia card rendering it unreadable and unwritable...

Page 26: ...rd to the AC adapter and insert the AC plug into a power outlet The POWER indicator on the AC adapter lights up and the camcorder is supplied power DC OUT jack POWER indicator To power outlet Note When the AC adapter battery charger is used to power the camcorder it cannot be used to charge the battery pack Removing the DC cable from the camcorder Perform steps 1 and 2 above Press the power source...

Page 27: ...dow facing outwards and with the erasure protect tab facing upwards Erasure protect tab Removing a Cassette Perform step 1 above then take out the cassette Cautions Do not try to close the cassette compartment door while the cassette holder is extending or retracting Be careful not to get your fingers caught in the cassette holder Do not apply force to the cassette holder except when pressing the ...

Page 28: ...erform steps 1 and 2 above Lift up the battery using a pointed object and take it out Note Replace the battery with a new CR2025 lithium battery when the time indicator of the camcorder starts to fall behind the correct time Notes on the Use of the Lithium battery REPLACE BATTERYWITH TOSHIBA MATSUSHITA OR HITACHI MAXELL TYPE CR2025 ONLY USE OF A DIFFERENT BATTERY MAY PRESENT A RISK OF FIRE OR EXPL...

Page 29: ...nd open the LCD monitor LCD monitor OPEN release button 2 Hold down the Lock button and set the Power switch to CAMERA The language selection screen appears on the LCD screen Lock button 3 Press or _ H _ on the operation button to select the desired language then press _ _ l SET _ BUTTONI Changing the Language 1 Set the camcorder toTAPE CAMERA or CARD CAMERA mode 2 3 Press the MENU DISPLAY button ...

Page 30: ...ing the procedure on page 59 MENU DISPLAY button Powerswitch Operation button 1 Press the LCD monitor OPEN release button _ and open the LCD monitor LCD monitor OPEN release button 2 Hold down the Lock button and set the Power switch to CAMERA Lock button 3 Press the MENU DISPLAY button until the menu screen appears 4 Press _ _ on the Operation button 5 Press or _ ii _ until 20 NEW YORK appears th...

Page 31: ...s Select _ then press _ _ on the Operation button Select DISPLAY _ then press _ _2_ iiiiii iiii i il i i _ii 2 Press or _ in to select 24H and then press _ 3 Press the MENU DISPLAY button to turn off the menu screen Notes The date and time once set are internally recorded even when not displayed on the screen The menu screen automatically turns off if no settings are made within 5 minutes 4 Press ...

Page 32: ...r removing the lens cap press both tabs on the top and bottom of the cap When recording hang the hook of the lens cap on the hand strap so that the cap will not get in the way Note Always replace the lens cap on the lens when the camcorder is not in use Hook Attaching the Shoulder Strap 1 2 3 Remove the battery pack Hold one end of the strap and thread it through the loop on the left side of the p...

Page 33: ...up the camcorder by the viewfinder Notes The viewfinder automatically turns off when the LCD monitor is opened When the vertical rotation of the monitor is between 135 and 180 however the viewfinder is on and the subject is displayed both in the viewfinder and on the monitor see page 42 Be sure to close the viewfinder after use Adjusting the Diopter Adjust the diopter according to your eyesight wh...

Page 34: ...hen the LCD monitor is open Use the viewfinder instead of the LCD monitor when you want to save battery power Use the viewfinder if the LCD screen becomes difficult to see in bright daylight Closing the LCD monitor Return the LCD monitor to the vertical 90 position with the screen facing in and fold it into the camcorder until it clicks into place Cautions Do not use excessive force when moving th...

Page 35: ...t the Power switch to OFF without pressing the Lock button Notes Battery power is consumed in Recording Standby mode Turn off the power if you will not be recording again soon If the camcorder remains in Recording Standby mode for more than 5 minutes in TAPE CAMERA mode the power will automatically turn off to save battery power and to protect the tape from being damaged To resume recording set th...

Page 36: ...oom out until it is able to focus on the subject See page 43 for recording macro shots See page 32 for use of the digital zoom Tips on Recording Positions To create images that are easy to watch during playback try to record with a stable posture while steadying your camcorder to prevent the image from shaking Holding the camcorder Put your right hand through the hand strap and place your left han...

Page 37: ...w cassette THE TAPE ENDS SOON 41 Less than 1 min CHANGE THE CASSE TTE The tape has reached 41 the end TAPE END Remaining Battery Power Display When using the camcorder with the battery pack as the power source you can turn on and off the remaining battery power indicator by pressing the MENU DISPLAY button If the battery power becomes very low a warning indicator will appear Replace the battery pa...

Page 38: ... to OFF without pressing the Lock button Notes The tape is automatically rewound when playback reaches the end of the tape Stereo earphones with a 3 5 mm diameter plug can be plugged directly into the PHONES jack When you use this jack the speaker automati cally turns off Watching the Playback in the Viewfinder You can also watch the playback in the viewfinder by closing the LCD monitor with the s...

Page 39: ...and VCR Set the Power switch on the camcorder to VCR and begin playback see page 23 Caution Make sure that the camcorder TV VCR and other equipment to be connected have been turned off before you make connections Making connections with any of the components left turned on may cause picture noise or malfunc tion Notes If your TV or VCR has only one audio input jack use the white plug for the audio...

Page 40: ...st forwards or reverses AUDIO1 2 During playback in TAPE VCR mode press ii on the Operation button AUDI01 2 II 2 When you find the desired scene press _ ii to return to normal playback Notes The sound is off during search Some picture noise appears during search This is not a malfunction To return to normal playback press _ ii again Notes The sound is off in Still mode To protect the tape the camc...

Page 41: ...ck button CARD CAMERA mode For recording still images on SmartMedia TAPE VCR mode For playing back or editing motion and still images recorded on tapes 1 Set the Media Selection switch to TAPE 2 Hold down the Lock button and set the Power switch to VCR Lock button CARD VCR mode For playing back still images recorded on cards 1 Set the Media Selection switch to CARD 2 Hold down the Lock button and ...

Page 42: ...er I1_ switch to OFF without pressing the Lock button MENU DISPLAY button The MENU DISPLAY button is used to ME U_ DISPLAY turn the on screen indicators and the menu screens on or off Each time you press the MENU DISPLAY button the on screen display changes as shown J below Indicators off Menu screen Indicators on Example o 30rain SP Note The warning indicators and some other indicators cannot be ...

Page 43: ...AUTO ON OFF button 1 Set the Media Selection switch to TAPE or CARD 2 Hold down the Lock button and set the Power switch to CAMERA The user mode indicator is displayed User mode indicator Lock button Press the AUTO ON OFF button Each time you press the AUTO ON OFF button the user mode changes between Auto mode and Manual mode To select Easy mode hold down the AUTO ON OFF button for more than two s...

Page 44: ..._ on the Operation button to select the desired menu screen then press I_ _ Example 5 Press or _ H _ to select the desired menu item then press _ _ Example 6 Press or _ H _ to select the desired menu setting then press I To adjust another menu item press _ then perform steps 4 to 6 Example To turn off the menu screen Pressthe MENU DISPLAYbutton Notes Certain menu items are common among Camcorder m...

Page 45: ...de indicator I_ 45min To return to SP mode Select SP in step 4 above Notes on the use of LP mode To record in LP mode be sure to use a Mini DV cassette labeled for use with LP mode Frozen images mosaic pattern picture noise audio interruptions or audio loss may occur in the following cases When using a tape which is not designated for use with LP mode When a tape recorded in LP mode under high tem...

Page 46: ... 12bit in step 4 above Note When using Audio Dubbing with 16 bit audio recordings both the dubbed and original sounds will be recorded in mono see page 68 Digital Image Stabilization DIS The digital image stabilization DIS function is factory preset to on to stabilize the image by electronically compensating for relatively minor image shaking that is often annoying in close up shots AUTO DIS indic...

Page 47: ...he image is enlarged digitally the picture quality decreases when higher digital zoom settings are used 1 Set the camcorder toTAPE CAMERA or CARD CAMERA mode 2 Press the MENU DISPLAY button until the menu screen appears 4 5 Press or _ ii to select 50 100 or 780 then press _ Press the MENU DISPLAY button to turn off the menu screen The D digital zoom indicator is displayed during digital zooming Di...

Page 48: ...button To obtain a brighter picture Press the GAMMA BRIGHTER button again The indicator appears m BRIGHTER _i iiii_ iiii iiiii_ iiiiiiii iii_i iii i iii iiiiiiiii i_i ii ii i i i i i In TAPE CAMERA or CARD CAMERA mode press the GAMMA BRIGHTER button once GAMMA appears indicating that Gamma Brightness Compensation is now working Iilmlll BRIGHTER 41 Note When the indicator is displayed the backgroun...

Page 49: ...ears Illfll BRIGHTER GAMMA AUTO In TAPE CAMERA or CARD CAMERA mode press the GAMMA BRIGHTER button once GAMMA appears indicating that the gain up function is now working Illfll BRIGHTER To cancel the gain up function Press the GAMMA BRIGHTER button until GAMMA disappears Notes Some picture noise appears in Gain up mode The picture noise increases when the x _ indicator is displayed When the _ indi...

Page 50: ... a brighter picture Press the IR LIGHT button SUPER CAT S EYE changes to IR LIGHT and the camcorder emits infrared light from the transmitter The picture becomes monochrome W B To cancel Night Recording Setthe SUPERCAT SEYEswitch to OFF Notes The picture will turn white if you use Night Recording in a bright location The camcorder may not be able to focus correctly when using Night Recording In su...

Page 51: ...edit search on the Operation button 4 5 Press or _ in to select START then press _ SEARCH flashes and the tape begins fast forwarding or rewinding to the end of the last recorded scene When the tape reaches the end of the last recorded scene FINISHED is displayed and the camcorder enters Recording Standby mode Press the MENU DISPLAY button to turn off the menu screen Notes To cancel the quick retu...

Page 52: ...iiiii i_i iifii ili i_iii i Press the MENU DISPLAY button until the menu screen appears Select a then press _ _ on the Operation button Select FADE _ then press _ _ 4 Press or _ 1 to select ON then press _ 5 Press the MENU DISPLAY button to turn off the menu screen FADE is displayed FADE indicator Using Fade Mode 1 Press the REC START STOP button to begin recording The picture turns white and the ...

Page 53: ... bands to produce an effective screen aspect ratio of 16 9 Normal screen Wide screen 1 Set the camcorder toTAPE CAMERA mode 2 3 Press the MENU DISPLAY button until the menu screen appears Select I_ then press _ _ on the Operation button Select 16 9 _ then press _ _ 4 Press or _ 11 to select ON then press I 5 Press the MENU DISPLAY button to turn off the menu screen The picture is displayed with th...

Page 54: ...P then press _ _ _ 6 Press or _ ll to select the desired still recording mode then press I Press the MENU DISPLAY button to turn off the menu screen Using Still Recording 1 Set the camcorderto TAPE CAMERA mode 2 In Recording Standby mode press the STILL button A still image of the subject is displayed 3 Press the REC START STOP button The still image of the subject will be recorded In SNAP mode th...

Page 55: ...till recording effect to select PHOTO SHOT 9 FRAMES or 16 FRAMES 2 In Recording Standby mode press the STILL button In TAPE CAMERA mode a still image of the subject is displayed with the selected effect Perform step 3 In CARD CAMERA mode the still image of the subject will be recorded with the selected effect Omit step 3 3 Press the REC START STOP button The still image of the subject will be reco...

Page 56: ...e Note Pressing I_ 11 _ or I I while the inset image is frozen cancels the still image Press the REC START STOP button The still image of the subject will be recorded In CARD CAMERA mode press the STILL button instead of the REC START STOP button To pause recording on tape Pressthe RECSTART STOPbutton To turn off the inset image Pressthe MENU DISPLAYbutton To cancel still recording effects Select ...

Page 57: ... displayed on the LCD monitor Open the LCD monitor to a 90 angle to the camcorder body _ and then rotate it 180 vertically _ 3 Set the Media Selection switch to TAPE or CARD and begin recording Caution Do not invert the image by rotating the monitor during recording Notes The screen image is automatically inverted when the vertical rotation of the monitor is between 135 and 180 When the monitor is...

Page 58: ...by pushing the Power Zoom control to the W side and then move the camcorder closer to the subject until you obtain the desired angle of view The camcorder will automatically focus on the subject when the lens is set for the widest angle Power Zoom control Tri Using the Remote Control Use the supplied remote control to operate the camcorder from a distance such as when you want to record yourself i...

Page 59: ... button pp 23 78 CARD REC button p 74 TAPE REC START STOP button p 20 W T buttons pp 21 60 buttons p 23 PLAY button pp 23 78 button pp 23 78 pp 23 78 SLOW button p 45 Shift buttons p 60 Advance reverse buttons p 45 PAUSE STILL button pp 25 45 Notes Be careful not to allow direct sunlight or bright light from interior illumination to fall onto the remote sensor as this may prevent the remote contro...

Page 60: ...ion allows you to play back images in slow motion During playback in TAPE VCR SLOW mode press the SLOW button i 2 Press the I1 or 11 button Each time you press the _ _ _ button the picture advances one frame forward or backward To return to normal playback press the PLAY button _ Notes The sound is off during reverse slow and frame advance playback If you use the slow or frame advance function wit...

Page 61: ...amera recording in TAPE modes press the MENU DISPLAY button until the menu screen appears Select I TC then press _ on the Operation button Select TIME CODE _ then press _ _ 4 Press the MENU DISPLAY button to turn off the menu screen The time code appears MENU DISPLAY Time code To turn off the time code Select DISP OFF in step 3 above Note When the tape reaches an unrecorded section the time code r...

Page 62: ... bright Subject is being shot through a dirty or wet window Two su_ts at different distances overlap inthe same scene Subjects at different distances appear in the center of the scene at the same time 1 2 3 4 Set the camcorder to TAPE CAMERA or CARD CAMERA mode Press the AUTO ON OFF button to select Manual mode Press the MENU DISPLAY button until the menu screen appears Select a then press m _ on ...

Page 63: ...oximately 6 feet 1 8 m Set the zoom control to wide angle and then try refocusing If the lens is dirty or fogged the camcorder may not be able to correctly focus When MF is displayed you can manually adjust the focus by pressing or ii even if the focus setting screen is not displayed When you want to cancel all manual settings and return to Auto mode press the AUTO ON OFF button 9 Press the MENU D...

Page 64: ... Select a then press m _ on the Operation button Select SHUT SPEED _ then press _ _ 6 Press or _ nl _ to select the desired shutter speed then press The selected shutter speed is displayed on the menu screen i MANUAL 1 2 bit SHUT SPEED 10000 v 2000 AUTO sP SET BUTTON 5 Press _ to display the shutter speed setting screen i MANUAL 12 bit SHUT SPEED 10000 I v AUTO AUTO sP SET BUTTON Press the MENU DI...

Page 65: ... you use a fast shutter speed Using a fast shutter speed under fluorescent lighting will cause flickering in the picture and possibly periodic color shifts The manual shutter speed setting will be canceled if a scene setting is selected thereafter The manual shutter speed setting cannot be used with Night Recording When you want to cancel all manual settings and return to Auto mode press the AUTO ...

Page 66: ...l mode Press the MENU DISPLAY button until the menu screen appears Select a then press m _ on the Operation button Select EXPOSURE _ then press _ _ 5 6 Press I to display the exposure setting screen MANUAL 12bit EXPOSURE 5 V O 5 SP SET 4 BUTTON Press or _ i to select the desired exposure level The number shown is the selected exposure level The adjustment range is from 5 least light to 5 most ligh...

Page 67: ...e press the MENU DISPLAY button while W B LOCK flashes MENU DISPLAY MANUAL Press the W B button to turn off the white balance lock screen W B LOCK is displayed i MANUAL W B LOCK I_ 30min SP 12 bit 1 2 3 Set the camcorder to TAPE CAMERA or CARD CAMERA mode Press the W B button to display the white balance lock screen W B AUTO SET MENU DISPLAY Aim the lens at a white object Adjust the distance of th...

Page 68: ...cks and whites of the image are reversed and colors of the image are inverted 1 Set the camcorder toTAPE CAMERA or CARD CAMERA mode 2 Press the MENU DISPLAY button until the menu screen appears 4 5 Press or m I to select the desired digital picture effect then press _ The selected digital picture effect is displayed on the menu screen Press the MENU DISPLAY button to turn off the menu screen To ca...

Page 69: ...TY When the illumination is from a spotlight or candles 1 Set the camcorder toTAPE CAMERA or CARD CAMERA mode 2 Press the MENU DISPLAY button until the menu screen appears MENU DISPLAY Q 3 Select a then press m _ on the Operation button Select SCENE MENU _ then press _ _ 4 Press or _ ml to select the scene setting that best fits the recording situation then press _ The selected scene setting is di...

Page 70: ...magnification increases the sounds from the zoom microphone and built in microphone are mixed according to the zoom setting TELE The zoom microphone is fixed to record sounds at a distance The built in micro phone is turned off OFF The zoom microphone is turned off The built in microphone is on 1 2 3 4 Mount the zoom microphone to the camcorder Set the camcorder to TAPE CAMERA mode Press the MENU ...

Page 71: ...yed back Setting the Confirmation Sounds A confirmation sound is made when you turn on or off the Power switch press the REC START STOP button or perform other desig nated operations Use the procedure below to change the type of sound or to turn off the confirmation sounds altogether Type of Confirmation Sound Settings CHIME A chiming sound is made BEEP An electronic beeping sound is made OFF No c...

Page 72: ...ng the clock from New York time to Los Angeles time 1 Set the camcorder toTAPE CAMERA or CARD CAMERA mode AUTO JUN 2 2002 I_ 30min SP 10 30AM 2 Press the MENU DISPLAY button until the menu screen appears 3 4 5 Select _ then press _ _ on the Operation button Select AREA _ then press _ _ Press or _ li _ to select 17 L A then press _ _ The camcorder is now set to Los Angeles time Press the MENU DISPL...

Page 73: ... Singapore Taiwan 10 TOKYO Japan Korea 11 SYDNEY Australia Sydney 12 SOLOMON New Caledonia 13 WLLNGTN Fiji New Zealand 14 SAMOA Western Samoa 15 HAWAII Hawaii Is Tahiti HST Hawaii Standard Time 16 ANCHRGE U S A Alaska AST Alaska Standard Time 17 L A U S A Los Angeles San Francisco PST Pacific Standard Time 18 DENVER U S A Denver MST Mountain Standard Time 19 CHICAGO Mexico Mexico City U S A Chicag...

Page 74: ...AY button to turn off the menu screen The _ indicator appears when the date time is displayed MENU l 2002 DISPLAY I_ 30min SP 11 30AM Daylight saving time indicator To reset to standard time Select OFF in step 4 above 2 Press the MENU DISPLAY button until the menu screen appears MENU _ PLAY 3 Select CE then press _ _ on the Operation button Select DYLT SAVE _ then press _ _ O 4 Press or _ ii to se...

Page 75: ...ack Zoom Press the ZOOM W button to zoom out to the widest angle Notes Use of Playback Zoom may cause a reduction in picture quality for still images Images in Playback Zoom mode cannot be transferred via DV or PC connect cable to a personal computer The example screens for this feature are for TAPE VCR mode During playback in TAPE VCR or CARD VCR mode press the ZOOM T button to zoom in 2 Press th...

Page 76: ...ENU DISPLAY button until the menu screen appears Select r_ 7 then press _ _ on the Operation button Select MULTI FRAME _ then press _ _ m BRIGHII_R To obtain a brighter picture press the GAMMA BRIGHTER button again GAMMA2 appears m BRIGH _R To cancel Gamma Playback Press the GAMMA BRIGHTER button until GAMMA1 and GAMMA2 disappear Note Gamma Playback has no effect during still playback 3 Press or _...

Page 77: ...een 4 Press the MENU DISPLAY button to turn off the menu screen 5 Rewind or fast forward the tape to just before the position where you want to use the playback effect and then begin playback The still image is replaced with the next image with the selected playback effect To cancel the playback effect Select OFF instep 3 above Preparation Plan the scene transition and record still images with the...

Page 78: ...ted Available only in TAPE VCR mode The example screens for this feature are for TAPE VCR mode 1 During playback in TAPE VCR or CARD VCR mode press the MENU DISPLAY button until the menu screen appears 2 Select r_ 7 then press _ _ on the Operation button Select PIC EFFECT _ then press _ _2_ To cancel Picture Effect Playback Select OFF instep 3 above Notes Images in Picture Effect Playback mode can...

Page 79: ...ase qH_ Increase __lllID_D Red4 _ Green Darker4H_ Brighter Note Close the LCD monitor to turn on the viewfinder when adjusting the VF BRIGHT Press _ then press the MENU DISPLAY button to turn off the menu screen 3 Press or _ i to select AUTO NORMAU or BRIGHT then press _ il I I I I 4 AUTO The camcorder automatically switches between NORMAL and BRIGHT depending on the ambient lighting This mode is ...

Page 80: ...n press the Record button on the VCR to begin recording Press the Pause Still button on the VCR to pause recording when the source l _ _ tape reaches the beginning of the S video cable commercially available sequence to be cut 5 Press the Pause Still or Record button To S VIDEO socket on the VCR to resume recording when _ the source tape reaches the end of the _o sequence to be cut To stop editing...

Page 81: ...tape If the source equipment has an S video input socket you can use a commercially available S video cable for the video connection The yellow video plug does not need to be connected to the VCR To Record from an External Source 1 Set the camcorder to TAPE VCR mode 2 3 4 Begin playback on the source equipment connected to the camcorder Check the camcorder screen to see if the picture is being pro...

Page 82: ... camcorder The camcorder enters the Recording Standby mode Press _ l on the Operation button to begin recording To stop recording Press on the Operation button Cutting Unwanted Sequences 1 Press _ in to pause recording when the source tape reaches the beginning of the sequence to be cut 2 Press _ in to resume recording when the source tape reaches the end of the sequence to be cut Notes Make sure ...

Page 83: ... and right sound Audio 2 No audio 16 bit audio recording The audio is recorded in stereo with the left and right sound on two separate channels Audio 1 Left sound Audio 2 Right sound In Audio Dubbing mode 12 bit audio recording The dubbed audio is recorded on Audio 2 Audio 1 Original stereo left and right sound Audio 2 Dubbed stereo left and right sound 16 bit audio recording The dubbed audio is r...

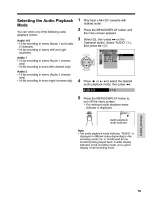
Page 84: ...ppears If you wish to change the dubbed audio or dub additional scenes 1 Press the MENU DISPLAY button to turn off the audio dubbing screen 2 Repeat steps 1 to 5 above Notes Audio dubbing cannot be used with record ings made in LP mode It is recommended that you use Audio Dubbing only with recordings made with this camcorder Use of recordings made with other digital video equipment may result in p...

Page 85: ...dubbed audio Press the MENU DISPLAY button until the menu screen appears Select r_ 7 then press _ _ on the Operation button Select AUDIO _ then press _ _2_ 4 Press or _ l to select the desired audio playback mode then press _ 5 Press the MENU DISPLAY button to turn off the menu screen The selected audio playback mode indicator is displayed MENU DISPLAY UDIO_ 2 Audio playback mode indicator Note Th...

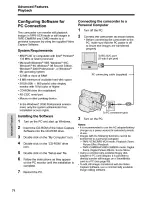
Page 86: ...Double click on the My Computer icon 4 Double click on the CD ROM drive icon 5 Double click on the Setup exe file 6 Followthe instructions as they appear on the PC monitor until the installation is complete Restart the PC Connecting the camcorder to a Personal Computer 1 Turn off the PC 2 Connect the camcorder as shown below Before connecting the camcorder to the PC make sure that the PC power is ...

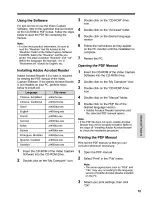
Page 87: ...ar405swe exe 1 Insert the CD ROM of the Video Capture Software into the CD ROM drive 2 Double click on the My Computer icon 3 Double click on the CD ROM drive icon 4 Double click on the Acroread folder 5 Double click on the desired language version 6 Followthe instructions as they appear on the PC monitor until the installation is complete Restart the PC Opening the PDF Manual 1 Insert the CD ROM ...

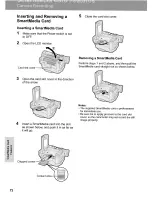
Page 88: ...ction of the arrow 4 Insert a SmartMedia card into the slot as shown below and push it in as far as it will go Removing a SmartMedia Card Perform steps 1 and 2 above and then pull the SmartMedia card straight out as shown below Notes The supplied SmartMedia card is preformatted for immediate use Be sure not to apply pressure to the card slot cover as the camcorder may not record the still image pr...

Page 89: ...hen recording completes AUTO Z_c _A r_D_t I0190 Notes Recording under insufficient lighting may result in blurred images It is recommended that you use a tripod to record insufficiently illuminated subjects Recording under the light of a fluorescent mercury or sodium lamp may cause flickering in the image and depending on the timing of the shot may result in changes to color hue in the image Cauti...

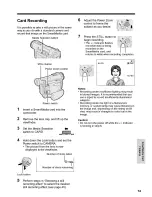
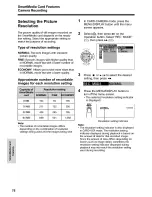
Page 90: ...able images differs depending on the combination of resolution settings being used and the images being shot 2 In CARD CAMERA mode press the MENU DISPLAY button until the menu screen appears Select I_ then press _ on the Operation button Select REC MODE _ then press _ _ 3 Press or _ ii to select the desired setting then press _ _a_J _i_ _ 4 Press the MENU DISPLAY button to turn off the menu screen...

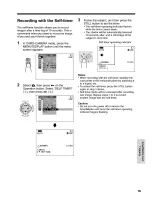
Page 91: ... flashes while the timer counts down The shutter will be automatically released 10 seconds after and a still image of the subject is recorded Self timer operating indicator i AUTO _ NORMAL CANCEL STILL I CARD 10 90 Notes When recording with the self timer stabilize the camcorder in the horizontal plane by attaching it to a tripod etc To cancel the self timer press the STILL button again in step 3 ...

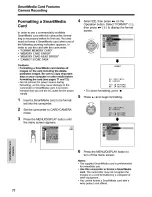
Page 92: ...ormatting as this may cause damage to the camcorder or SmartMedia card It is recom mended that you use the AC outlet for the power supply 1 Insert a SmartMedia card to be format ted into the camcorder 2 Set the camcorder to CARD CAMERA mode 3 Press the MENU DISPLAY button until the menu screen appears CARD MENU DISPLAY 4 SelectETC then press _ _ on the Operation button Select FORMAT _ then press _...

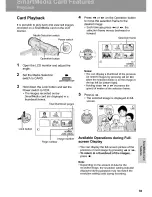
Page 93: ... you press _ or _ the selection frame moves backward or forward Selection frame 1 2 NORMAL 100 0003 Notes You can display a thumbnail of the previous or next 6 images by pressing _ or _ _ when the selection frame is on the image at the top left or bottom right Holding down i or _ increases the speed of motion of the selection frame 5 Press I II The selected image is displayed in full screen Availa...

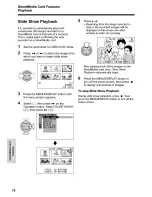
Page 94: ...menu screen appears Select _ then press m _ on the Operation button Select SLIDE SHOW _ then press I _ _ 5 Press _ ii Beginning from the image selected in step 2 the recorded images will be displayed in full screen one after another in order of recording 6 After playing back all the images on the SmartMedia card once Slide Show Playback automatically stops Press the MENU DISPLAY button to turn off...

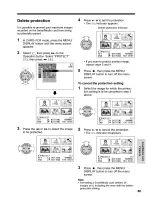
Page 95: ...en press the MENU DISPLAY button to turn off the menu screen To cancel the protection setting 1 Select the image for which the protec tion setting is to be canceled in step 3 above _ IPROTECT 1 2 SET BUTTON NORMAL END V BUTTON 100 0006 _PROTECT 1 2 SET BUTTON NORMAL END v BUTTON 100 0004 3 Press the _ or _ _ to select the image to be protected 2 Press _ ll to cancel the protection The _ indicator ...

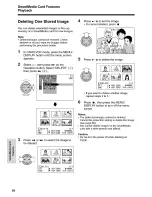
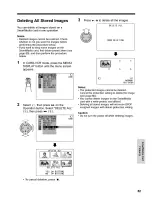
Page 96: ...BUTTON NORMAL END v BUTTON 100 0006 Press _ or _ _ to select the image to be deleted _TDELETE 1 2 SET BUTTON NORMAL END v BUTTON 100 0003 4 Press ll to set the image Tocancel deletion press 5 Press _ ll to delete the image _DELETE 1 2 SET A BUTTON NORMAL END v BUTTON 100 0003 6 If you want to delete another image repeat steps 3 to 5 Press then press the MENU DISPLAY button to turn off the menu scr...

Page 97: ...s _q CARD MENU E_SPLAY 2 Select _ then press _ _ on the Operation button Select DELETE ALl_ _ then press _ _2_ D CARD 3 Press _ ll to delete all the images DELETE ALL NOW DELETING 2 3 5 6 _q 1 1 NORMAL 100 0004 Notes The protected images cannot be deleted Cancel the protection setting to delete the image see page 80 You cannot delete images on the SmartMedia card with a write protect seal affixed ...

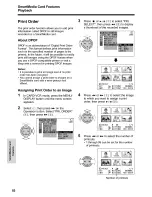
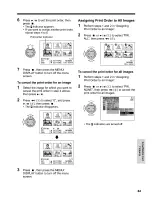
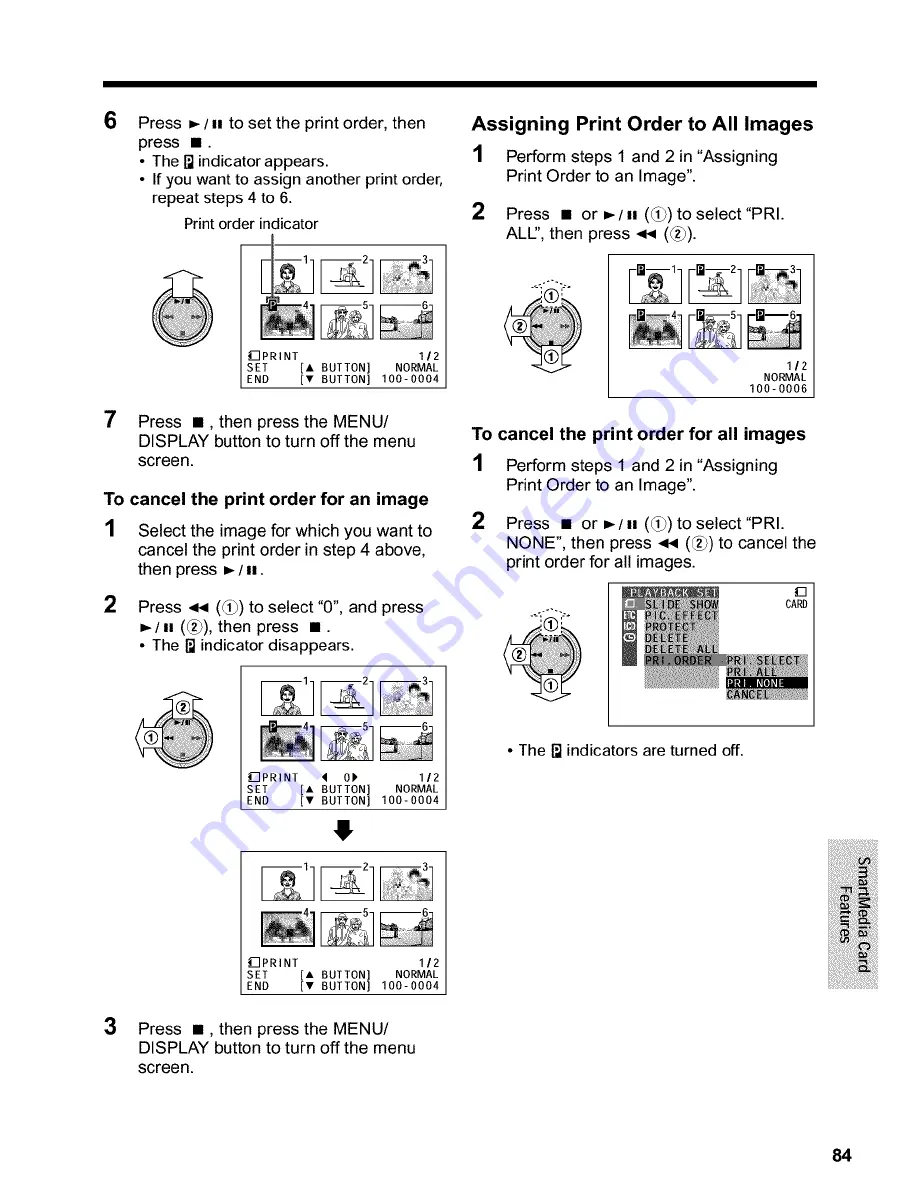
Page 98: ...n assigned You cannot assign a print order to images on a SmartMedia card with a write protect seal affixed Assigning Print Order to an Image 1 In CARD VCR mode press the MENU DISPLAY button until the menu screen appears 2 Select _ then press _ on the Operation button Select PRI ORDER _ then press _ _ CARD 3 4 5 Press or _ H _ to select PRl SELECT then press _ _ to display a thumbnail of the recor...

Page 99: ...ss _ H _2_ then press The _ indicator disappears __ _3 O PRINT _ 0P 1 2 SET A BUTTON NORMAL END V BUTTON 100 0004 1_ _3 Assigning Print Order to All Images 1 Perform steps 1 and 2 in Assigning Print Order to an Image 2 Press or _ ll _ toselect PRl ALU then press _ _ 112 NORMAL 100 0006 To cancel the print order for all images 1 Perform steps 1 and 2 in Assigning Print Order to an Image 2 Press or ...

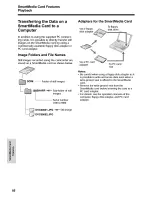
Page 100: ...er of still images L _ 100SHARP _ Sub folder of still images ___ _100aIt n 999_e r D DVC00001 JPG _ Still image L_ D DVC00002 JPG Adapters for the SmartMedia Card To floppy Via a floppy _ disk drive disk adapter Via a adapter To PC card slot Notes Be careful when using a floppy disk adapter as it is possible to write and erase data even when a write protect seal is affixed to the SmartMedia card R...

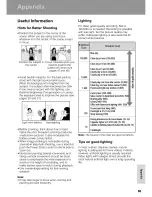
Page 101: ...er Zoom control to the W side to zoom out Horizontal panning lateral movement and tilting vertical movement should be done slowly to emphasize the wide expanse of a scene or the height of a building and to make scenes easy to watch during playback Use a wide angle setting for fast moving subjects Note It may take longer to focus when zooming and panning are used frequently Blue sky A 100 000 Clear...

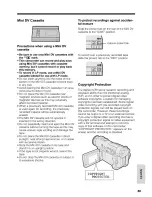
Page 102: ...erence for Standardization of Consumer Use Digital VCR Formats This product incorporates copyright protec tion technology that is protected by method claims of certain U S patents and other intellectual property rights owned by Macrovision Corporation and other rights owners Use of this copyright protection technology must be authorized by Macrovision Corporation and is intended for home and other...

Page 103: ...ject the Mini DV cassette without running the tape as this may cause uneven tape winding and damage the tape Do not place the Mini DV cassette in direct sunlight near strong heat sources or in areas with excessive steam Store the Mini DV cassette in its case and stand it in an upright position If the tape is not properly wound rewind the tape Do not drop the Mini DV cassette or subject it to exces...

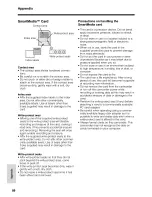
Page 104: ...ith a soft dry cloth Do not reuse a write protect seal once it has been affixed and removed Precautions on handling the SmartMedia card The card is a precision device Do not bend apply excessive pressure subject to shock or drop Do not store or use in a location subject to a strong electromagnetic field or electronic noise When not in use store the card in the supplied protective case to prevent d...

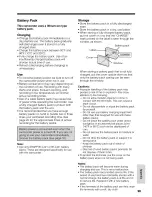
Page 105: ...a fully charged battery pack put the cover on it so that the CHARGE mark printed on the label is seen through the window as shown Battery pack When storing a battery pack that is not fully charged put the cover upside down so that only the battery pack casing can be seen through the window Cautions Improper handling of the battery pack may present a risk of fire or explosion Pay close attention to...

Page 106: ...oving the camcorder from a cold place to a warm place When placing the camcorder in a cold room which is then heated rapidly When moving the camcorder outdoors from an air conditioned room When placing the camcorder in the direct path of air blowing from _ _ _ _ _ an air conditioner When placing the camcorder in a humid room How to prevent trouble due to dew formation When using the camcorder in a...

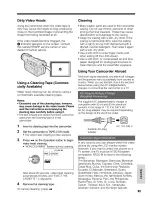
Page 107: ...ing with a soft dry cloth If the casing is particularly dirty wipe the casing with a tightly wrung cloth dampened with a diluted neutral detergent Then wipe it again with a soft dry cloth Use a soft cloth to wipe finger marks and other soiling off the LCD screen Use a soft cloth or compressed air and lens paper designed for photographic lenses to clean the lens and the viewfinder eyepiece Using Yo...

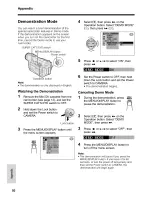
Page 108: ..._ _ on the Operation button Select DEMO MODE _ then press _ _ O Press or _ i to select ON then press _ Set the Power switch to OFF then hold down the Lock button and set the Power switch to CAMERA The demonstration begins Canceling Demo Mode 1 During the demonstration press _E Uv DISPLAY the MENU DISPLAY button to _ pause the demonstration 2 Select I_TC then press _ _ on the Operation button Selec...

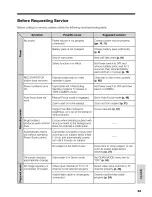
Page 109: ...lfunction Camcorder is unable to focus when zooming in on subject within 6 feet 1 8 m and automatically zooms out until it focuses on subject No subject in the field of view On screen displays Camcorder is in Demo mode automatically change No image appears on connected TV screen Video input channel on TV or TV channel is not selected properly Audio video cable is not properly connected Charge batt...

Page 110: ... 92 Use a new cassette Remove write protect seal p 89 Cancel the protection setting p 80 Remove write protect seal p 89 Connect power source properly pp 10 11 Charge battery pack sufficiently p 9 Stop tape and try again p 20 Adjust diopter p 18 Adjust picture p 64 Connect audio video or DV cable properly pp 65 67 Set REMOTE menu item to ON pp 43 44 Replace remote control batteries with new ones p ...

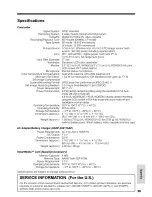
Page 111: ... 3 3 V type SmartMedia wM card SSFDC DC 7 4V 4 0 W during camera recording using the viewfinder in Full Auto mode with zoom motor off 4 8 W VL WD450U 5 1 W VL WD650U during camera recording using the LCD monitor in Full Auto mode with zoom motor off and backlight in normal mode 32 F to 104 F 0 C to 40 C 30 to 80 4 F to 140 F 20 C to 60 C 3 Ad W x 421 32 H x 7 11 32 D 93 7 mm W x 118 mm H x 186 5 m...

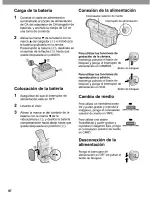
Page 112: ... abajo hasta que quede bloqueada en posici6n _ Conexibn de la alimentacibn Conmutador selector de madio nterruptor de alimentaciOn i Para utilizar las funciones de grabacibn de la c_mara rnantenga pulsado el bot6n de bloqueo y ponga el interruptor de alimentaci6n en CAMERA Bot6n de bloqueo Para utilizar las funciones de reproduccibn y edicibn rnantenga pulsado el bot6n de bloqueo y ponga el interr...

Page 113: ... hasta que el portavideocasete encaje en posici6n produciendo un chasquido Cierre la puerta del compartimento pulsando sobre el centro hasta que quede cerrada produciendo un chasquido Marca mmmr_ Insercibn de una tarjeta SmartMedia 1 AsegQrese de que el interruptor de alimentaci6n est6 en OFF 2 Abra el monitor LCD 3 4 Cubierta de la ranura de la tarjeta Abra la cubierta de la ranura de la tarjeta ...

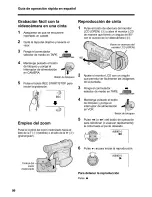
Page 114: ...a W _ granangular Reproduccibn de cinta Pulse el bot6n de abertura del monitor LCD OPEN _ y abra el monitor LCD de manera que forme un ngulo de 90 con el cuerpo de la videoc mara _ Bot0n de abertura del monitor LCD OPEN 9d 2 3 4 5 Ajuste el monitor LCD con un ngulo que permita ver f cilmente las im genes de la pantalla Ponga el conmutador selector de medio en TAPE _ r_TApE Mantenga pulsado el bot6...

Page 115: ...se el bot6n de abertura del monitor LCD OPEN _ y abra el monitor LCD de manera que forme un ngulo de 90 con el cuerpo de la videoc mara _2_ Bot0n de abertura del monitor LCD OPEN oo o 2 3 Ajuste el monitor LCD con un ngulo que permita ver f cilmente las im genes de la pantalla Ponga el conmutador selector de medio en CARD c D_T_ E 4 5 Mantenga pulsado el bot6n de bloqueo y ponga el interruptor de ...

Page 116: ...a ESPAI_IOL como idioma de la visualizacion en pantalla aparecen las siguientes visualizaciones indicadas a continuacion _ Modo TAPE CAMERA 1 12 bits 30m SP _ Modo TAPE VCR I i AUDIO1 2 SP I O Modo f cil FACIL I Z J J 101 ...

Page 117: ..._ Modo CARD CAMERA AUTOM _TAR 10 90 t I AU _TOM 3 TAR NORMAL 10 90 Modo CARD VCR l s 6 _ NO_ _ 100 0006 TAR J J J 102 ...

Page 118: ...fichages sur _cran suivants apparaissent Iorsque FRAN _AIS est s_lectionn_ pour la langue de I affichage t i LUMI Q AUTO 30rain SP 12bits I _ F Mode TAPE VCR i AUDIOI 2 1 I SP t Mode facile FACILE 1 Z J J 103 ...

Page 119: ..._ Mode CARD CAMERA AUTO NORMAL 1 _CARTE 10 90 _CARTE 10 90 ile FACILE 1 Mode CARD VCR o_Oo_ 3 CARTE J J 104 ...

Page 120: ...onstttute complete fulfillment of all habthttes and responstbthttes of Sharp to the purchaser wtth respect to the Product and shall constttute full satisfaction of all claims whether based on contract neghgence strict hab_hty or otherwise In no event shall Sharp be hable or tn any way responstble for any damages or defects tn the Product whtch were caused by repairs or attempted repairs performed ...

Reviews: