background image

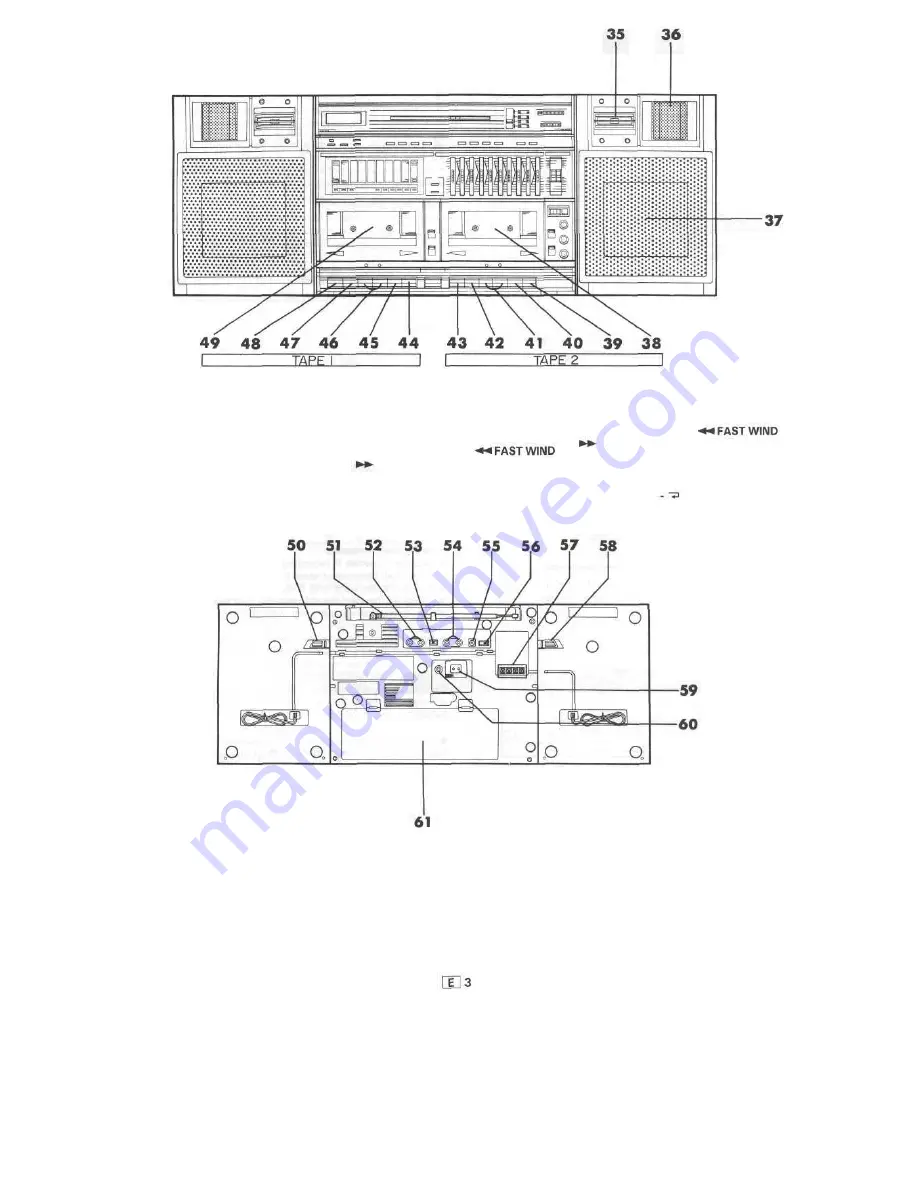
35. Super Tweeter

36.Tweeter

37. Woofer

38. Cassette Compartment

39. Pause Button - PAUSE I I

40. Stop/Eject Button - STOP/EJECT •

4 1 . Fast Wind Buttons -

42. Play Button - PLAY •

43. Record Button - RECORD •

44. Pause Button - PAUSE II

45. Stop/Eject Button - STOP/EJECT •

46. Fast Wind Buttons -

47. Play Button - PLAY •

48. Play Button (Auto-Reverse continu-
ing to TAPE 2)

49. Cassette Compartment

50. Speaker Release Lever

5 1 . FM/SW1/SW2 Telescopic Rod
Antenna

52. Line Output Sockets - LINE OUT

53.Input Selector - INPUT

54. Line Input Sockets

55. Earth Terminal - GND (PHONO)

56. Beat Cancel Switch - BEAT CANCEL

57. External Speaker Terminals -
SPEAKERS

58. Speaker Release Lever

59. AC Power Input

60. External DC Power Input - DC 15 V

6 1 . Timer and Main Battery Com-
partment

Summary of Contents for WF-939ZP

Page 1: ......

Page 2: ... and demagnetiser mentioned in this Operation Manual are not included in this unit CAUTIONS Do not use oil solvents benzine paint thinner and insecti cides on unit Do not expose unit to moisture or temperatures higher than 60 C 140 F Keep unit away from strong magnetism excessive dust or humidity Hold AC power plug by head when removing from AC out let since pulling lead can damage internal strand...

Page 3: ...FINE TUNING 15 Timer On Off Switch TIMER 16 Power Switch POWER 17 Volume Controls VOLUME 18 Tape Counter and Reset Button TAPE COUNTER 19 Microphone Sockets MIC 20 Headphones Socket PHONES 2 1 Tape 2 Direction Switch DIRECTION 22 Tape 2 Reverse Mode Switch REV MODE 23 Graphic Equalizer GRAPHIC EQUALIZER 24 Tape 1 Direction Switch DIRECTION 25 Tape 1 Reverse Mode Switch REV MODE 26 Dubbing Start Bu...

Page 4: ...uttons 47 Play Button PLAY 48 Play Button Auto Reverse continu ing to TAPE 2 49 Cassette Compartment 50 Speaker Release Lever 51 FM SW1 SW2 Telescopic Rod Antenna 52 Line Output Sockets LINE OUT 53 Input Selector INPUT 54 Line Input Sockets 55 Earth Terminal GND PHONO 56 Beat Cancel Switch BEAT CANCEL 57 External Speaker Terminals SPEAKERS 58 Speaker Release Lever 59 AC Power Input 60 External DC ...

Page 5: ...r panel and inside the battery compartment 3 Replace battery compartment cover Note for main batteries Replace batteries if recordings start distorting Replace all batteries at same time Remove batteries if unit is not in use Using AC power lead disconnects batteries Don t mix normal batteries with Ni Cd alkaline or other types When the batteries become weak recording may become impossible even th...

Page 6: ...ds out as far as necessary and connect them to the SPEAKERS terminals SETTING THE CLOCK Turn the POWER switch OFF SLEEP before connecting the speakers Caution Maximum speaker input is 100 W PMPO or 26 W RMS The speakers could be damaged if used with an amplifier producing greater than 100 W PMPO or 26 W RMS Do not short circuit the amplifier speaker outputs or speaker inputs as this could damage t...

Page 7: ...tend the telescopic rod antenna Adjust the posi tion and length of the antenna until FM broadcast reception is best For Receiving SW1 or SW2 Broadcasts Raise and extend the telescopic rod antenna vertically to its full length For Receiving MW Broadcasts Rotate or locate the unit to receive peak signal strength of the MW broadcast SOUND CONTROL Moving VOLUME controls LEFT and RIGHT towards MAX in c...

Page 8: ...s differ Refer to the table below for proper use and differentia tion of tape functions FUNCTION Auto reverse from A B Single side play Switching sides A B APLD APPS APSS FAST WIND Recording Full Auto Stop Dubbing Continuous Play TAPE 1 Sides A B are played continuously until STOP EJECT is pressed when the REV MODE switch is at Press the button to play sides A and В and then s t o p Possible when ...

Page 9: ... selection is located When you re finished press STOP EJECT button to stop and to eject tape Replace tape in case Note While fast winding operation is in progress the FAST WIND button will not be released when the tape end is reached if the PAUSE button is pressed In this case press the STOP EJECT button 2 TAPE 2 Press PLAY and lift the REV MODE switch for one way p l a y b a c k Press PLAY and th...

Page 10: ...tion is completed press STOP EJECT for TAPE 1 to can cel the APPS mode APLD APPS APSS TAPE 1 only APLD locates a desired selection by skipping the number of pieces from the current to the desired selection APPS plays a specified number of selections and automatical ly enters the pause mode APSS locates the beginning of the current or next selection and automatically begins playback from that piece...

Page 11: ...el to A B or С whichever gives the best reception when recording MW SW1 or SW2 7 Press PAUSE button again to begin recording 1 Turn the power switch on 2 Set FUNCTION switch to TAPE 3 Load recorded cassette into cassette compartment of TAPE 1 Insert the blank tape into TAPE 2 4 Set TAPE switches for TAPE 1 and 2 to the proper positions Turn the METAL selector off when using normal or chrome tape i...

Page 12: ...ded Tapes Previously recorded material will be erased automatically when ever new material is re recorded onto the tape If it is desired to erase a previously recorded tape without recording over it follow the instructions 1 Insert the tape to be erased into the cassette compartment of TAPE 2 2 Set the FUNCTION switch to TAPE 3 Set the DUBBING switch to HIGH 4 Make sure TAPE 1 is stopped and depre...

Page 13: ...ff auto matically after 64 minutes The power will be cut off and playback will stop after 64 minutes but the PLAY button will not be released Press STOP EJECT This is also true when using the sleep function To turn off at a preset time less than 64 minutes The radio and cassette deck can all be turned off automat ically The timer can be set whether or not other functions are be ing used 1 Press SL...

Page 14: ... to PHONO CD LINE 4 Start the record or set the CD player to PLAY Recording From Another Amplifier 1 Connect the LINE OUTPUT terminals of your amplifier to the INPUT sockets of the unit 2 Set the INPUT selector on the rear panel to LINE 3 Set the FUNCTION switch to PHONO CD LINE 4 Start recording as usual See page 10 To record Follow the instructions for recording on page 10 Using an External Ampl...

Page 15: ... variations being of a kind as not to reduce the quality performance or appearance GENERAL Power source Output power AC 110 127 V and 220 240 V 50 60 Hz DC 15V UM SUM 1 or R20 type x 10 or external 15 V DC PMPO 200 W 100 W 100 W AC operation MPO 40 W 20 W 20 W AC opera tion RMS 26 W 13 W 13 W DC oper ation 10 distortion External mic 600 ohms Phono line in CD 50 kohms Headphones 8 3 2 ohms External...

Page 16: ...MEMO ...

Page 17: ...SHARP CORPORATION ...

Reviews: