background image

a

3

This device complies with Part 15 of the FCC Rules.

Operation is subject to the following two conditions: (1) This device

may not cause harmful interference, and (2) this device must accept

any interference received, including interference that may cause

undesired operation.

WARNING - FCC Regulations state that any unauthorized changes

or modifications to this equipment not expressly approved by the

manufacturer could void the user’s authority to operate this

equipment.

Note: This equipment has been tested and found to comply with

the limits for a Class B digital device, pursuant to Part 15 of the

FCC Rules.

These limits are designed to provide reasonable protection against

harmful interference in a residential installation. This equipment

generates, uses, and can radiate radio frequency energy and, if

not installed and used in accordance with the instructions, may

cause harmful interference to radio communications.

However, there is no guarantee that interference will not occur in a

particular installation. If this equipment does cause harmful

interference to radio or television reception, which can be

determined by turning the equipment off and on, the user is

encouraged to try to correct the interference by one or more of the

following measures:

- Reorient or relocate the receiving antenna.

- Increase the separation between the equipment and receiver.

- Connect the equipment into an outlet on a circuit different from

that to which the receiver is connected.

- Consult the dealer or an experienced radio/TV technician for help.

Note:  A shielded interface cable is required to ensure compliance

with FCC regulations for Class B certification.

FOR YOUR RECORDS....

For your assistance in reporting this Electronic Organizer in case

of loss or theft, please record the model number and serial number

(located on the bottom of the case) below.

Please retain this information

Model Number

Serial Number

Date of Purchase

Place of Purchase

Summary of Contents for Wizard OZ-570

Page 1: ...ions may cause harmful interference to radio communications However thereisnoguaranteethatinterferencewillnotoccurina particular installation If this equipment does cause harmful interference to radio or television reception which can be determined by turning the equipment off and on the user is encouraged to try to correct the interference by one or more of the following measures Reorient or relo...

Page 2: ...countries NOTICE SHARP strongly recommends that you keep separate permanent written records of all important data Data may belostoralteredinvirtuallyanyelectronicmemoryproduct under certain circumstances Therefore SHARP assumes no responsibility for data lost or otherwise rendered unusable whether as a result of improper use repairs defects battery replacement use after the specified batterylifeha...

Page 3: ...gement 33 44 The Calendar Application The Schedule Application The To Do Application The ANN Anniversary Application Chapter 4 Creating Your Own Database 45 50 The Tel Application The User File Application Customizing the User File Application Chapter 5 Memo 51 54 The Memo Application Chapter 6 Desk Accessories 55 66 The Calc Calculator Application The Clock Application Chapter 7 Expense Function ...

Page 4: ...ation Locking the Organizer Changing the Calendar Display Format Selecting the Large Font View Appendices 89 93 A Resetting the Organizer Allresetoperation B Battery Replacement General guidelines Replacing the operating batteries C Specifications Index 94 98 Product Support 99 ...

Page 5: ...ny sharp pointed object or even your fingernailstopressthem Sharp or hard object can scratch and damage the Organizer Make sureitisadequatelyprotectedwhen carried with other objects Do not carryitlooseinabagorbriefcase find a pocket or secure compartment within your bag CleantheOrganizeronlywithasoft dry cloth Do not use solvents Do not carry the Organizer around in your back pocket as it may brea...

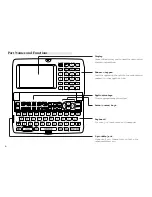
Page 6: ...u need to know to set up and begin working with your Organizer frominstallingthebatteriestoinitialization The chapter also includes a labeled illustration of the partsoftheOrganizer andbasicexplanation ofits key features from the keyboard to the display and itssymbols ...

Page 7: ... applications Keyboard For entry of characters and commands Display Shows information and is used for navigating thevariousfunctions Application keys Startsappropriateapplications Arrow cursor keys SOLVE CANCEL OPTION PORT CALENDAR DAILY ANN TO DO SYNC SEARCH NEW MENU PREV NEXT EDIT SCHEDULE TEL MEMO EXPENSE CLOCK USERFILE AM A B CALC CONV A B PM A A ALARM CAPS CUT COPY PASTE HELP ...

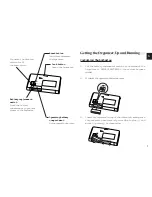
Page 8: ...ey are positioned correctly according to plus and minus polarity as shown below Battery replacement switch Locks the battery compartment to prevent access to the batteries Operating battery compartment Holds operating battery Connects the docking stationforPC communication Lock button Opens the Organzier Reset button Initializesandresets theOrganizer NORMA L OPERA TION REPLA CE BATTE RIES RES ET N...

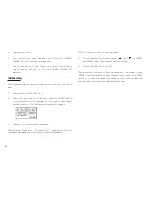
Page 9: ...e bottom of the Organizer using a pen or some other pointed object The following message will appear 3 Press Y toinitializetheOrganizer The message Working Please Wait appears while the Organizer proceeds with the initialization procedure The LCD Contrast screen then appears 4 Ifthedisplayisnotclear press and or PREV and NEXT untilthedisplayissatisfactory 5 Press ENTER when ready The Replacing Bat...

Page 10: ...ing the Organizer displays the following welcome message briefly outlining its functions When and are displayed hidden entries can be displayed by pressing NEXT or PREV Press ENTER once or twice to proceed with the Name Field S e t t i n g Name Field Setting 1 Press NEXT to turn to next page 2 Press 1 or 2 to select the desired name order Press ENTER when you have finished The User Setup introduct...

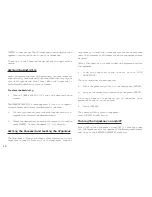
Page 11: ...ne number etc Then press The cursor moves to the ADDRESS field 4 Enteryourfulladdress Press to move the start of the next line in ADDRESS 5 Press ENTER when done Press ENTER to proceed with setting up the Clock as described below or CANCEL to quit the User Setup procedure Setting the Clock In order for the Calendar Schedule To Do and other time based applications to work correctly the built in clo...

Page 12: ...g single digit hours and minutes with 0 8 Press PM to select PM or AM for AM then press ENTER A new screen then appears to inform you that the basic setup procedure is now completed and the Organizer is ready for use However there are other areas in which you can customize your Organizer further by setting various options You can select START ORGANIZING to start using the Organizer Or you can choo...

Page 13: ...press ENTER Or select numbers 1 4 directly Setting the Password and Locking the Organizer The Organizer allows you to keep selected entries in your Organizer secure by locking it with a password Once the Organizer is locked the Secret entries cannot be accessed until the Organizer is Unlocked for which the password must be given Select this option if you want to define a password and lock the Orga...

Page 14: ...g and or PREV and NEXT 4 Press ENTER when you are satisfied with the contrast Turning the key beep on and off The Organizer can be set to make a sound a beep each time a key is pressed This may help you to know whether a key has been pressed properly The default setting is on indicated by a musical symbol on the bottom of the display You can use the TOOLS menu to change the setting 1 Press MENU th...

Page 15: ...t information to optimum use when you return to your home or office You can quickly update your computerized mailing lists for example or even transfer your notes letters and memos onto a PC for further processing Applications Operations on the Organizer are performed using applications The Organizer s Calendar and Schedule for example are applications that record and display time related informat...

Page 16: ...ate can be entered the user can press to display the special pop up one month calendar You can use PREV and NEXT to select the desired month then the arrow keys to select the desired date You may find this more convenient thantypinginthedatedirectly sincethepop upcalendaralso shows the days of the week The keyboard The Organizer s keyboard has a standard layout just like a typewriterorcomputer wor...

Page 17: ...ing the Organizer see p 85 EDIT The entry on the display can be edited All alarms are enabled When this symbol is not shown the alarm sound for any alarms that have been set is disabled see p 65 The key sound is on see p 13 This symbol appears at the bottom of the display whilethebacklightison Built in help and other messages The Organizer has a built in help feature which acts as a convenient on ...

Page 18: ...ressing NEXT takes you to the next page of the display pressing PREV takes you to the previous page and pressing CANCEL takes you back to the HELP INDEX menu From time to time during normal operation the Organizer will display messages to guide you through necessary tasks Many of these messages will give you a choice of commands or ask you to confirm important operations while others will simply d...

Page 19: ...1 8 ...

Page 20: ... an application simply press the corresponding key located on the top of the keyboard Each time you press CALENDAR SCHEDULE TO DO ANN CLOCK TEL USER FILE MEMO EXPENSE DAILY or CALC CONV the selected application will appear Any application already being displayed will be hidden whenever a new application is selected You can always return to another application at the exactpointwhereyouleftoffsimply...

Page 21: ...an entry is being created by pressing NEW The Calc except Conversion function and Clock applications do not have Index View or Edit modes Index mode The Index mode of Tel and User File shows you a two lines view of each entry within the application while the Index mode of the rest of the applications shows you a one line view of each entry This allows you to easily find a particular entry which yo...

Page 22: ...new entry or edit an existing e n t r y Other operations CANCEL When user cancel to edit the data in edit mode Do you really want to throw away all of these changes Yes No will be shown for confirmation ENTER Stores an entry in the Organizer s memory or initiatesanoperation Activates the pop up menu for a field displaying the pop up symbol Moves the cursor PREV Move cursor to previous or next page...

Page 23: ...o the CATEGORY field Press to open the pop up menu Select BUSINESS 4 Press to move to the LAST NAME field Type in the last name Jones 5 Press to move to the FIRST NAME field 6 Type in Pat 7 Press to move to the COMPANY field 8 Type in SHARP CORPORATION 9 Press to move to the TITLE field 1 0 Type in SUPERVISOR 1 1 Press to move to the OFFICE field 1 2 Type in 201 654 6546 1 3 Press move to the FAX ...

Page 24: ...p 51 for more information Fields Most applications divide the display into field boxes The number of fields in each application varies as do the types of fields Thedifferenttypesoffieldincludetextfields adatefield timefieldsandpop upfields Therearealsoafewspecialtypes oftextfields IntheUserFilesapplication youcandefinethe names of fields according to your preferences see p 48 You can type any char...

Page 25: ...gintext Typing in text is simple and straightforward The Organizer s keyboard layout is just like the keyboard on a typewriter or computer Letters lower case and upper case Any of the standard letters A to Z can be entered by pressing thecorrespondingkey Allletterswillnormallyappearinlower case Hold down either of the keys while pressing letter key s toenterupper caseletters 2nd functionslikea Cap...

Page 26: ...egin typing InsertionmodeistheOrganizer sdefaultsetting indicatedby thetrianglecursor Toswitchtotheoverwritingmode press INS Anytextyouenterwillreplacetheexistingtext Thecursor appears as in the overwrite mode To switch back to the previous mode press INS again Deletingtext If you make a mistake while entering text use the following keystoerasetheincorrecttext thenenterthecorrecttext BS Deletes th...

Page 27: ...w will appear at the bottom of the display The arrows indicatethedirectionyouneedtoscrollin Press or toscrolltheinformationonelineatatime Finding Specific Entries in Your Organizer There are a number of ways that you can locate entries and information in your Organizer One is to scroll between entries using the NEXT and PREV keys Others are as follows Using Index mode Indexmodegivesyoualistingofal...

Page 28: ...g 4 When the desired entry is displayed select it and press ENTER toseetheentryinfull 5 You can also press any letters symbols numbers then the most relevant entry will be highlighted Press ENTER to see the details of the entry Only Tel User File and MEMO applicationsprovidethisfunction Using keywords If you know a particular entry is in your Organizer but you don t remember where you can use the ...

Page 29: ...ears in the preset view 2 Select a day using the arrow keys then press ENTER to see the Weekly Calendar 3 Press ENTER again to see the Weekly Graph 4 Press ENTER again to return to 2 Month Calendar For more information about using the Calendar application seep 33 You can open the Calendar menu by pressing MENU to select the desired Calendar view ...

Page 30: ...ting entries using the application menu You can also make deletions using the application menu The DATA DELETION submenu allows you to do this flexibly and e a s i l y 1 Open the desired application 2 Select the entry in Index mode or display it in View mode 3 Press MENU to open the application menu 4 Select DATA DELETION Deletesallentriesin TELapplication Deletesallentriesin theselectedcategory D...

Page 31: ...m memory capacity you may not be able to store an entry or the data being processed may be lost when you change applications To avoid these problems you should check the remaining memory space regularly and free up space when necessary by deleting out of date entries The Check Memory function allows you to easily check the amount of free memory available in the Organizer and thus avoid the inconve...

Page 32: ...used to set up and configure certain features such as the display contrast An illustration and summary of the TOOLS menu including page references where full explanations can be found are provided below Other important facilities and functions are provided via the PREFERENCES menu which allows you to tailor the Organizer and is described in Chapter 10 and the PERIPHERALS menu which provides comman...

Page 33: ...3 2 ...

Page 34: ...ophisticated calendar that can display details of any month from January 1901 to December 2099 The Calendar also provides you with a convenient way of accessing viewing and making new entries in the Ann Schedule and To Do applications The Calendar provides you several Calendar views 1 Month Calendar 2 Month Calendar Weekly Calendar and Weekly Graph YoucanalsojumptoDailyCalendarjustbypressing DAILY...

Page 35: ...he next month week or day by pressing PREV or NEXT then moving the cursor to a specific date to select it for display in another Calendar view However another convenient way of selecting a date that is not on the display is using SPECIFIC DATE in the Calendar application menu 1 Press MENU in any Calendar view and select SPECIFIC DATE A date entry window appears 2 Enter the date you want to select ...

Page 36: ... 3 Press ENTER DeletesselectedScheduleentries Goes directly to a particular date see p 34 Goes directly to today s date seep 34 Select the Calendar view see p 3 3 In 1 Month Calendar 2 Month Calendar Weekly Calendar Weekly Graph and Daily Calendar you can press NEW to open a new Schedule Edit mode Date Calculating You can find and display any date a given number of days beforeorafteraparticulardat...

Page 37: ...ion Sixdifferenttypesofrepeating events include Daily Repeats on the following one or more days for events that span consecutive days Work day The same as Daily repeat but excludes weekends Weekly Repeats the same day each week for regular weekly events Bi weekly Repeats every other week Monthly by day Repeats the same day of each month for example the first Tuesday for regular monthly events on a...

Page 38: ...e alarm A Schedule alarm can be set to remind you of scheduled events such as appointments and meetings You can set an alarm for any entry that has a starting time set Alarms that have been setwillsoundeveniftheunitisturnedoff Enter the following information with an alarm set for one hour in advance Date July 16 1999 Time 1 00 2 00 pm Description Lunch with Sally 1 Press NEW to open a new entry 2 ...

Page 39: ...m field or press 2nd ALARM to set the alarm 15 minutes before the entry s starting time If the start time of a Schedule entry is before 0 14 and 2nd ALARM are pressed 0 00 will be set as the alarm time automatically Clearing a set alarm ToclearanalarmthathasbeensetforaScheduleentry display the entry in Edit mode then press 2nd ALARM The Schedule application menu Selects the Calendar view seep 33 S...

Page 40: ...skandobjectives assignthempriorities To help you in this task entries are identified as TO BE DONE or DONE Making new entries Entries in the To Do application contain five fields Category Description Due Date Priority and Done indicator The category field which you can define yourself and assign as you like can be used to manage tasks according to project the personnel involved in them or any othe...

Page 41: ... most convenient for you 2 Press and toselecttheentryyouwanttoreview 3 Press ENTER to see the entry in full The entry is displayed in View mode Assigning due dates to entries A To Do entry must be given a due date or month so the Organizer knows how to classify it and the Calendar knows when it becomes due The due date can be entered either by typing in the actual date or by selecting the date fro...

Page 42: ...ess DAILY 2 Display the date you want to check If the entry you want to check off is not displayed press untilitappears 3 Go to the entry you have completed and press SMBL The entry is checked off and marked with and the completed entry will be kept under today s day Check off entries in the To Do application 1 Select the entry in Index mode 2 Press SMBL The entry is checked off and marked with Th...

Page 43: ...ion s Index view press MENU 2 Select CATEGORIES The CATEGORIES window appears 3 Make the desired change to the category list 4 Press ENTER to store the edited entry The To Do Index view appears When you edit a category name any To Do entries that refertothatcategoryareautomaticallyupdatedtoreflect the change Selects TO BE DONE or DONE index mode Opens the CATEGORIES window so you can edit categori...

Page 44: ...ding anniversaries and birthdays of friends relatives and business associates Once entered the dates of annual events are displayed on the Calendar giving you plenty of warning to prepare for them well in advance every year The Ann application menu Selects ANN by Date file or ANN by Day file Selectsthespecificentries fordeletion seep 29 ...

Page 45: ...4 4 ...

Page 46: ...pplication The Tel application stores the names telephone numbers and addresses of business clients companies personal friends and so on Updating the Category list You may wish to edit the names of existing categories 1 From the TEL application s Index view press MENU 2 Select CATEGORIES The CATEGORIES window appears 3 Make the desired change to the category list 4 Press ENTER to store the changes...

Page 47: ...You can assign a kind of field order for each category Two kinds of field order Personal and Business are available for you to choose 1 Press TEL to open the application 2 Press MENU select FIELD ORDER The FIELD ORDER window appears 3 Assign a kind of field order for each category 4 Press ENTER when you have finished Or CANCEL to cancel the changes ForthedetailsoftheTelapplication seep 19 The Tel ...

Page 48: ...n in the following four ways Category You can update the category list File name You can rename the file name of your choice F i e l d s You can change the field names Sortingorder You can specify which fields are used to sort the entries displayed in Index mode Updating the Category list You may wish to edit the names of existing categories 1 From the USER FILE application s Index view press MENU...

Page 49: ...s required Enter the new name up to 12 characters The name can contain letters numbers and symbols 4 Press ENTER when you have finished Or CANCEL to cancel the changes and leave the fields as they were Modifying the Index display and the Index sort order You can set up a different Index format for the User File application designatingtwofieldsyouwanttodisplayinIndex mode The User File application ...

Page 50: ...roll between pages 4 Press and use the same methods to enter INDEX 2 5 Press ENTER when you have finished or CANCEL to cancel the changes The Index view reappears with the entries sorted by Name Fieldnamescurrently set to be displayed for each entry in Index mode The User File application menu Opens the CATEGORIES window so you can edit category names Edits the File name see p 4 8 Edits the field ...

Page 51: ...5 0 ...

Page 52: ...om meeting notes to memorandums and letters Before reading this chapter be sure you have read Editing Techniques in Chapter 2 More advanced editing features are used in this chapter Be sure you have a good understanding of the Organizer s basic editing procedures before beginning to use the Memo application Creating documents 1 Press MEMO to open the application The Memo application opens in Index...

Page 53: ...s are sorted for display according to their title alphabetically Therefore you can find out the desired entry as easy as possible Turning word wrap on and off Word wrap automatically moves text which will not fit onto the end of a line to a new line preventing words from being split when you type This allows you to type text without having to worry about when to insert a carriage return to move to...

Page 54: ...a 5 3 5 The Memo application menu Turns WORD WRAP on and off see above Selectsspecificentriesfor deletion seep 29 ...

Page 55: ...5 4 ...

Page 56: ...oot and percentage calculations The Calc application also provides support for cost sellingpricemarkupandmargincalculations Inaddition it has a powerful currency units conversion function TherearefourdifferentdisplayoptionsintheCalcapplication and the application always opens with the most recently used d i s p l a y To move between the different calculator modes either press CALC CONV repeatedly ...

Page 57: ... appears When any of the following situations occur the error indicator E is displayed and calculations are suspended Press C CE tocleartheerror The integer part of the calculation result is exceeds 12 digits aroughcalculationisobtained Example 4567890123 x 456 2 08295789608 is displayed with E whichindicatesthattheroughresultis 2 08295789608 x 1012 ie 2 082 957 896 080 Theintegerpartofthecalculat...

Page 58: ...to the field whose new value you want to calculate and press to indicate the missing value 3 Press SOLVE The new value is calculated and appears in the field Setting the number of decimal places When using the Cost Selling price Markup and Cost Selling price Margin calculator you can choose whether the number of decimal places used in calculations is 0 or 2 IneitherCost Sellingprice MarkuporCost S...

Page 59: ... currency conversion screens in which you can set and edit the exchange rates yourself The other two index groups have preset conversion factors so conversion can be performed right away Changing the currency rate 1 Press CALC CONV several times until the Conversion index display appears Select the desired item and press ENTER to confirm For example you want to set one Canadian dollar equal to 0 4...

Page 60: ...exchange rate start again from step 1 above You can use each currency conversion at any time once it has been set You can press ENTER to switch between conversion display and conversion index display Performing a conversion For example you want to find out how many liters there are in 10gallons 1 Press CALC CONV several times until the Conversion index display appears 2 Press PREV or NEXT to move ...

Page 61: ...our Organizer The Calc application menu Selectsthebasic cost sell margin cost sell markupor conversion calculator mode Sets the number of decimal places see p 57 CONVERSION UNITS FACTOR Currencies User Specified User Specified Length inch cm 2 54 feet m 0 3048 yard m 0 9144 mile km 1 609344 Area acre m2 4 046 86 acre ha 0 404686 Volume gal l 3 78541 l gal l 4 54609 fl oz ml 29 5735 l fl oz ml 28 4...

Page 62: ...me WhenyoufirstuseyourOrganizer thedefaultLocalcityisset as New York To change this setting 1 Press MENU to open the Clock menu 2 Select CHANGE LOCAL CITY Alistofcitiesappears Thecurrentlyselectedcityisatthetop ofthelist Thecitiesarelistedinalphabeticalorderbycountry and then by city name 3 Type the first letter of the name of the country in which the target city is located For example if you want...

Page 63: ...hown in 12 or 24 hour format 4 Move to the DATE field Enter the current month and day intwodigits andtheyearinfourdigits Youcanalsoselect the date by pressing to display the pop up calendar Use PREV and NEXT to display the desired month then to move to the current day You can set any date from January 1st 1901 to December 31st 2099 5 Move to the TIME field enter the current time and press AM or PM...

Page 64: ...hetimein Thecurrentlyselected Worldcityappearsatthetopofthelist 3 If the city you want to select as your World city is on the list selectitandthenpressproceedfromstep6below If not typethefirstletterofthecountrycontainingthetarget c i t y Alistofcitiesappears JustasfortheLOCALCITYlist allcities inthislistareinalphabeticalorderaccordingtocountryname Use PREV and NEXT to display the city you want 4 S...

Page 65: ...rm as a simple reminder or to wake you up but do not want to make a full Schedule entry 1 Press MENU to open the Clock menu and select SET DAILY ALARMS The SET DAILY ALARMS window opens You can set up to fivealarms Daylight Saving Time DST Assigning DST to a city DesignatingDaylightSavingTime DST foracityautomatically setsthetimeforthatcityonehouraheadofitsregulartime 1 Press MENU to open the Cloc...

Page 66: ...om of the display indicates that any alarm that is set will sound at the appropriate time There may be times when you do not want to hear any of the set alarms You can disable all Schedule and Daily alarms sound easily with a single operation 1 Press MENU three times to open the TOOLS menu 2 Select ALARM SOUND ON The disappears from the display All alarm sounds are now turned off ie no audible ala...

Page 67: ...6 6 ...

Page 68: ... of the expenses In addition the EXPENSE REPORT option allow you to see the total expenses for a single day or for a certainperiod Entering Expense Record 1 Press EXPENSE to open the application The Expense application opens in Index mode 2 Press NEW A blank form opens in Edit mode 3 Enterthedateintheorderofmonth day year Typeinthe date 08101999 or press use PREV and NEXT to display August 1999 th...

Page 69: ... MovetotheStatusfield Press toselectthedesired statusmode Press 1 4 to select Select TO BE SUBMITTED 9 Press to move to the Category field Press to selectthedesiredcategory Press 1 8 tochooseitem Select BUSINESS 1 0 Press ENTER to store the entry The message Stored appears briefly The entry is now stored and displayed in view mode Press ENTER or CANCEL to switch to Index mode Simple Calculation in...

Page 70: ...e records for a specific date To summarize all records in the Business category for AMEX on Aug 15 1999 for example 1 Press EXPENSE to open the application 2 Press MENU to open the Expense menu 3 Select EXPENSE REPORT A blank form is displayed 4 Press to select BUSINESS 5 Press to move to the Period field Enter the From date or the To date Type in 08151999 6 Move to the Payment Type field Press to...

Page 71: ...e to the Status field and select TO BE SUBMITTED 8 Press ENTER when you have finished The total expense amount for the specified period is calculated and displayed Entering and changing category and payment typesettings In the CATEGORIES and PAYMENT TYPE reference lists there are 12 types of categories and 8 types of payments You can change the order of these existing categories and payment types ...

Page 72: ...n menu Opens the CATEGORIES window so you can edit the category see above Opens the PAYMENT TYPE window so you can edit the payment type see above Selects the Expense Report function Selectsthespecificentries fordeletion seep 29 ...

Page 73: ...7 2 ...

Page 74: ...f Text The Organizer lets you cut copy or paste blocks of text using thekeyboard Thefirststepincutting copying andpastingis to select the block of text you want to work with Textthathasbeencutorcopiedisstoredontheunit sinternal clipboard Onlyoneblockoftextcanbestoredintheclipboard atatime anditwillremainthereuntilanewblockoftextiscut or copied There is no limit to the number of times you can paste...

Page 75: ...be replaced with the pasted text Thus you can easily replace one block of text with another by highlightingitbeforepasting Copying or Moving Entries The CUT COPY PASTE operations provide a quick convenient way for you to copy or move an entire entry to another location Entries have to be in the same file and same application 1 Select an entry that you want to copy or move in Index mode 2 Press 2nd...

Page 76: ...y 0 9 to get the selected symbol The symbol window closes and the selected character is enteredatthecurrentcursorposition 5 If the symbol you just selected is an accent mark or Type the letter for which you want that accent mark to be used When you next open the Symbol menu the character you selected will be selected again as the default The Organizer automatically displays the ten characters most...

Page 77: ...7 6 ...
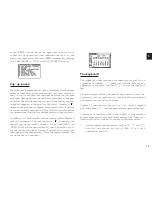
Page 78: ...has the flexibilitytoconnecttootherOrganizersandtransfer data to desktop computers using data transfer facilities which are accessed through the PERIPHERALS menu This chapter provides descriptions and examples to get you up and running quickly with these powerful features The Peripherals Menu Sets up data exchange with PCs see p 78 Transfers data with other OZ 570 Organizer see p 78 ...

Page 79: ...ck on each Organizer Transferring Data Thereareseveralwaystotransferinformation whetherspecific entries or entire files between the Organizer and other information processing devices including personal computers and other SHARP Organizers In this way you can back up yourinformationtoguardagainstlosingit orcopyinformation so that you or someone else can work with it on another device A summary of t...

Page 80: ...A submenu opens 4 Select GET DATA APPEND 5 On the sending Organizer select the entry you want to send Press MENU four times to open the PERIPHERALS menu Select UNIT TO UNIT A submenu opens 6 Select SEND SELECTED DATA The selected entry is transferred and appended to data in the appropriateapplication Transferringallentriesinanapplication All entries in Schedule To Do Ann Memo Expense Tel and User ...

Page 81: ...k on each Organizer 3 Plug each end of the cable into the cable jack on each Organizer To conserve battery power disconnect the cable as soon as a transfer is completed Transferring data 1 Turn on both Organizers 2 On OZ 570 Organizer open the application in which you want to receive the data Only data corresponding to the application selected on the receiving Organizer will be transferred regardl...

Page 82: ...ill be shown in the receiving unit instead After transferring a Memo record to OZ 570 from other SHARP Organizer nothing will be shown on the Title field ofthereceivingunit There are some other restrictions See p 82 Exchanging Information with a Personal Computer Using SHARP s optional Organizer Link software and cable package or certain third party software packages you can exchange data with a p...

Page 83: ...o conserve battery power always press ON to leave the PC Link mode as soon as you have finished transferring data Points to Remember when Using Peripherals When using Organizer Link software designed for an Organizer other than OZ 570 Organizer Data in applications that are not compatible with the Organizer Link cannot be transferred When receiving data from an Organizer other than OZ 570 Organize...

Page 84: ... sdisplay TheOrganizeroffersalevelofsecurityforitsentries andoperations Itistodefineparticularentrieswithin various applications as secret and then enable the LOCK ORGANIZER option within the PREFERENCES menu Setting the Owner Information The Owner Information comprises your name address and number 1 Press MENU twice to display the PREFERENCES menu 2 Select OWNER INFORMATION The cursor starts in t...

Page 85: ...ch means that upper and lower case letters are treated differently The password SHARP for example is different from the passwords Sharp or sharp Choose your password carefully If you forget your password there is no way to bypass the Secret function or enter a new password without losing all data marked as Secret It is strongly recommended that you use a password that you will always be able to re...

Page 86: ... appears prompting you to enter your password 3 Enter your password exactly as you registered it 4 Press ENTER If the password is correct disappears Ifthepasswordisincorrect amessageappearsindicatingthis 5 After unlocking the Organizer access any entry you want using the normal procedures If you forget your password you will not be able to unlock the Organizer and access your secret information If...

Page 87: ... SECRET The SECRET submenu appears 3 Select DELETE ALL DATA A warning message appears asking if you are sure you want to delete all the secret entries If you have forgotten your password you have no choice but to proceed 4 Press Y todeleteallsecretentries Thiswillthenallow you to enter a new password You can also lock the Organizer yourself at any time 1 Press MENU twice to open the PREFERENCES me...

Page 88: ...y to Saturday format this is the default or a Monday to Sunday format In the Calendar application 1 Press MENU twice to open the PREFERENCES menu 2 Select WEEKLY FORMAT A submenu appears The current setting is indicated by a tick 3 Select the desired format Then the 1 Month 2 Month Calendar View will show the weeks in your desired format Setting up the date format Almost all Organizer applications...

Page 89: ...arge Font View Since the Organizer s display is fairly small you may find the displayedinformationeasiertoreadifitischangedintoalarge fontview In general all of the Organizer s applications except Clock Calc Calendar ExpenseReportapplications sharethisfeature If you want to change the screen to be a larger font view just press key on the keyboard If you want to resume it press again ...

Page 90: ... Appendices A Resetting the Organizer A strong impact exposure to an electrical field or other unusual conditions may render the unit inoperative and pressing the keys will have no effect If this occurs you will have to press the RESET switch at the bottom of the unit using a pen or similar object to be able to continue to use the unit A condition that makes the unit inoperative may erase some or ...

Page 91: ...lowing type of battery There are some extremely important points to remember when installing new batteries Replace the two operating batteries at the same time with new batteries of the same type Caution Keep batteries out of the reach of children Remove batteries from the unit when they become weak or when the unit will not be used for a long period of time Leaving weak batteries in the unit may ...

Page 92: ...If nothing happens when you press ON Setting the battery replacement switch to REPLACE BATTERIES shuts off power to the unit Check that the battery replacement switch is set to NORMAL OPERATION Repeat the above battery replacement procedure step by step After following the above battery replacement procedure the LCD contrast setting which is set by user will be back to its default mode NOR MAL OPE...

Page 93: ...ers entry in the name field 12 characters entry in the number field Maximum data size Approx 2000 bytes per entry User interfaces Keyboard Other features Secret function data transfer search function help function et al Calculator digits 12 Functions Addition subtraction multiplication division constant square root percent memory calculation cost sell margin calculation cost sell markup calculatio...

Page 94: ... months of 1 hour continuous use per day Using the Backlight for 2 minutes per hourly use and searching for 5 minutes per hourly use at an ambient temperature of 25 C 77 F Backlight life Backlight life may vary depending on usage If the Backlight is on for 10 minutes per day eg 1 minute 10 times a day the brightness will be reduced by half after 10 years at an ambient temperature of 25 C and 65 hu...

Page 95: ... 73 Working with blocks of text 25 C Calc ulator application 55 Date calculations 35 Calculations Examples 58 Performing 59 Date calculation 35 Conversion 58 Cost price margin calculations 56 Cost price markup calculations 56 Calendar application Setting up the initial display 87 Calendar view Daily 33 1 Month 33 Selecting 34 2 Month 33 Weekly 33 Caring for the Organizer 4 Categories To Do applica...

Page 96: ...t 23 Setting 87 Daylight Saving Time DST 64 Assigning to a city 64 Enabling disabling 64 Decimal point setting 57 Deleting All Secret entries 86 Single entries 29 Text 25 Using the application menu 29 Display Setting LCD contrast 13 Symbols 16 Display modes Edit mode 21 Index mode 20 View mode 21 E Edit mode 21 Editing Techniques 23 Editing Categories 42 Entries 23 Error indicator 56 F Fields 23 F...

Page 97: ... 85 Memo application 51 Memory check 30 Menu 14 Application 35 38 42 43 46 49 53 60 65 71 Peripherals 77 Tools 31 Modifying the Field Order 46 Moving Blocks of text 73 Entries 74 N New entries Making 22 39 51 67 O Organizer Link 81 Overwriting text 25 Owner information 10 83 P Part names and functions 6 Password Deleting changing 86 Forgotten 86 Registering 84 Paste 26 74 PC Link 81 Peripherals me...

Page 98: ...ly alarms 64 Date format 87 LCD contrast 13 Local city 61 Weekly format 87 Owner Information 10 83 Password 84 Schedule alarms 37 World city 63 Setting up Calendar s initial display 87 For data transfer 78 80 Simple Calculation in Amount Field 68 Symbols On the display 16 Entering 75 T Tel application 45 To Do application 39 Tools menu 31 Transferring data 78 Between two OZ 570 Organizers 78 With ...

Page 99: ...98 U Unlocking the Organizer 85 User File application 47 W Weekly format 87 Weekly view 33 Word wrap 52 World city 63 ...

Page 100: ...oduct support you can Call a Sharp Representative 800 BE SHARP Visit our Web Site http www sharp usa com Call our Fax On Demand Service 630 378 9853 Send an E mail CompuServe account 75300 3260 America OnLine account SHARPWIZ Internet account pdasupport sharpsec com Engage in forum discussions CompuServe type Go Sharp America Online type Keyword Sharp Fax your questions or comments 630 378 9987 Wr...

Page 101: ...FROM THE DATE OF PURCHASE SET FORTH BELOW Some states do not allow limitations on how long an implied warranty lasts so the above limitation may not apply to you Neither the sales personnel of the seller nor any other person is authorized to make any warranties other than those described herein or to extend the duration of any warranties beyond the time period described herein on behalf of Sharp T...

Page 102: ...ipment or any hardware software firmware fluorescent lamp power cords covers rubber parts or peripherals other than the Product Where to obtain service At a Sharp Authorized Servicer located in the United States To find out the location of the nearest Sharp Authorized Servicer call Sharp toll free at 800 BE SHARP What to do to obtain service Ship prepaid or carry in your Product to a Sharp Authori...

Reviews: