background image

10/7/26

XL-E100H_OM_EN.fm

E-8

10

9

8

7

6

5

4

3

1
2


Caution:

z

Do not place two discs in one disc tray.

z

Do not play discs of special shapes (heart, octagon, etc).
It may cause malfunctions.

z

Do not push the disc tray whilst it is moving.

z

If the power fails whilst the tray is open, wait until the
power is restored.

z

If TV or radio interference occurs during CD operation,
move the unit away from the TV or radio.

z

Be sure to place 8 cm (3") disc in the middle of the disc
tray.

z

Due to the structure of the disc information, it takes longer
to read an MP3/WMA disc than a normal CD
(approximately 20 to 90 seconds).

Notes for CD or MP3/WMA disc:

z

When the end of the last track is reached during fast
forward, “END” will appear on the display and CD
operation will be paused. When the beginning of the first
track is reached during fast reverse, the unit will enter the
playback mode (only for CD).

z

Rewritable multi-session discs with unfinished writing, can
still be played.

Advanced CD or MP3/WMA disc 

playback

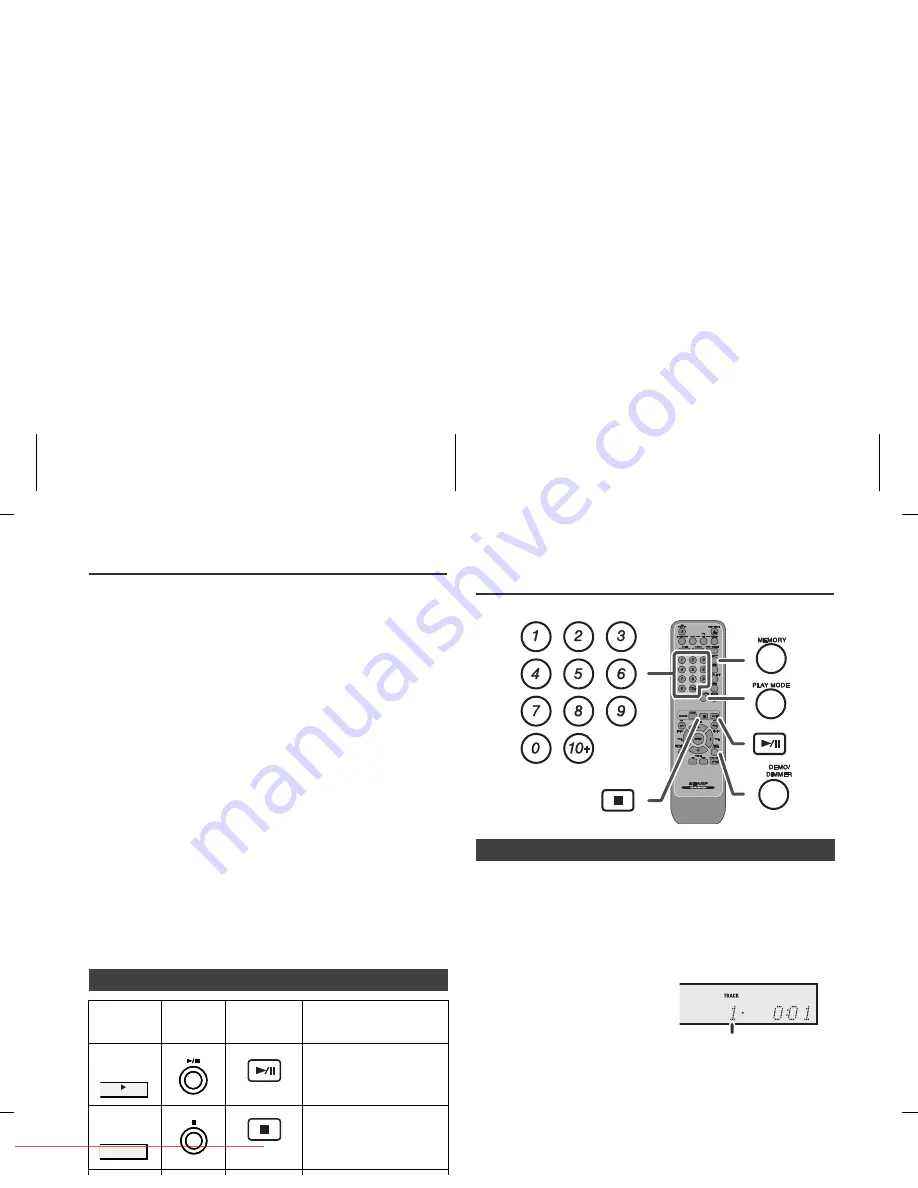
By using the numeric buttons, the desired tracks on the
current disc can be played.

Use the numeric buttons on the remote control to select
the desired track whilst playing the selected disc.

z

The numeric buttons allow you to select up to number 9.

z

When selecting number 10 or higher, use the “10+” button.

Notes:

z

A track number higher than the number of tracks on the

disc cannot be selected.

z

During random play, direct search is not possible.

To stop playback:

Press the   (CD/USB  ) button.

Repeat play can play one track, all tracks or a programmed

sequence continuously.

To repeat one track:

Press the PLAY MODE button repeatedly until “Repeat One”

appears. Press the  /  (CD/USB  / ) button.

To repeat all tracks:

Press the PLAY MODE button repeatedly until “Repeat All”

appears. Press the  /  (CD/USB  / ) button.

To repeat desired tracks:

Perform steps 1 - 5 in “Programmed play” section on page 9

and then press the PLAY MODE button repeatedly until

“Repeat All” appears.

To cancel repeat play:

Press the PLAY MODE button repeatedly until “Normal”

appears and “

” disappears.

„

Various disc functions

Function

Main 

unit

Remote 

control

Operation

Play

Press in the stop 

mode.

Stop

Press in the playback 

mode.

Pause

Press in the playback 

mode. Press the  /   

button to resume 

playback from the 

paused point.

Track
up/down

Press in the playback 

or stop mode. 

If you press the 

button in the stop 

mode, press the  /  

button to start the 

desired track.

Fast 
forward/ 
reverse

Press and hold down 

in the playback 

mode.

Release the button to 

resume playback.

„

Direct track search

A. For example, to choose 13

1

Press the “10+” button once.

2

Press the “1” button.

3

Press the “3” button.

B. For example, to choose 130

1

Press the “10+” button twice.

2

Press the “1” button.

3

Press the “3” button.

4

Press the “0” button.

„

Repeat play

RRMCGA22

RRMCGA226AW

S

A

Selected track number

Downloaded from 

www.Manualslib.com


manuals search engine


Downloaded From Disc-Player.com Sharp Manuals

Summary of Contents for XL-E100H

Page 1: ...OMPONENTŲ SISTEMA HI FI COMPONENT SYSTEM HI FI KOMPONENTNI SISTEM HI FI COMPONENT SYSTEM MODEL MODELIS ΜΟΝΤΕΛΟ MODEL MODEL INSTRUKCJA OBSŁUGI HASZNÁLATII ÚTMUTATÓ NÁVOD NA POUŽITÍ NÁVOD NA POUŽÍVANIE ІНСТРУКЦІЯ З ЕКСПЛУАТАЦІЇ MANUAL DE UTILIZARE VARTOJIMO VADOVAS ΕΓΧΕΙΡΙΔΙΟ ΛΕΙΤΟΥΡΓΙΑΣ PRIROČNIK ZA UPORABO OPERATION MANUAL Downloaded From Disc Player com Sharp Manuals ...

Page 2: ...evékenység előtt illetve amikor hosszabb ideig nem használja a készüléket Figyelmeztetés CZ ŮLEŽITÉ INFORMACE Když je tlačítko ON STAND BY ZAP POHOTOVOSTNÍ REŽIM v poloze STAND BY POHOTOVOSTNÍ REŽIM v přístroji se stále nachází napětí Když je tlačítko ON STAND BY ZAP POHOTOVOSTNÍ REŽIM v poloze STAND BY POHOTOVOSTNÍ REŽIM přístroj se dá zprovoznit pomocí režimu časovače nebo dálkového ovládání Upo...

Page 3: ...de întreţinere sau în cazul neutilizării deconectaţi unitatea din priză LT SPECIALIOS PASTABOS Kai mygtukas ON STAND BY nustatytas STAND BY pozicija maitinimo įtampa vis dar yra prietaiso viduje Kai mygtukas ON STAND BY nustatytas STAND BY pozicija prietaisas gali būti įjungiamas laikmačiu arba nuotolinio valdymo pultu Įspėjimas Šis prietaisas neturi dalių kurias galėtų taisyti pats vartotojas Nie...

Page 4: ...is unit contains no user serviceable parts Never remove covers unless qualified to do so This unit contains dangerous voltages always remove mains plug from the socket before any service operation and when not in use for a long period Warning To prevent fire or shock hazard do not expose this appliance to dripping or splashing No objects filled with liquids such as vases shall be placed on the app...

Page 5: ...cą PaĔstwo pozbyü siĊ produktu naleĪy skontaktowaü siĊ z wáadzami lokalnymi i uzyskaü informacje na temat prawidáowej metody usuniĊcia produktu B Informacje dla uĪytkowników biznesowych dotyczące usuwania odpadów 1 W krajach Unii Europejskiej W przypadku gdy produkt uĪywany jest do celów handlowych i zamierzają go PaĔstwo usunąü NaleĪy skontaktowaü siĊ z dealerem firmy SHARP który poinformuje o mo...

Page 6: ...idovat výrobek který je používán pro ponikatelské úþely Obrat te se na prodejce SHARP který vás informuje o odebrání výrobku Odebrání a recyklace mohou být zpoplatnČny Malé výrobky a malá množství mohou odebírat místní sbČrny odpadu 2 V ostatních zemích mimo Evropskou unii Chcete li tento výrobek zlikvidovat obrat te se na místní orgány které vás seznámí s vhodnou metodou likvidace INFORMACE O LIK...

Page 7: ...mod de dis punere a acestui deúeu B InformaĠii despre dispunerea deúeurilor pentru Firme 1 În Uniunea Europeană Dacă produsul a fost utilizat în Ġeluri de afaceri úi doriĠi să l aruncaĠi Vă rugăm să contactaĠi reprezentanĠa SHARP care vă va informa despre preluarea produsului PuteĠi fi obligaĠi la plata serviciului de preluare úi reciclare Produsele mici úi în cantităĠi mici pot fi preluate de pun...

Page 8: ... ȝİ IJȘȞ ĮʌȩȡȡȚȥȘ ȖȚĮ İʌȚȤİȚȡȘȝĮIJȚțȠȪȢ ȤȡȒıIJİȢ 1 ȈIJȘȞ ǼȣȡȦʌĮȧțȒ DzȞȦıȘ ǹȞ IJȠ ʌȡȠȧȩȞ ȤȡȘıȚȝȠʌȠȚİȓIJĮȚ ȖȚĮ İʌȚȤİȚȡȘȝĮIJȚțȠȪ ıțȠʌȠȪȢ țĮȚ șȑȜİIJİ IJȘȞ ĮʌȩȡȡȚȥȒ IJȠȣ ǼʌȚțȠȚȞȦȞȒıIJİ ȝİ IJȠȞ ĮȞIJȚʌȡȩıȦʌȠ IJȘȢ SHARP Ƞ ȠʌȠȓȠȢ șĮ ıĮȢ ʌȜȘȡȠijȠȡȒıİȚ ıȤİIJȚțȐ ȝİ IJȘȞ İʌȚıIJȡȠijȒ IJȠȣ ʌȡȠȧȩȞIJȠȢ ǼȞįȑȤİIJĮȚ ȞĮ ȤȡİȦșİȓIJİ IJȠ țȩıIJȠȢ ȖȚĮ IJȘȞ İʌȚıIJȡȠijȒ țĮȚ IJȘȞ ĮȞĮțȪțȜȦıȘ ȂȚțȡȐ ʌȡȠȧȩȞIJĮ țĮȚ ıİ ȝȚțȡȑȢ ʌȠıȩIJȘIJİȢ ȓıȦȢ ȝʌȠȡȠȪȞ ȞĮ İʌȚıIJȡĮijȠȪ...

Page 9: ...recovery and recycling and thus prevent potential negative effects on the environment and human health which could otherwise arise due to inappropriate waste handling 2 In other Countries outside the EU If you wish to discard this product please contact your local authorities and ask for the correct method of disposal B Information on Disposal for Business Users 1 In the European Union If the prod...

Page 10: ...g applications via Internet intranets and or other networks other revenue generating content distribution systems pay audio or audio on demand applications and the like or on revenue generating physical media compact discs digital versatile discs semiconductor chips hard drives memory cards and the like An independent license for such use is required For details please visit http mp3licensing com ...

Page 11: ...tion should not be impeded by covering the ventilation openings with items such as newspapers tablecloths curtains etc z No naked flame sources such as lighted candles should be placed on the apparatus z Attention should be drawn to the environmental aspects of battery disposal z This unit should only be used within the range of 5 C 35 C 41 F 95 F z The apparatus is designed for use in moderate cl...

Page 12: ...3 17 X Bass Button 6 18 Bass Treble Button 6 19 Memory Button 8 12 20 Clear Button 9 21 Clock Timer Button 7 16 22 Sleep Button 17 23 Folder Button 10 24 Play Mode Button 9 25 Disc USB Play Pause Button 7 8 11 26 Disc USB Stop Button 7 8 11 27 Tuning Up Skip Up Fast Forward Time Up Button 7 8 11 12 16 28 Volume Up Button 6 29 Enter Button 7 16 30 Demo Dimmer Button 4 6 31 Audio Line INPUT Button 5...

Page 13: ...ter the demonstration mode z To cancel the demonstration mode press the DEMO DIMMER button remote control during power stand Make sure to unplug the AC power lead before making any connections Right speaker FM aerial screws not supplied wall Attaching to the wall Assembling Wall socket AC 220 240 V 50 60 Hz Installing the AM loop aerial Red Black Left speaker AM loop aerial Aerial connection Demon...

Page 14: ... Replace the batteries if the operating distance is reduced or if the operation becomes erratic Purchase 2 AAA size batteries UM SUM 4 R3 HP 16 or similar z Periodically clean the transmitter on the remote control and the sensor on the unit with a soft cloth z Exposing the sensor on the unit to strong light may interfere with operation Change the lighting or the direction of the unit if this occur...

Page 15: ...SS TREBLE button to select BASS 2 Within 5 seconds press the VOLUME or button to adjust the bass 1 Press the BASS TREBLE button to select TREBLE 2 Within 5 seconds press the VOLUME or button to adjust the treble When the EQUALIZER MODE button is pressed the current mode setting will be displayed To change to a different mode press the EQUALIZER MODE button repeatedly until the desired sound mode a...

Page 16: ... and VBR files z During VBR file playback time counter in the display may differ from its actual playback time z Bitrate which is supported by MP3 is 32 320 kbps 1 Press the ON STAND BY button to turn the power on 2 Press the CLOCK TIMER button 3 Within 10 seconds press the ENTER button To adjust the day press the or button and then press the ENTER button 4 Press the or button to select 24 hour or...

Page 17: ... fast reverse the unit will enter the playback mode only for CD z Rewritable multi session discs with unfinished writing can still be played Advanced CD or MP3 WMA disc playback By using the numeric buttons the desired tracks on the current disc can be played Use the numeric buttons on the remote control to select the desired track whilst playing the selected disc z The numeric buttons allow you t...

Page 18: ... can choose up to 32 selections for playback in the order you like To cancel the programmed play mode During programmed stop mode press the CD USB button The display will show Memory Clear and all the programmed contents will be cleared Adding tracks to the programme If a programme has been previously stored the MEM indicator will be displayed Press the MEMORY button Random play Programmed play CD...

Page 19: ...folder and file order information which is recorded on the disc depends on the writing software There maybe possibilities that this unit will playback the files not according to our expected playback order z For CD MP3 WMA 255 numbers of folders and files To play back CD R RW About folder playback order 1 ROOT folder is set as folder 1 2 As for folders inside ROOT folder Folder A and Folder B the ...

Page 20: ...mory device that has MP3 WMA format files on the unit When the USB memory is connected to the main unit the device information will be displayed 2 Press the FOLDER button and press the PRESET or button to select desired playback folder To start playback with folder mode on go to step 4 To change the playback folder press the PRESET or button to select another folder 3 Select desired file to be pla...

Page 21: ...t track search 8 Repeat play 8 Random play 9 Programmed play 9 Note If USB memory device is not connected USB No Media will be shown on the display Notes z This unit only supports MPEG 1 Audio Layer 3 format Sampling Frequency is 32 44 1 48kHz z Playback order for MP3 files may differ depending on the writing software used during file download z Bitrate which is supported by MP3 is 32 320 kbps WMA...

Page 22: ...ries traffic information and TA Traffic Announcement will appear whilst a traffic information is on air PTYI Dynamic PTY Indicator will appear whilst the Dynamic PTY station is received You can control the RDS by using the buttons on the remote control only Memorising a station 1 Perform steps 1 3 in Tuning 2 Press the MEMORY button 3 Within 30 seconds press the PRESET or button to select the pres...

Page 23: ...tation which is not broadcasting any radio text No RT will be displayed when you switch to the radio text position z Whilst radio text data is received or when the text contents change RT will be displayed To specify programmed types and select stations PTY search You can search a station by specifying the programme type news sports traffic programme etc see page 15 from the stations in memory Usi...

Page 24: ...ntal DRAMA All radio plays and serials CULTURE Programmes concerned with any aspect of OTHER M Musical styles not fitting into any of the other categories Particularly used for specialist music of which Rhythm Blues and Reggae are examples WEATHER Weather reports and forecasts and meteorological information FINANCE Stock Market reports commerce trading etc CHILDREN For programmes targeted at a you...

Page 25: ...not use the timer function z For timer playback Plug in USB or load discs to be played 1 Press the ON STAND BY button to turn the power on 2 Press and hold the CLOCK TIMER button 3 Within 10 seconds press the or button to select Once or Daily and press the ENTER button 4 Within 10 seconds press the or button to select Timer Set and press the ENTER button 5 To select the timer playback source CD TU...

Page 26: ... Daily timer The timer operates at the same time every day It will continue until the daily timer setting is cancelled Cancel the daily timer when it is not in use 1 Turn the power on and press and hold down the CLOCK TIMER button 2 Within 10 seconds press the or button to select Once or Daily and press the ENTER button 3 Within 10 seconds press the or button to select Timer Call and press the ENT...

Page 27: ...is too high sound distortion may occur Should this happen lower the volume of the connected device If volume level is too low increase Audio cable not supplied Portable audio player etc General Symptom Possible cause z The clock is not set to the correct time z Did a power failure occur Reset the clock Refer page 7 z When a button is pressed the unit does not respond z Set the unit to the power st...

Page 28: ...umulation of dirt on the disc surface Follow the guidelines below for maximum enjoyment from your CD collection and player z Do not write on either side of the disc particularly the non label side from which signals are read Do not mark this surface z Keep your discs away from direct sunlight heat and excessive moisture z Always hold the CDs by the edges Fingerprints dirt or water on the CDs can c...

Page 29: ... 10 T H D RMS 100 W 50 W 50 W 10 T H D RMS 66 W 33 W 33 W 1 T H D Output terminals Speakers 4 ohms 20Hz 20kHz Subwoofer Pre out audio signal 200 mV 10 k ohms at 70 Hz Headphones 16 ohms recommended 32 ohms USB USB host interface z Complies with USB 1 1 Full Speed 2 0 Mass Storage Class z Support Bulk only and CBI protocol Support file z MPEG 1 Layer 3 z WMA Non DRM Bitrate support z MP3 32 320 kbp...

Page 30: ...Downloaded From Disc Player com Sharp Manuals ...

Reviews: