background image

XL-E15H_OM_EN.fm

E-13

2009June30

Timer and sleep operation

Before setting timer:

Checking the timer setting:

Cancelling the timer setting:

Reusing the memorised timer setting:

Notes:

z

After selecting the playback source, when press the 

CLOCK/TIMER button to confirm, “SOURCE” will appear and

blink for 2 seconds, then change to last function.

z

When the preset time is reached, playback will start at current

setting if no selected playback source is made.

z

The volume cannot be preset during timer setting.

„

Timer playback

1

Check that the clock is set to the correct time (refer to page 7).
If it is not set, you cannot use the timer function.

2

For timer playback, load the disc to be played back.

1

Press the ON/STAND-BY button to turn the power on.

2

Press the CLOCK/TIMER button for about 2 seconds.

3

Within 10 seconds, press the CLOCK/TIMER button. 

4

Press the PRESET (  or  ) button to set hour then press the
CLOCK/TIMER button.

5

Press the PRESET (  or  ) button to set minute and then
press the CLOCK/TIMER button.

6

Switch input with the PRESET (  or  ) button to select 
“TMR-OFF” and then press the CLOCK/TIMER button.  

7

Press the PRESET (  or  ) button to set hour and then press
the CLOCK/TIMER button.

8

Press the PRESET (  or  ) button to set minute and then
press the CLOCK/TIMER button.

9

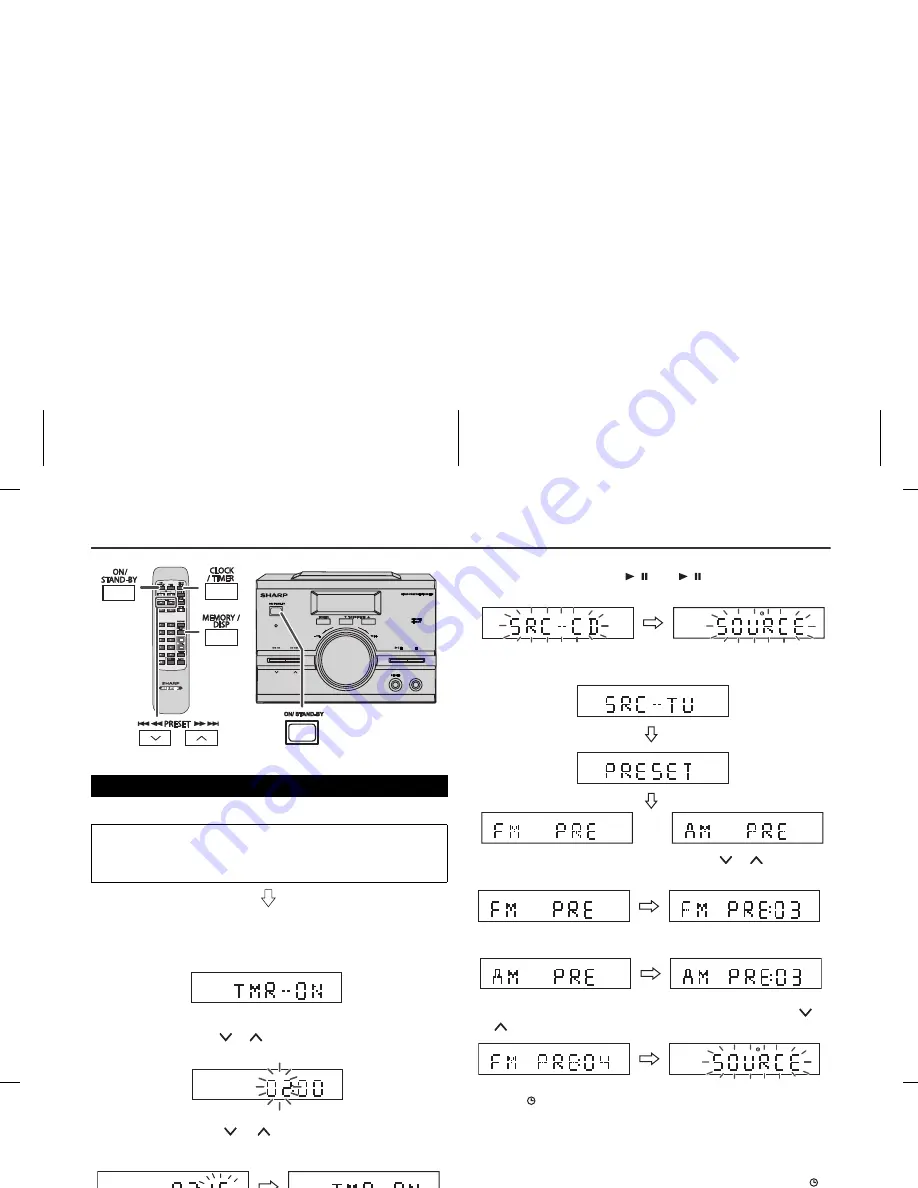
To select the timer playback source, switch input with PRESET
(  or  ) button to select “SOURCE”.

AUDIO IN

AUDIO IN

PRESET

PRESET

XL-E15

XL-E15

10

To select CD, press the  /  (CD  / ) button and then press
the CLOCK/TIMER button.

11

To select TUNER, press the TUNER (BAND) button and then
press the CLOCK/TIMER button.

12

Select a station by pressing the PRESET (  or  ) button and
then press the CLOCK/TIMER button to set the station selected.

OR

13

To select a preset channel number, press the PRESET (  or

) button and then press the CLOCK/TIMER button.

14

The “ ” indicator lights up and the unit is ready for timer
playback.

15

Press the ON/STAND-BY button to enter the power stand-by
mode. Press the CLOCK/TIMER button to confirm the timer
setting.

16

When the preset time is reached, playback will start. “ ”
indicator will blink to show timer playback.

17

When the timer end time is reached, the system will enter 
the power stand-by mode automatically.

1

Press the CLOCK/TIMER button repeatedly to view as follow:

Press the SLEEP button for 2 seconds. The “ ” indicator

disappear and the display show “TMR-OFF”.

The timer setting will be memorised once it is entered. To reuse the

same setting, press the SLEEP button for 2 seconds.

The “ ” indicator light up and the display show “TMR-ON”.

OR

Summary of Contents for XL-E15H

Page 1: ...MICRO COMPONENT SYSTEM MIKROWIEŻA MIKROSYSTÉM MODEL MODEL MODEL XL E15H OPERATION MANUAL INSTRUKCJA OBSŁUGI NÁVOD NA POUŽITÍ ...

Page 2: ...żenie Żeby zapobiec niebezpieczeństwu pożaru lub porażeniu prądem Audiovizuální materiál může obsahovat díla chráněné autorským zákonem které nesmějí být nahrávány bez povolení majitele copyrightu Přečtěte si příslušný zákon ve své zemi Upozornění Abyste zabránili nebezpečí požáru nebo úrazu elektrickým proudem zabraňte kontaktu tohoto zařízení s kapalinami Na zařízení neklaďte žádné předměty s ka...

Page 3: ...ég alatt van Mindig húzza ki a hálózati tápcsatlakozót az elektromos aljzatból bármilyen szervizelési tevékenység előtt illetve amikor hosszabb ideig nem használja a készüléket LT SPECIALIOS PASTABOS Kai mygtukas ON STAND BY nustatytas STAND BY pozicija maitinimo įtampa vis dar yra prietaiso viduje Kai mygtukas ON STAND BY nustatytas STAND BY pozicija prietaisas gali būti įjungiamas laikmačiu arba...

Page 4: ...ut the take back of the product You might be charged for the costs arising from take back and recycling Small products and small amounts might be taken back by your local collection facilities 2 In other Countries outside the EU If you wish to discard of this product please contact your local authorities and ask for the correct method of disposal INFORMATION ON BATTERY DISPOSAL For EU The crossed ...

Page 5: ...te se na prodejce SHARP který vás informuje o odebrání výrobku Odebrání a recyklace mohou být zpoplatnČny Malé výrobky a malá množství mohou odebírat místní sbČrny odpadu 2 V ostatních zemích mimo Evropskou unii Chcete li tento výrobek zlikvidovat obrat te se na místní orgány které vás seznámí s vhodnou metodou likvidace INFORMACE O LIKVIDACI BATERIÍ V zemích Evropské unie PĜeškrtnutá nádoba na od...

Page 6: ...vă va informa despre preluarea produsului PuteĠi fi obligaĠi la plata serviciului de preluare úi reciclare Produsele mici úi în cantităĠi mici pot fi preluate de punctele locale de colectare Pentru Spania Vă rugăm să contactaĠi sistemul de colectare sau autorităĠile locale pentru preluarea produselor uzate 2 În alte Ġări din afara UE Dacă doriĠi să aruncaĠi acest produs vă rugăm să contactaĠi auto...

Page 7: ...rrĘl B Hulladék elhelyezési tájékoztató vállalati felhasználók részére 1 Az Európai Unióban Ha a terméket üzleti célokra használta és ki kívánja selejtezni Kérjük forduljon a SHARP kereskedéshez ahol tájékoztatják Önt a termék visszavételérĘl Lehetséges hogy a visszavételbĘl és újrahasznosításból eredĘ költségeket felszámítják ElĘfordulhat hogy a helyi hulladékbegyĦjtĘ létesítmény átveszi a kisebb...

Page 8: ...ts and or other networks other revenue generating content distribution systems pay audio or audio on demand applications and the like or on revenue generating physical media compact discs digital versatile discs semiconductor chips hard drives memory cards and the like An independent license for such use is required For details please visit http mp3licensing com MPEG Layer 3 audio coding technolog...

Page 9: ...d level at a given volume setting depends on speaker efficiency location and various other factors It is advisable to avoid exposure to high volume levels Do not turn the volume on to full at switch on Listen to music at moderate levels Excessive sound pressure from earphones and headphones can cause hearing loss General z Use the unit on a firm level surface free from vibration z Keep the unit aw...

Page 10: ... 5 2 FM Aerial Wire 4 3 AM Loop Aerial Sockets 4 4 Speaker Terminals 5 Reference page 1 Remote Control Transmitter 5 2 On Stand by Button 6 3 CD Stop Button 8 10 4 CD Play Pause Button 8 11 5 Disc Track Down or Fast Reverse Tuner Preset Down Time Down Button 7 8 12 13 6 Disc Track Up or Fast Forward Tuner Preset Up 6 1 2 3 4 5 1 2 4 3 10 11 12 2 3 4 1 Display Rear panel Speaker system 1 Full Range...

Page 11: ... to unplug the AC power lead before making any connections Right speaker Wall socket AC 220 240 V 50 60 Hz Left speaker AM loop aerial Aerial connection see page 4 Speaker connection see page 5 AC power connection see page 5 FM aerial ...

Page 12: ... the batteries if the operating distance is reduced or if the operation becomes erratic Purchase 2 AAA size batteries UM 4 R03 HP 16 or similar z Periodically clean the transmitter on the remote control and the sensor on the unit with a soft cloth z Exposing the sensor on the unit to strong light may interfere with operation Change the lighting or the direction of the unit if this Speaker connecti...

Page 13: ...control Press again to restore the volume When the EQUALIZER button on the remote control is pressed the current mode setting will be displayed To change to a different mode press the EQUALIZER button repeatedly until the desired sound mode appears To turn the power on Press the ON STAND BY button to turn the power on After use Press the ON STAND BY button to enter the power stand by mode At STAND...

Page 14: ... files z During VBR file playback time counter in the display may differ from its actual playback time z Bitrate which is supported by MP3 is 32 320 kbps WMA WMA files are Advanced System Format files that include audio files which are compressed with Windows Media Audio codec WMA is developed by Microsoft as an audio format file for Windows Media Player z Bitrate which is supported by WMA is 64 1...

Page 15: ...indle label side up 8 cm 3 disc may be played without an adaptor 4 Close the disc compartment z Due to the structure of its disc information it takes longer approximately 20 to 90 seconds to read a CD R RW disc recorded in the MP3 or WMA format than a normal CD FUNCTION FUNCTION MICRO COMPONENT SYSTEM MICRO COMPONENT SYSTEM XL MP15 XL MP15 PHONES PHONES ON STAND BY ON STAND BY REMOTE REMOTE SENSOR...

Page 16: ...ext by the random operation z In random play the unit will select and play tracks automatically You cannot select the order of the tracks z During random play repeat function is not possible z In random function playback will stop after all the tracks is played randomly Notes z This unit only supports MPEG 1 Audio Layer 3 format Sampling Frequency is 32 44 1 48kHz MPEG 2 Audio Layer 3 MPEG 2 5 Aud...

Page 17: ...d if you press the ON STAND BY button to enter the stand by mode or change the function from CD to another Programmed play 1 Whilst in the stop mode press the MEMORY DISP button to enter the programming save mode 2 Press the or button to select the desired tracks 3 Press the MEMORY DISP button to save the track number 4 Repeat steps 2 3 for other tracks Up to 32 tracks can be programmed 5 Press th...

Page 18: ...d back To playback CD R RW About folder playback order 1 ROOT folder is set as folder 1 2 As for folders inside ROOT folder Folder A and Folder B the folder which is recorded earlier on the disc will be set as folder 2 3 As for folder inside Folder A Folder C and Folder D the folder which is recorded earlier on the disc will be set as folder 3 4 Because there is no folder in Folder C Folder D will...

Page 19: ...e than 0 5 seconds scanning will start automatically and the MICRO COMPONENT SYSTEM MICRO COMPONENT SYSTEM XL E15 XL E15 PHONES PHONES ON STAND BY ON STAND BY REMOTE REMOTE SENSOR SENSOR ON STAND BY ON STAND BY FUNCTION FUNCTION AUDIO IN AUDIO IN PRESET PRESET TUNING TUNING DISP DISP MEMORY MEMORY TUNER TUNER BAND BAND FOLDER FOLDER Memorising a station 1 Perform steps 1 3 in Tuning on page 12 2 P...

Page 20: ...en press the CLOCK TIMER button AUDIO IN AUDIO IN PRESET PRESET XL E15 XL E15 10 To select CD press the CD button and then press the CLOCK TIMER button 11 To select TUNER press the TUNER BAND button and then press the CLOCK TIMER button 12 Select a station by pressing the PRESET or button and then press the CLOCK TIMER button to set the station selected OR 13 To select a preset channel number pres...

Page 21: ...ing sleep time whilst it is displayed by pressing the SLEEP button step 2 1 Press the SLEEP button repeatedly to select SLEEP 00 To use timer and sleep operation together 1 Set the sleep time see Sleep Operation 2 Whilst the sleep timer is set set the timer playback steps 2 14 page 13 Timer playback start time Sleep operation will automatically stop Timer playback setting Sleep timer setting End t...

Page 22: ...the power on Note If neither operation above restores the unit clear all the memory by resetting it 1 Press the ON STAND BY button to enter the power stand by mode 2 Press and hold TUNING FOLDER and press ON STAND BY button on main unit RESET appear Caution This operation will erase all data stored in memory including clock timer setting tuner preset and CD programme General Symptom Possible cause...

Page 23: ...lens If finger prints or dust accumulate on the pickup clean it gently with a dry cotton swab MICRO COMPONENT SYSTEM MICRO COMPONENT SYSTEM XL MP15 XL MP15 PHONES ON STAND BY ON STAND BY REMOTE REMOTE SENSOR SENSOR AUDIO IN PRESET General Power source AC 220 240 V 50 60 Hz Power consumption Power on 15 W Power stand by 0 6 W Dimensions Width 200 mm 7 7 8 Height 137 mm 5 3 8 Depth 210 mm 8 1 4 Weig...

Page 24: ......

Reviews: