background image

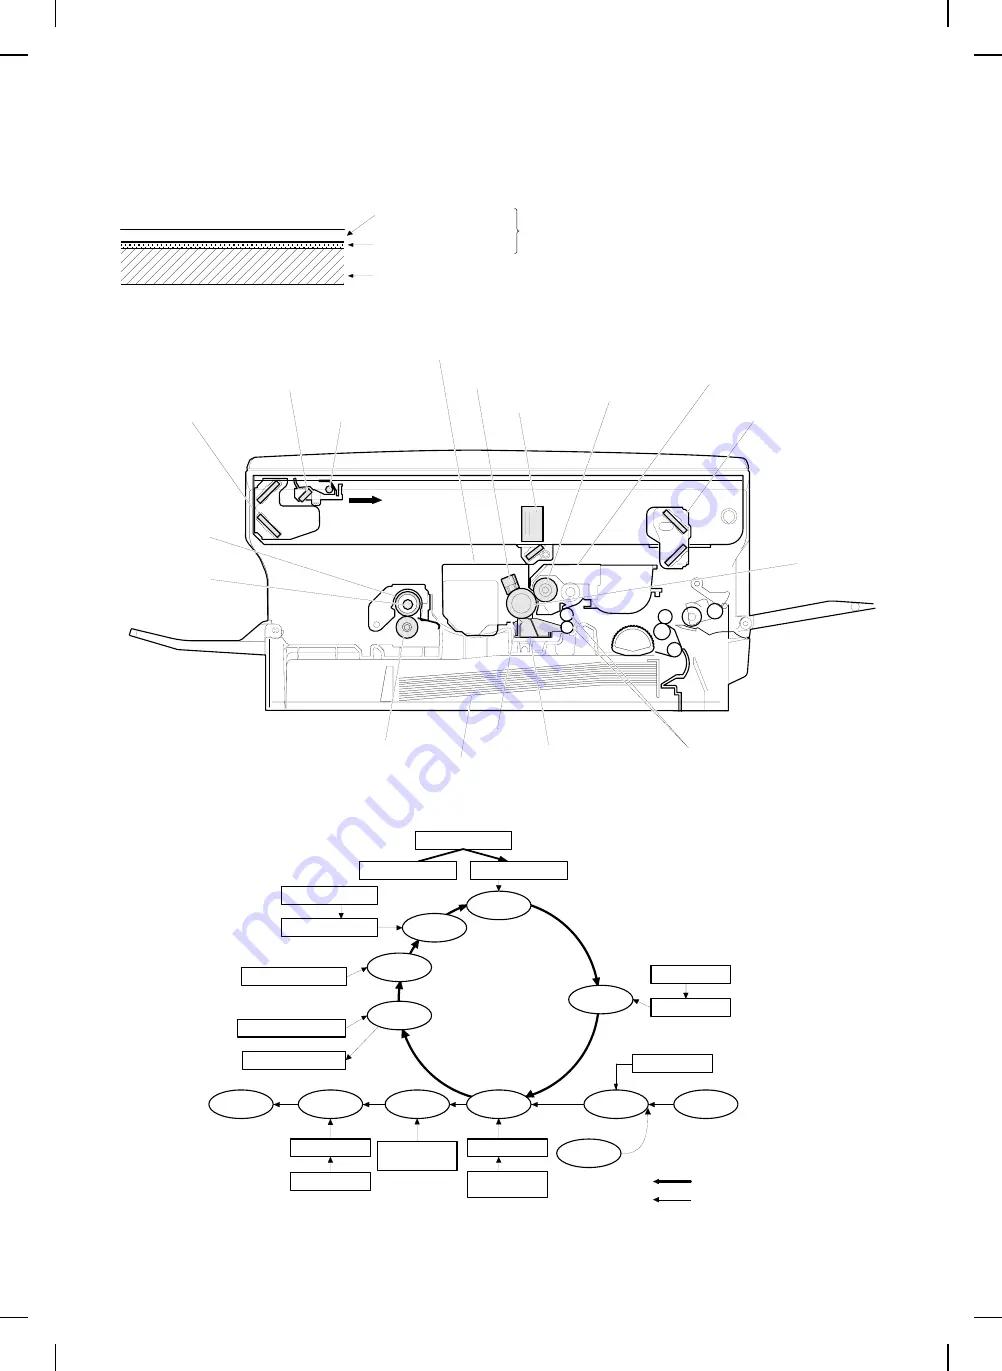
[6] COPY PROCESS

1. Copy process composition

Drum base

An OPC drum is used for the photoconductor.
(Structure of the OPC drum layers)

Carrier Transfer layer

(About 20µm)

OPC layer

Carrier Generation layer

No. 2/No. 3 mirror unit

No. 1 mirror

Copy lamp

Drum cartridge

Main charger

Lens

MG roller

TD cartridge

No. 4/No. 5 mirror unit

Drum

Resist roller

Transfer unit

Separation
electrode

Paper tray

Lower heat roller

Heater lamp

Upper heat roller

Exposure

Main high voltage unit

Main corona

Charge

Discharge

Drum

Cleaning

Cleaning blade

Waste toner collection

Paper exit

Fusing

Separation

Heat roller

Heater lamp

Transfer

Transfer corona

Transfer high
voltage unit

Developing

Toner

Developer

Image forming process

Sync with
drum

Original

Copy lamp

Mirror/Lens

Separation 
electrode

paper feed

Manual
paper feed

Paper transport route

Discharge lamp

Resist roller

Copy process flow

Tray

6 – 1

www.freeservicemanuals.info

1/11/16

Published in Heiloo, Holland.

Summary of Contents for Z-810

Page 1: ...Y 8 1 9 ADJUSTMENTS 9 1 10 SIMULATION SELF DIAGNOSTICS 10 1 11 USER PROGRAMS 11 1 12 ELECTRICAL SECTION 12 1 SHARP CORPORATION CONTENTS This document has been published to be used for after sales service only The contents are subject to change without notice Parts marked with is important for maintaining the safety of the set Be sure to replace these parts with specified ones for maintaining the s...

Page 2: ... ASSEMBLY 1 Operation panel 8 1 2 Optical section 8 1 3 Fusing section 8 6 4 Tray paper feed transport section 8 8 5 Manual paper feed section 8 10 6 Rear frame section 8 13 7 Others 8 15 9 ADJUSTMENTS 1 Optical section 9 1 2 Copy density adjustment 9 18 3 Others 9 22 10 SIMULATION 1 Entering the simulation mode 10 1 2 Simulation list 10 2 3 Contents of simulation 10 3 4 Toner save mode setting an...

Page 3: ... conditions To assure copy quality and the machine performances the following environment conditions must be observed 1 Standard condition Temperature 20 25 C Humidity 65 5 RH 2 Operational condition 3 Transit condition 4 Supply storage condition 85 60 20 10 C 30 C 35 C Humidity RH 90 60 20 20 C 30 C 45 C Humidity RH 90 20 5 C 40 C Humidity RH 5 Basic specification matrix Item Model Z 810 Z 820 Z ...

Page 4: ...s Standard paper specified paper recycled paper Remark User adjustment of paper guide available Single manual paper feed section Paper size A4 B5 A5 B6 A6 Post card All landscape feed Paper weight 52 130g m2 Paper feed capacity Kind Standard paper specified paper recycled paper second original paper OHP label postcard Remark User adjustment of paper guide available Multi manual paper feed section ...

Page 5: ...label postcard single copy only except for standard paper specified paper recycled paper post card Remark Fordable user adjustment of paper guide available Paper exit section Paper exit tray capacity 50 sheets Original table Original reference position Left center Max original size B4 10 14 Original kinds Sheet book solid body Optical section Exposure system Slit exposure by moving the optical sys...

Page 6: ...ification Fixed magnification ratios 2R 2E AB series 141 115 100 81 70 Inch series 141 129 100 78 70 Zooming magnification ratios 70 141 72 steps in increment of 1 Manual steps manual photo 5 steps Copy speed First copy time Tray paper feed 8 0 sec Pre heat mode 16sec or below Auto power shut off mode 20sec or below Manual paper feed 8 0 sec Pre heat mode 16sec or below Auto power shut off mode 20...

Page 7: ... Note 3 Registration card name SEC Registration card One year warranty SUK On site warranty registration sheet Destination Japan SEC SECL SEEG SUK SCA AB series agents Inch series agents Tray Universal F Installed when shipping F Installed when shipping F Installed when shipping F Installed when shipping F Installed when shipping F Installed when shipping F Installed when shipping F Installed when...

Page 8: ...eveloper cartridge 1 3K ZT 81TD3 5 Toner 155g developer 165g 4 Drum cartridge Drum cartridge 1 12K ZT 81DR 5 Drum 1 Cleaner blade 1 Toner reception seal 1 Main charger 1 Note No 4 Drum cartridge is a completely assembled unit and component parts are not supplied as service parts The words printed on the individual box are in English German French and Spanish SCNZ South and Central America Asia Age...

Page 9: ...in English German French and Spanish Saudi Arabia No Name Content Life Outside product name Package 1 Developing cartridge Black Toner developer cartridge 1 4K ZT 81TD1 5 Toner 170g developer 165g 2 Developing cartridge Red Toner developer cartridge 1 3K ZT 81TD2 5 Toner 155g developer 165g 3 Developing cartridge Blue Toner developer cartridge 1 3K ZT 81TD3 5 Toner 155g developer 165g 4 Drum cartr...

Page 10: ...tion month January 1 September 9 October 0 November X December Y 1 8 Division No Japan Black option Overseas Black option Japan Red option Overseas Red option Japan Blue option Overseas Blue option Overseas production packed together Same pack for SMF production 8 2K cartridge for same pack for SEC SECL SCA 7 Production control label attachment position Factory Serial No 00001 99999 Production mon...

Page 11: ... 1 Appearance 1 Exit tray 2 Operation panel 3 Document glass 4 Document cover 5 Power switch 6 Paper tray 7 Release lever 8 Bypass tray guides 9 Bypass tray 5 4 3 2 8 7 6 1 9 4 1 www freeservicemanuals info 1 11 16 Published in Heiloo Holland ...

Page 12: ...s play 3 Drum replacement required indicator When 11 000 copies are made after installing the photoconduc tor cartridge this lamp lights up When 1 000 copies are made after that the lamp blinks to stop the machine The remaining life of the photoconductor cartridge is displayed on the COPY QUANTITY display in 2 digits 3 times 6 digits in total by pressing and holding the clear key for more than 5 s...

Page 13: ...3 Internal 1 Drum cartridge 2 TD cartridge 3 Fusing unit lever 4 Transfer corona cleaner 5 Fusing unit 6 Transfer corona 2 1 3 4 6 5 4 3 www freeservicemanuals info 1 11 16 Published in Heiloo Holland ...

Page 14: ...4 Toner motor Supplies toner 5 Cooling fan motor Cools the optical section 6 Exhaust fan motor Cools the inside of the machine 7 Tray paper feed paper transport roller solenoid Presses the take up roller and rotates the transport roller 8 Resist roller solenoid Rotates the resist roller 6 5 1 8 7 4 3 2 4 4 www freeservicemanuals info 1 11 16 Published in Heiloo Holland ...

Page 15: ...n Mirror home position detection Home position H F Main motor rotation sensor PWB Common Main motor rotation detection H when interrupted by the encoder G Lenz home position sensor PWB Common Lens home position detection Home position H H PPD1 sensor PWB Common Paper transport sensor 1 L when paper is passed I PPD2 sensor PWB Common Paper transport sensor 2 L when paper is passed J POD sensor PWB ...

Page 16: ...do not touch the photoconductive drum Scratches or smudges on the drum will cause dirty copies 2 The fusing area is hot Exercise care in this area Never use the oils and greases which are not listed in this material 3 Installing procedure Unpacking Set up 1 Remove the copier from the bag 2 Remove all pieces of tape from the copier and remove the cor rugated cardboard from under the exit tray NOTE ...

Page 17: ...mes 8 Remove the cover from the TD cartridge 9 Slide the TD cartridge in until it locks in place 10 Gently push down the upper half of the copier to close it To do this place both your hands on the middle of the right hand side of the document cover 11 Pull out the paper tray remove the pressure plate lock load copy paper into the tray and push the paper tray firmly back into the copier If the pre...

Page 18: ...trode Paper tray Lower heat roller Heater lamp Upper heat roller Exposure Main high voltage unit Main corona Charge Discharge Drum Cleaning Cleaning blade Waste toner collection Paper exit Fusing Separation Heat roller Heater lamp Transfer Transfer corona Transfer high voltage unit Developing Toner Developer Image forming process Sync with drum Original Copy lamp Mirror Lens Separation electrode p...

Page 19: ...enly neutralize the drum surface As the electrical resistance is decreased the positive charge in the aluminium layer moves to neutralize the negative charge present in the OPC layer Step 2 Charge A uniform negative charge is applied over the OPC drum surface by the main corona unit Step 3 Exposure Copy lamp mirror lens The original image is projected through the mirror and the lens to the OPC dru...

Page 20: ...tting procedure For setting use Sim 26 11 1 Set value 1 5 Set value Content 0 OPC drum membrane decrease correction is not performed 1 For every 3 000 copies the copy lamp voltage is increased by 0 33 V 0 66 V in 200 V series 2 For every 3 000 copies the copy lamp voltage is increased by 0 66 V 1 32 V in 200 V series 3 For every 3 000 copies the copy lamp voltage is increased by 0 99 V 1 98 V in 2...

Page 21: ...o 5 mirror 9 No 6 mirror F No 2 No 3 mirror unit G Copy lamp unit H No 4 No 5 mirror unit I Mirror motor J Lens No 4 No 5 mirror unit drive motor K Lens home position sensor L Mirror home position sensor M Auto exposure sensor 1 Original table The original table is fixed and originals are set to the left frame side as the reference 2 Copy lamp 100V system 200W 200V system 200W 3 Mirror Six mirrors...

Page 22: ...s used to transmit the drive power of the mirror motor to the copy lamp unit and the No 2 3 mirror base to scan the mirror base 18 Lens drive motor This is a stepping motor which is used to move the lens and the No 4 5 mirror base 19 AE sensor The original density is detected with the intensity of the copy lamp light reflected from the original The measurement area is the mirror base scan area of ...

Page 23: ...he manual den sity mode The applying voltage becomes lower 7 2 Fuser section General description General block diagram cross section Top view The mirror base scan speed mirror motor rpm is changed to zoom Copy paper feed direction The lens and the mirror are moved to zoom The mirror scan speed is changed to zoom Mirror scan speed Drum rotating speed Enlargement Original The lens and the mirror are...

Page 24: ...below 140 C during the copy cycle c Open thermistor d Open thermal fuse e When the temperature does not reach 185 C within 27 sec after supplying the power D Fusing resistor Fusing resistor This model is provided with a fusing resistor in the fusing section to improve transfer efficiency General descriptions are made in the following General descriptions Since the upper heat roller is conductive w...

Page 25: ...e given below Paper 11 8 5 19 12 14 18 17 5 5 6 4 13 7 3 16 16 16 15 3 9 3 10 2 1 2 A Tray paper feed operation 1 The figure below shows the positions of the pick up roller the paper feed clutch sleeve and the paper feed latch in the initial state without pressing the COPY button after lighting the ready lamp The paper feed latch is in contact with the projection of the clutch sleeve 2 When the CO...

Page 26: ... disengage the resist start latch from the clutch sleeve projection transmitting rotation of the resist drive gear to the resist roller shaft Thus the paper is transported by the resist roller 7 After the resist roller starts rotating the paper is passed through the pre transfer roller to the transfer section Images are trans ferred on the paper which is separated from the OPC drum by the drum cur...

Page 27: ...ns hereinafter are the same as the paper feed opera tions from the tray Refer to A 5 8 C Conditions of occurrence of paper misfeed 1 When the power is turned on PPD or POD is ON when the power is turned on 2 Copy operation a PPD1 jam 1 PPD1 does not turn off within 4 sec after turning on the resist roller b PPD2 jam 1 PPD2 is off immediately after turning on the resist roller 2 PPD2 does not turn ...

Page 28: ...intermittent gear B is shifted from Fig 1 to Fig 2 2 At the second rotation of intermittent gear A intermittent gear B is shifted from Fig 2 to Fig 3 to turn on the new drum cartridge sensor recognizing the new drum cartridge 3 At the third rotation of intermittent gear A intermittent gear B is shifted from Fig 3 to Fig 4 completing the operation After completion of the operation though intermitte...

Page 29: ... Part name Ref page 1 Operation panel unit 8 1 2 Operation PWB 8 1 B Disassembly procedure 1 Remove four screws and the harness and remove the operation panel unit 2 Remove five screws and remove the PWB holder 3 Remove five screws and remove the operation PWB C Assembly procedure Reverse the disassembly procedure 2 Optical section 8 1 www freeservicemanuals info 1 11 16 Published in Heiloo Hollan...

Page 30: ...or PWB 8 3 8 Lens home position sensor PWB 8 3 B Disassembly procedure 1 Remove the parts as shown below 2 Remove two screws and the connector and remove the copy lamp unit 3 Remove the copy lamp 4 Remove the E ring and the shaft and the lens drive wire and remove the lens unit Copy lamp unit Copy lamp Lens unit 8 2 www freeservicemanuals info 1 11 16 Published in Heiloo Holland ...

Page 31: ...ove No 4 5 mirror unit 7 Remove one screw and remove the mirror home position sensor 8 Remove one screw and remove the lens home position sensor 9 Remove one screw and remove the AE holder F Remove one screw and remove the AE sensor PWB AE sensor PWB AE holder 8 3 www freeservicemanuals info 1 11 16 Published in Heiloo Holland ...

Page 32: ...se positioning plate 3 Hold so that the winding pulley groove is up and wind the mirror base drive wire 8 turns 4 Put the 7th turn of the mirror base drive wire in the winding pulley groove and fix with a screw 5 Pass the wire under Mo 2 3 mirror unit plate and wind it around pulley A 6 Pass the wire through the internal groove of the double pulley and pass through pulley B 7 Hook the spring hook ...

Page 33: ...re to perform the focus adjustment Normal Change the position of No 4 5 mirror unit drive lever to adjust Enlargement Reduction Change the position of the zooming cam to adjust D Lubrication and greasing 1 Apply grease to the lens unit driving section Grease name White grease X5 6020 Part code UKOG 0158FCZZ 2 Apply grease to the lens unit and No 4 5 mirror unit drive section Grease name Floil grea...

Page 34: ...t No Part name Ref page 1 Fusing upper unit 8 6 2 Heater lamp 8 7 3 Thermostat unit 8 7 4 Thermistor 8 7 5 Upper heat roller 8 7 6 Separation pawl 8 8 7 Lower heat roller 8 8 8 Cleaning roller 8 8 B Disassembly procedure 1 Loosen the blur screw and remove the fusing upper unit and remove the cover Copy lamp unit running section No 2 3 mirror unit running section 1 3 2 Cover 8 6 www freeservicemanu...

Page 35: ...xing band and remove the thermis tor 5 Remove the spring and the separation pawl 6 Remove the plate spring of the heater lamp on the right side 7 Remove C ring on the left side and the bearing and remove the upper heat roller Plate spring Heater lamp Separation pawl 8 7 www freeservicemanuals info 1 11 16 Published in Heiloo Holland ...

Page 36: ...e disassembly procedure D Lubrication and greasing Apply grease to the U section of the lower heat roller bearing Grease name Floil grease Floil GU2 Part code UKOG 0255FCZZ 4 Tray paper feed transport section C ring Bearing Upper heat roller Bearing Gear C ring Lower heat roller Cleaning roller 8 8 www freeservicemanuals info 1 11 16 Published in Heiloo Holland ...

Page 37: ... and remove the clutch unit 3 Remove E ring and the spring and remove the paper feed link arm and the bearing 4 Remove the paper feed roller unit from the tray paper feed unit paper transport unit 5 Remove PPD1 sensor PWB 6 Remove PPD2 sensor PWB Tray paper feed unit paper transport unit Paper feed roller Paper feed link arm Clutch unit PPD1 sensor PWB PPD2 sensor PWB 8 9 www freeservicemanuals in...

Page 38: ...r 8 11 3 Spring clutch A 8 11 4 Spring clutch B 8 12 5 Multi field solenoid 8 12 B Disassembly procedure 1 Remove four screws and the harness and remove the multi paper feed unit 2 Remove two screws and the spring and remove the arm hinge arm B stopper and arm A 3 Remove four screws and remove the paper feed unit Arm hinge Arm A Arm B Stopper 8 10 www freeservicemanuals info 1 11 16 Published in H...

Page 39: ...he paper feed roller 6 Remove the pick up roller 7 Remove the parts of spring clutch A as shown below 8 Remove two screws and remove the bracket Paper feed roller Pick up roller 8 11 www freeservicemanuals info 1 11 16 Published in Heiloo Holland ...

Page 40: ...nsertion position of the spring when installing spring clutch B Insert the hook into the initial position where it was before disassembly 3 After assembly of the unit rotate the gear section and check that the stopper and arm B are at the initial positions E Lubrication and greasing 1 Apply grease to the cam boss of spring clutch A Grease name Floil grease Floil G 484 Part code UKOG 0238FCZZ L O C...

Page 41: ...me Floil grease Floil G 484 Part code UKOG 0238FCZZ 6 Rear frame section A List No Part name Ref page 1 Main PWB unit 8 13 2 High voltage PWB unit 8 14 3 AC PWB unit 8 14 4 DC PWB unit 8 14 5 Drive unit 8 15 B Disassembly procedure 1 Remove one screw and the harness and remove the main PWB unit Main PWB 8 13 www freeservicemanuals info 1 11 16 Published in Heiloo Holland ...

Page 42: ... PWB unit 3 Remove one screw and the harness and remove the high voltage PWB unit 4 Remove four screws and remove the cover 5 Remove two screws and the harness and remove the AC PWB unit 8 14 www freeservicemanuals info 1 11 16 Published in Heiloo Holland ...

Page 43: ...g of the wire 2 Do not mistake the transfer charger connector with the separation electrode connector for insertion 7 Others A OC matt attachment procedure 1 Put the OC matt to the reference position as shown below and remove the duplex tape 2 Tilt down the OC cover and attach the OC matt Drive unit Socket unit Transfer charger harness Duplex tape Reference position 8 15 www freeservicemanuals inf...

Page 44: ... following precautions when performing adjust ments 1 Observe the sequence of procedures shown in the flowchart below 2 Adjustments can be started midway in the flowchart only if all the previous items have been properly adjusted 3 If the content of an adjustment item in the flowchart is changed all the following items must ge adjusted accordingly 4 Sim in the flowchart stands for Simulation Lens ...

Page 45: ...the test chart UKOG 0089CSZZ or the resolution chart andmake a 100 copy on A4 or 8 1 2 x 11 paper so that the resolutionpatterns are copied at the center and the four corners Check the resolution at the center and the four corners Set the scale along the document reference plate vertical to thepaper transport direction and make a 100 copy on A4 or 8 1 2 x11 paper Compare the scale and the copy ima...

Page 46: ...exposure adjustment plate toadjust the uniformity Make copies at the max and the min ratios Measure the distance between the copy image lead edge and the copypaper lead edge of each copy and compare the two Make a 100 copy with Sim 50 1 A Measure the copy image lead edge and the copy paper lead edge Change Sim 50 1 set value A so that so that the difference iswithin the specified range Change Sim ...

Page 47: ...he optical axis of the lens in parallel with each other III Note The copy image distortion adjustment is completed by making a copy and adjusting parallelism of the mirror For that purpose this adjustment must have been properly per formed IV Cases when the adjustment is required 1 When the lens or the lens unit is disassembled or its part is replaced 2 When the copy image is distorted as follows ...

Page 48: ...n fixing screw without moving the lens unit drive gear 6 Turn the No 4 5 mirror unit drive cam without moving the lens unit drive gear so that the cam position hole is fit with the reference hole in the optical unit frame 7 Pass the pin through the No 4 5 mirror unit drive cam positioning hole and fix so that the cam does not turn 8 Tighten the cam fixing screw to fix the No 4 5 mirror unit drive ...

Page 49: ...is distorted as shown below V Necessary tools Screwdriver Hex wrench Scale Test chart for distortion adjustment Make a chart shown below by yourself Draw a rectangle on a paper B4 or 8 1 2 x 14 as shown below Be sure to make four right angles VI Adjustment procedure 1 Remove the right cabinet manual paper feed unit the docu ment reference plate 2 Remove the document glass 3 Loosen the fixing screw...

Page 50: ...unit projection to check parallelism and fix the copy lamp unit to the drive wire Procedures 1 to 8 are for adjustment of mechanical horizontal parallelism The copy lamp unit and No 2 3 mirror are fixed to the specified positions and the mechanical horizontal parallelism of No 2 3 mirror is adjusted Then the optical horizontal parallelism must be adjusted in the following procedures 9 Set the imag...

Page 51: ...rt is replaced 2 When the copy lamp unit No 2 3 mirror unit drive section is disassembled or its part is replaced 3 When the copy image is distorted as follows V Necessary tools Screwdriver Screwdriver Scale Test chart for distortion adjustment Make by yourself Draw a rectangle on A4 or 8 1 2 x 11 paper as shown below Be sure to make four right angles VI Adjustment procedure 1 Set the test chart f...

Page 52: ...image center at the vertical center of the copy paper III Note Before performing this adjustment the following adjustment must have been completed If not this adjustment cannot be performed properly No 4 5 mirror unit right angle adjustment Image distortion adjustment IV Cases when the adjustment is required 1 When the lens unit is disassembled or its part is replaced 2 When the copy image is shif...

Page 53: ...nt is required 1 When the lens or the mirror unit is disassembled or any one of their parts is replaced 2 When the copy lamp unit No 2 3 mirror unit drive section is disassembled or its part is replaced 3 When a cop image of improper focus is obtained V Necessary tools Screwdriver Test chart One with the resolution adjustment chart VI Adjustment procedures 1 Set the test chart on the document tabl...

Page 54: ...justments must have been completed If not this adjustment cannot be performed properly Image distortion adjustment Focus adjustment The vertical magnification ratio adjustment must be performed in advance to the horizontal copy magnification ratio adjustment Never reverse the sequence The horizontal copy magnification ratio is based on the vertical copy magnification ratio III Cases when the adjus...

Page 55: ...to a smaller value the actual copy magnification ratio becomes smaller Repeat procedures 1 to 8 until the vertical copy magnification ratio in the normal 100 copy mode is within the specified range b Horizontal copy magnification ratio adjustment Zoom copy I Summary Scanning speed is changed with simulations 48 1 to adjust the horizontal copy magnification ratio II Note Before performing this adju...

Page 56: ...ratio adjustment and the horizontal copy magnification ratio ad justment Selection is made by the density select key Vertical copy magnification ratio adjustment Auto density lamp ON Horizontal copy magnification ratio adjustment Auto Manual density lamp ON 8 Enter a new horizontal copy magnification ratio with the copy quantity set key and press COPY button The above proce dure changes the lens h...

Page 57: ...posure balance Fig 1 5 Make a copy in the same manner as procedure 2 and check the uniformity Repeat procedures 1 to 5 until proper uniformity is ob tained VII Troubles caused by improper adjustment 7 Image loss void area adjustment The image loss void area adjustment is performed by the combination of the copied image position adjustment on the copy paper and the void area adjustment Since the im...

Page 58: ... set adjustment values is displayed on the COPY QUANTITY display Adjustment value A Corresponds to the time interval from the scanner unit starting and the scanner home position sensor OFF to reaching at the lead edge of the document That is this is the value used to determine the optical document lead edge reference position and it must be fit with the edge section of the document reference plate...

Page 59: ...above range change adjustment value B and repeat procedure 10 until it is within the above range b Void area adjustment I Summary After adjustment of the copy image position with Sim 50 1 select the mode of Sim 50 1 to adjust the void area The adjustment is performed by changing the time interval from the mirror motor ON to the main corona grid ON On the other hand the rear edge void area is adjus...

Page 60: ...r replaced V Necessary tools Screwdriver Scale Test chart Black background document VI Adjustment procedure Lead edge void area adjustment 1 Put a scale and B4 or 81 2 14 paper on the document table 2 Execute simulations 50 1 to set to the lead edge void ad justment mode The set adjustment value is displayed on the COPY QUANTITY display 3 With the document cover open make several copies at 100 4 M...

Page 61: ...eplaced When the AE sensor is replaced When the main control PWB is replaced When the EEPROM on the main control PWB is replaced When memory trouble U occurs When any part of the copy lamp control circuit is replaced When the AC power PWB is replaced 2 Note for copy density adjustment 1 Perform the following items before the copy density adjustment Clean the optical section Clean the AE sensor Cle...

Page 62: ...adjustment 5 Copy density adjustment procedure The copy density adjustment is performed by changing the exposure level at each copy mode in Sim 46 01 The exposure level is changed by changing the copy lamp voltage The copy density adjustment must be performed for five copy modes Selection of the modes is made with the exposure mode select key A Test chart UKOG 0162FCZZ setting 1 Set the test chart...

Page 63: ... the copy quantity display 2 Adjust at exposure level 3 1 and 5 similarly with the manual mode non toner save mode D Photo copy mode copy density adjustment 1 Press the exposure mode select key to set to the photo mode The operation panel displays the photo mode When exposure level 3 is displayed the value is displayed on the copy quantity display 2 Adjust at exposure level 3 1 and 5 similarly wit...

Page 64: ...6 7 8 9 Not copied Slightly copied 1 10 W 2 3 4 5 6 7 8 9 Slightly copied Not copied 1 10 W 2 3 4 5 6 7 8 9 Not copied Clearly copied 1 10 W 2 3 4 5 6 7 8 9 Not copied Slightly copied 1 10 W 2 3 4 5 6 7 8 9 Slightly copied Not copied 1 10 W 2 3 4 5 6 7 8 9 Clearly copied Not copied 1 10 W 2 3 4 5 6 7 8 9 Slightly copied Not copied 9 21 www freeservicemanuals info 1 11 16 Published in Heiloo Hollan...

Page 65: ...performed No 4 5 mirror unit right angle adjustment is completed The copy image center adjustment is completed III Necessary tools Screwdriver Scale Test chart for center position adjustment Make a test chart as shown below Draw a line in the paper transport direction at the center of A4 or 8 1 2 x 11 paper IV Adjustment procedure 1 Set the center position adjustment test chart to the document ref...

Page 66: ...The DV bias voltage is outputted for 30 sec 4 Adjust the DV bias adjustment volume to set the output voltage to 150 10V 3 Main charger 1 Set the digital multi meter range to DC700V or above 2 Put the test rod to the GB side of the high voltage PWB and the chassis GND 3 Execute Sim 8 2 The main charger and the transfer charger are turned on for 30 sec 4 Adjust the adjustment volume so that the outp...

Page 67: ...ion number performed Press the clear key All displays on the operation panel go off and the machine enters the ready state for entering the main code Press the clear key End Is the main code the same Is the sub code displayed Press the clear key The COPY QUANTITY display blinks to indicate the previously set sub enters the ready7 state for sub code input code and the machine Press the clear key En...

Page 68: ...ing temperature setting 43 4 Fusing temperature in multi copy 46 1 Exposure level adjustment Note 1 47 AE sensor characteristics measurement 48 1 Vertical horizontal copy magnification ratio adjustment and zooming exposure correction setting Note 1 50 1 Lead edge image position adjustment and void adjustment lead edge rear edge Note 1 51 2 Resist amount adjustment Note 1 In the simulation mode exc...

Page 69: ...dure Operation of simulation 1 3 is repeated continuously Aging 5 1 Operation panel display lamp and the control circuit operation check Operation procedure Every time when the COPY key is pressed half of the display lamps on the operation panel light up alternatively 1 Copy key Power save key Copy quantity display Zoom indicator 2 Copy ratio indicator AB series 141 115 100 81 70 Inch series 141 1...

Page 70: ...edly There is a blank between displays The display after the longest blank shows the top digits Example 00 31 46 In the above case the value is 3 146 12 Drum CRU counter value check Operation procedure The CRU drum counter value installed is checked Example 00 31 46 In the above case the value is 3 146 24 7 Drum counter clear When this simulation is executed the drum counter will be 0 25 1 Main mo...

Page 71: ... increased by 0 99V 1 98V in 200V series 4 For every 3 000 copies the copy lamp voltage is increased by 1 32V 2 64V in 200V series 5 For every 3 000 copies the copy lamp voltage is increased by 1 65V 3 30V in 200V series 2 Default value 8 CPM machine 4 10 CPM machine 3 3 OPC drum membrane decrease correction counter clear Execution of Sim 24 7 will clear the counter 20 Rear edge void selection Ope...

Page 72: ...ally calculated 2 To change the max or min level the adjustment is performed in exposure level 1 or 5 in each copy mode The copy exposure gradient exposure gradient can be voluntarily adjusted Operation procedure When this simulation is executed the machine performs warm up a nd the currently set exposure level is displayed on the COPIES MADE display When the COPY key is pressed the entered value ...

Page 73: ...ey is pressed the copy lamp lights up at the specified voltage interval and the AE sensor input value is read and displayed and stored At that time the AE sensor gain is automatically adjusted If the jam lamp lights up at that time it indicates the occurrance of read error 48 1 Vertical horizontal copy magnification ratio adjustment and zooming exposure correction setting 1 Change the lens home po...

Page 74: ...d the copy image in 141 copy mm L2 Shift between the paper lead edge and the copy image in 70 copy mm A 11 545 L1 L2 A corresponds to the time from start of the scanner unit to reaching the original lead edge image position If this value is not proper a variation my be caused between the copy image lead edge and the paper lead edge in some copy magnification ratios B 11 284 L2 5 602 L1 B correspon...

Page 75: ...re rises above 240 C H4 00 Fusing section Heat roller abnormally low temperature detection The fusing temperature does not reach 185 C within 27 sec of turning on the power or the fusing temperature keeps at 140 C L1 00 Optical section Mirror base feed trouble When the mirror base is fed for the specified time 0 6 sec in mirror initializing after turning on the power the mirror home position senso...

Page 76: ...the copy quantity display and the currently selected parameter number for the program will blink on the right side 4 Select the desired parameter using the right copy quantity key The entered parameter number will blink on the right of the copy quantity display Program name Parameters Auto clear time 0 OFF 1 30 sec 2 60 sec 3 90 sec 4 120 sec Preheat mode 0 OFF 1 30 sec 2 60 sec 3 90 sec 4 120 sec...

Page 77: ...s until all the trouble indicators blink and appears in the copy quantity display The trouble indicators are the ê and hindicators 2 Press the clear key for more than 5 seconds to find out how many more copies can be made 3 Press the light or dark key 1st display 2nd display 3rd display Press and hold the key 10 345 copies can be made before the next drum cartridge replacement 11 2 www freeservice...

Page 78: ...N109 CN103 IC108 Q212 IC104 Q216 Q215 CN308 CN302 CN305 CN303 CN306 CN320 CN317 CN325 CN318 CN316 CN311 CN312 CN315 CN309 IC101 CPU Toner motor Blank lamp PWB Discharge lamp PWB Developer cartridge sensor PWB Lens home position sensor PWB Main motor rotation sensor P WB AE PWB Display Key Operation PWB Manual paper feed solenoid Main motor Mirror motor Exhaust fan motor CFM1 Paper exit sensor PWB ...

Page 79: ...8F Pin arrangement Flat package 21 RESET 22 CLK 23 VSS GND 24 X1 25 X2 26 EA 27 RXD2 P75 28 SCLK2 P76 29 TXD2 P77 30 WDTOUT P80 31 INT0 P81 32 STBY P82 33 ALE P83 34 VCC 35 AD0 P00 36 AD1 P01 37 AD2 P02 38 AD3 P03 39 AD4 P04 40 AD5 P05 80 P56 INT3 TI2 79 P55 WAIT TO1 78 VSS GND 77 P54 INT2 TI5 76 P53 INT1 TI4 75 VCC 74 P52 TO5 73 P51 TO4 72 P50 71 P47 70 P46 69 P45 68 P44 67 P43 66 P42 65 P41 64 P...

Page 80: ...D7 P10 P17 A8 A15 P20 P23 Port 1 Port 2 P30 P33 Port 3 P40 P47 Port 4 P50 P57 Port 5 P60 P67 Port 6 P70 P77 Port 7 P80 P83 Port 8 P90 P93 Port 9 P100 P101 Port 10 Watch Dog Timer 8bit A D Converter Serial I O UART I O Serial I O I O Timer 8bit 4ch Timer Event Counter 16bit 1ch Pattern Generation Port 0 Pattern Generation Port 1 Interrupt Controller Internal bus TMP90CM38 block diagram 12 3 www fre...

Page 81: ...t 6 42 P07 AD7 Output DSEG7 Display segment 7 43 P10 A8 Input KI0 Key input 0 Key in LOW 44 P11 A9 Input KI1 Key input 1 Key in LOW 45 P12 A10 Output CFM1 Exhaust fan motor 46 P13 A11 Output CFM1CNT Exhaust fan motor high low 47 P14 A12 Output DVBIAS Developing bias 48 P15 A13 Output MTHV Charging transfer 49 P16 A14 Input Output SDA EEPROM data line 50 P17 A15 Output SCL EEPROM clock line 51 VSS ...

Page 82: ...E sensor gain select 0 8 PORT11 AEG1 AE sensor gain select 1 9 PORT12 AEG2 AE sensor gain select 2 P5 1 P6 2 P7 3 P8 4 VSS 5 P9 6 P10 7 P11 8 P12 9 VDD 18 P4 17 P3 16 P2 15 P1 14 CLR 13 STB 12 CLK 11 DATA 10 CLR P11 CLK P3 P4 P5 DATA P1 P2 STB Shift register Latch circuit Control circuit P12 3 Start stop control circuit This circuit detects ON OFF state of the power and controls start stop of each...

Page 83: ...ing the HL signal to GND level via IC107 As a result the heater lamp ON signal is not generated IC202 output 1 pin is normally at LOW When the heat roller surface temperature falls below the set level a When the thermistor pin voltage is higher than the set level the output signal HL from the CPU becomes HIGH b The CL signal is passed through IC108 TR and Q212 to the solid state relay SSR When the...

Page 84: ...sensor circuit The AE sensor circuit is composed of the AE sensor PWB which includes the photo diode and the I V converting circuit and the amplifier circuit on the control PWB Operation amplifier A performs I V conversion of the original density level a minute current Operation amplifier B amplifies the output of operation amplifier A to the suitable level to input to the CPU When SIM 47 is execu...

Page 85: ...tion Top view 2 Operation After turning on the power and after td 30msec time from when the voltage exceeds 4 25V the output becomes HIGH td is set by the external capacitor C106 Block diagram TMa TMb R222 47KJ R223 47KJ 2 9 1 5 5V IC103 TA7291S IN1 IN2 GND 6 8 7 3 M C102 10UF35V TMa TMb CPU 24V 2 8 9 1 5 6 7 3 M REG GND 5V 24V TMa TMb 24V TMa TMb Internal circuit Protection circuit Heat insulatio...

Page 86: ...mp voltage IC111 7805 VI VO GND 1 3 2 BD102 S1NB60 T301 BD101 S1NB60 FW C111 2200µF 35V C107 47µF 10V C234 22000pF 50V ZD105 TMPG06 7 5A 5V PWB 4 5 2 IC202 NJM2901M FW R101 2 0KJ R228 30KF C115 0 01µF R227 2 2KF R226 10K 5V2 FWS C218 22000pF R106 15KF 100V series 2KF 200V series 10 9 8 IC202 NJM2901M R117 18KF 100V series 30KF 200V series 1SS133 R105 R104 C102 0 47µF 50V R103 R102 CLV DTC114EK Q20...

Page 87: ...ower sec tion is also designed for it When the power switch of the copier is turned on and the AC power is supplied AC waveforms for 5V power are generated in the secondary side of transformer T301 The AC waveforms are full wave rectified and smoothed by diode BD102 on the main PWB side and 5V is generated by 3 terminal regulator of IC111 The 5V power is supplied to the CPU When the CPU is actuate...

Page 88: ...C110 constant current chopper control IC SLA7024 is used The drive signal is outputted from the CPU to IC110 to drive the mirror motor by excitement in phase 1 2 3 4 5 6 7 8 1 IN1 2 IN2 IN3 IN4 IN5 IN6 IN7 GND 14 13 12 11 10 9 16 OUT1 15 OUT2 OUT3 OUT4 OUT5 OUT6 OUT7 COM IC101 CPU IC104 ULN2003A X 8V 24V D140 GP15 C231 22000pF 50V C232 22000pF 50V Q103 2SK1255 CP102 ICP N50 ROHM M Q214 DTA143EKA D...

Page 89: ...ignal from the main control signal Block diagram C DC power operational description 1 General When the specified AC input is applied to this power two DC vol tages of 24V VB and 14V V8S are provided V8S is made to BV stabilization power by the 3 terminal regulator in the main PWB The DC power employs the pseudo resonance self excitement flyback convertor system with the hybrid IC STR F6514 100V se...

Page 90: ... pin MOS FET drain 4 VIN VIN pin Power voltage of the control circuit grounding 5 GND GND pin GND Other functions Code Function OVP Built in the overvoltage protection circuit TSD Built in the overheating protection circuit 1 VIN pin No 4 pin start circuit The start circuit detects the VIN pin voltage to start or stop the operation of hybrid IC IC802 When the AC power is turned on capacitor C808 i...

Page 91: ...rcurrent in the primary side when the control circuit is opened 6 Secondary side rectifying smoothing output circuit The output from the transformer is passed through the rectifying diode and the smoothing diode to be outputted The component parts numbers of the VB 24V are rectifying diode D802 and smoothing capacitors C803 and C804 The component parts numbers of the VBS 14V are diode D801 and smo...

Page 92: ...E SENSOR PWB A B 12 27 F SENSOR PWB C 12 28 G AC POWER SUPPLY CIRCUIT 12 29 H DC POWER SUPPLY CIRCUIT 12 35 4 ACTUAL WIRING DIAGRAM 12 39 5 TIMING CHART A Warm up 12 41 B Tray paper feed 12 41 C Manual multi paper feed 12 42 D Manual single paper feed 12 42 www freeservicemanuals info 1 11 16 Published in Heiloo Holland ...

Page 93: ...smitted in any form or by any means electronic mechanical photocopying recording or otherwise without prior written permission of the publisher SHARP CORPORATION Printing Reprographic Systems Group Quality Reliability Control Center Yamatokoriyama Nara 639 11 Japan 1996 October Printed in Japan S www freeservicemanuals info 1 11 16 Published in Heiloo Holland ...

Reviews: