RECHARGEABLE WINE OPENER WITH BUILT-IN INFRARED THERMOMETER:
We recommend that you charge your electric wine opener for at least 12 hours before
using it for the first time.
Note:
The temperature display will be on when connected to the power source and will
remain off for about 6 seconds in order to save electricity. It will be activated only if the
button is pressed.
RECHARGING YOUR ELECTRIC WINE OPENER
- 3 -
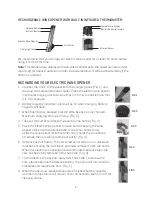
FIG 1
FIG 2
Foil Cutter
Release Button
Extract Button
Electric Wine Opener
Charging Stand
Infrared Sensor
Temperature Display
Battery Capacity Display
1. Connect the “Jack” of the adapter to the charging base (Fig. 1) and
the plug to a compatible power outlet. Place the electric wine opener
into the recharging unit to ensure that it is firmly in position and that
it is fully engaged.
2. Battery Capacity indication lights will be on when charging. Battery
Capacity will flash.
3. When flashing has stopped, Electric Wine Opener is fully charged.
Maximum charging time is 12 hours. (Fig. 2)
4. Take out foil cutter to remove the seal on wine bottle. (Fig. 3)
5. Place the Electric Wine Opener on wine bottle, keeping the wine
opener aligned with the wine bottle. One of your hands firmly
holds the wine opener while the other firmly holds the wine bottle;
otherwise the cork will not come out easily. (Fig. 4)
6. Depress the Pull Button. The corkscrew spiral will turn in a clockwise
direction entering the cork. Next, gradually remove it from the bottle.
When the electric wine opener mechanism automatically stops, the
cork has been fully removed from the bottle. (Fig. 4)
7. Lift the electric wine opener away from the bottle. To remove the
cork, please depress the Release Button. The spiral will turn counter-
clockwise and release the cork. (Fig. 5)
8. When the open and release procedure is finished, battery capacity
and room temperature will remain on for 20 seconds, then turn off for
sleeping status.
FIG 3
FIG 4
FIG 5


