Video Settings
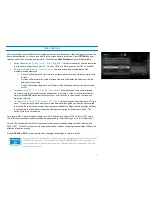
After connecting your satellite receiver, taking a moment to optimize your video settings will ensure the
best viewing experience. You are also able to set a screensaver
in this menu. Press
OPTIONS
on your
remote control, then enter the numbers
4, 5
. The following
Video Settings
options will be available:
•
Output Resolution
[1080p, 1080i, 720p, 480p, 480i]:
This determines the primary resolution
that is used to send video to your TV. On most HDTVs, 1080i is optimal. For SDTVs, use 480i.
•
SD Aspect Ratio
[Stretch, Normal, Zoom]:
This determines how standard definition
programs will be displayed.
o
“Stretch” will adjust the SD picture into a widescreen format, stretching the picture left
to right.
o
“Normal” will maintain the original screen size, and will display black bars on the left
and right of the picture.
o
“Zoom” will enlarge the picture on all sides, which will cause some of the picture to be
cut off.
•
Screensaver
[off, 1, 5, 10, 30, 45, 60, 90 minutes]:
Determines how long a static image
must remain on the screen before the screensaver is activated. If the screensaver activates,
simply press
ENTER
on the remote to remove it. Your location in the menus or options will
always be retained.
•
TV Type
[HDTV Small, HDTV Large, SDTV (CRT)]:
This option specifies what type of TV you
have – if you previously had Shaw Direct’s standard definition guide, you would have selected
this during the initial set-up wizard to optimize your readability. Adjusting this setting outside of
the setup wizard will only determine the default guide view (as outlined in section 2A. The
Guide) for future user creation.
On a regular HDTV, recommended settings are 1080i, Stretch, and either HDTV Small or HDTV Large -
this will result in standard definition channels automatically “stretched” by your TV to fit the screen.
On an SDTV connected via HDMI or component video, recommended settings are 480i, Normal, and
SDTV (CRT). For SDTVs connected via composite video or coaxial, changing these settings will have no
effect and is not necessary.
Press
GO BACK
or
EXIT
on your remote after changing the settings to return to live TV.
Once you select an Output Resolution, a pop-up message will be displayed to confirm that you have
selected a resolution your TV can support. You must press
ENTER
on your remote to confirm, or
the resolution will revert back to the previous one. This helps make sure you don’t lose video and
are unable to get it back.
2
Summary of Contents for HDDSR 600
Page 4: ...How to Read This Manual iv...
Page 16: ...Understanding the Guide 12...


