5
You must install the wall thermostat for the furnace to operate. When the wall thermostat calls for heat, the draft motor will engage,
allowing combustion air to flow into the firebox. This causes a hotter fire, increasing the heat in the heat chamber. When the home
reaches the selected temperature on the wall thermostat, it will disengage the draft motor and the fire in the firebox will reduce to a low
burn until the thermostat calls for another heat cycle. The fan limit control is factory pre-set at 150° as the “ON” temperature setting and
100° as the “OFF” temperature setting. This means when the heat chamber reaches 150°, the blower will turn on; when the chamber
cools, the blower will turn off. This process is called a heating cycle.
IMPORTANT: FOR TECHNICAL SUPPORT OR CUSTOMER SERVICE ISSUES,
DO NOT RETURN TO THE STORE, CALL 1-800-875-4788.
THIS UNIT IS NOT TO BE CONNECTED TO A CHIMNEY FLUE THAT SERVES ANOTHER APPLIANCE.
INSTALLING THE ANCHOR PLATE:
Note: Check with your dealer for the anchor plate that connects to Class A HT2100 chimney. IMPORTANT: BEFORE YOU FOLLOW
THE NEXT STEPS, ENSURE THE ANCHOR PLATE YOU RECEIVE MATCHES YOUR CHIMNEY PIPE, AS CHIMNEY PIPE IS NOT
GENERIC AND WILL NOT INTERCHANGE.
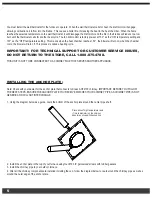
1. Using the diagram below as a guide, caulk the bottom of the anchor plate around the center pipe shaft.
2. Install the anchor plate to the top of your furnace using four #10 3/4” galvanized screws with rubber gaskets.
3. Install the chimney pipe to your outdoor furnace.
4. After all the chimney components are installed including the cap, follow the diagram below to caulk around the chimney pipe as well as
around the outer edge of the anchor plate.
PLACE A LINE OF
1
4
DIA HIGH TEMPERATURE
SILICONE CAULK ON CHIMNEY ADAPTOR AS
SHOWN BY DASHED LINES
Place a line of high temperature caulk
(1/4 inch diameter) on the chimney
adaptor as shown with dashed line.


