background image

05-10ET13-0B

Page 5

ASSemBlY oF PeAK STYle GARAGe SHelTeR

NOTE FOR FRAME EXTENSION KIT:  

10' x 8' is the base frame dimension. Your model may have more middle 

ribs than shown in the illustrations. You will receive one extra rib for every extra 4 feet of building length that you 

purchase. The basic frame assembly will remain the same. The cover will be the correct size for the length of the 

building ordered.

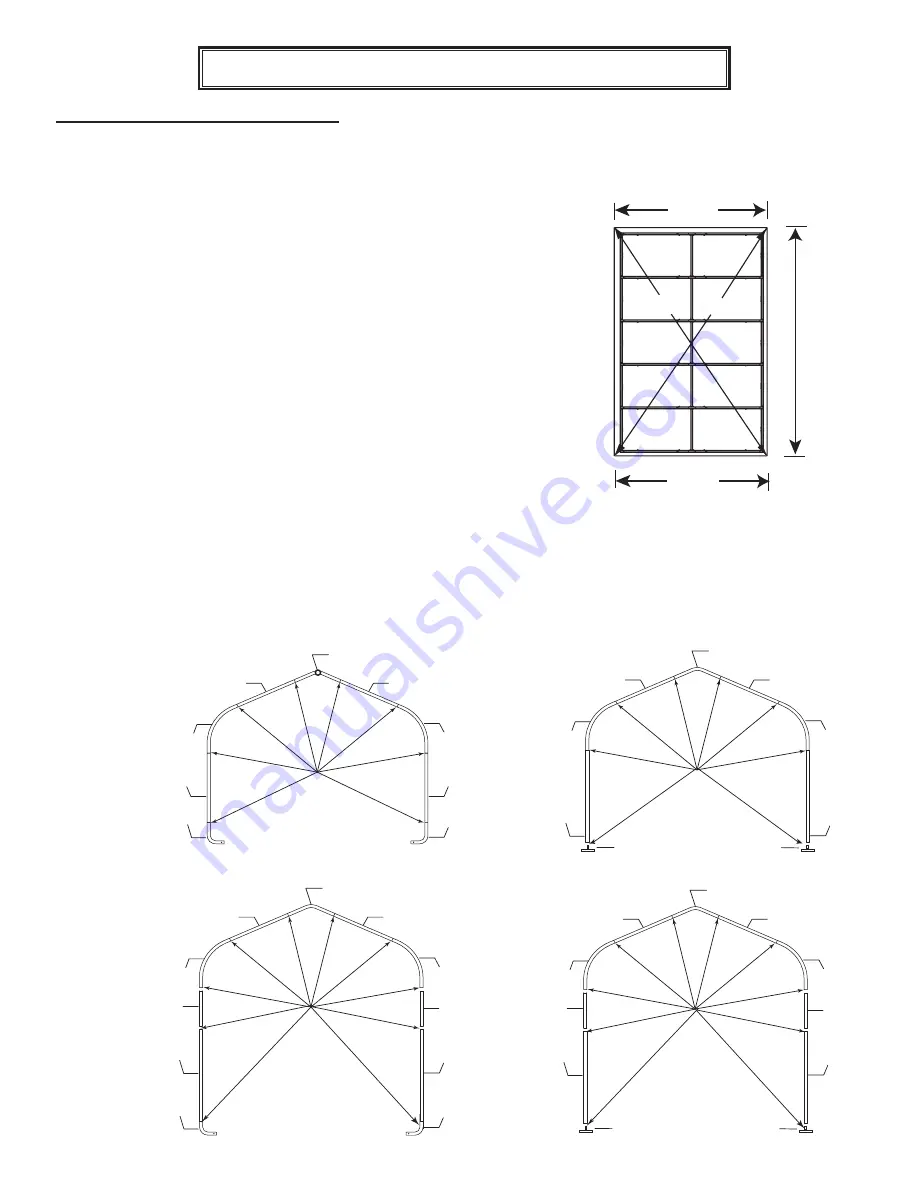
1. PloTTInG And SQUARInG UP THe FRAme:

A.

 Before building your shelter, you should choose a flat area  

     on your property and plot your shelter. Stake out the area  

     for the frame in the desired spot. Check that it measures  

     10’ in width and the length would be determined by the size  

     shelter you purchased. Tie a rope diagonally from corner to  

     corner.

B.

 Measure across area, end to opposite end. See Detail A.  

     The measurement A and B should be equal.

10'

10'

A

B

LENGTH  

OF  

BUILDING

DETAIL A

DETAIL B

End Ribs

DETAIL C

Middle Ribs

10121

10132

10132

10127

10127

10128

10128

10131

10132

10132

10126

10126

800464

800464

800464

800464

10113

10113

#10114

2” Bolt 

Item #19 

All Connections

#10114

2” Bolt 

Item #19 

All Connections

#10114

2” Bolt 

Item #19 

All Connections

10131

10132

10132

10126

10126

800464

800464

10113

10113

10223

10223

10132

10132

800464

800464

10223

10223

10128

10127

10127

10121

10128

#10114

2” Bolt 

Item #19 

All Connections

2. ASSemBle end And mIddle RIBS:

A. 

Assemble end and middle ribs as shown in Detail B and Detail C.  

    Securely fasten all of the joints with the hardware indicated.

10' HIGH

8' HIGH

Summary of Contents for 10' x 8' x 8' Peak Style Shelter

Page 1: ...6175 Canada 6 4 09 Before you start 2 individual recommended for assembly approximate time 3 hr Please read instructions COMPLETELY before assembly This shelter MUST be securely anchored THIS IS A TE...

Page 2: ...ShelterLogic LLC custom fabric cover included ShelterLogic LLC Shelters offer storage and protection from damage caused by sun light rain tree sap animal bird excrement and light snow Please anchor th...

Page 3: ...UBE 15 X1 5 8 DIA CORNER UPRIGHT TUBE 57 3 4 X1 5 8 DIA BEND CORNER LEG 21 X1 5 8 DIA CROSS RAIL 48 1 2 X1 163 PLAIN ENDS 2 H CROSS RAIL 50 1 2 X1 163 1 SWDG 2 HOLE CROSS RAIL PLAIN END 47 X1 1 8 DIA...

Page 4: ...G 21 X1 5 8 DIA CROSS RAIL 48 1 2 X1 163 PLAIN ENDS 2 H CROSS RAIL 50 1 2 X1 163 1 SWDG 2 HOLE CROSS RAIL PLAIN END 47 X1 1 8 DIA CROSS RAIL PLAIN ENDS 45 3 4 L 2 HOLES CROSS RAIL SWEDGED 48 7 8 X1 1...

Page 5: ...h would be determined by the size shelter you purchased Tie a rope diagonally from corner to corner B Measure across area end to opposite end See Detail A The measurement A and B should be equal 10 10...

Page 6: ...nut onto the bolt and tighten Repeat these steps for the opposite side and all of the remaining ribs The side rails for the last rib will have two plain ends 4 Install Wind Braces A Attach wind brace...

Page 7: ...with the clamps provided 5 Install Top Rail Place the first top rail under each end rib and secure it with a bolt as shown in Detail F The same cross rail should lay on top of the all middle ribs Sec...

Page 8: ...he pocket on each side of end panel pull webbing to remove the slack Be careful not to pull the webbing through the other side of the webbing pocket E Insert the S Hook on ratchet into hole on the leg...

Page 9: ...tchet into hole on the leg bend Insert the webbing into the spindle of the ratchet and pull tight Wind the ratchet so that the webbing overlaps itself D Disassemble cover rails and slide through fabri...

Reviews: