background image

05-10ET13-0B

Page 9

10110

COVER RAILS

CORRECT

FRonT

ReAR

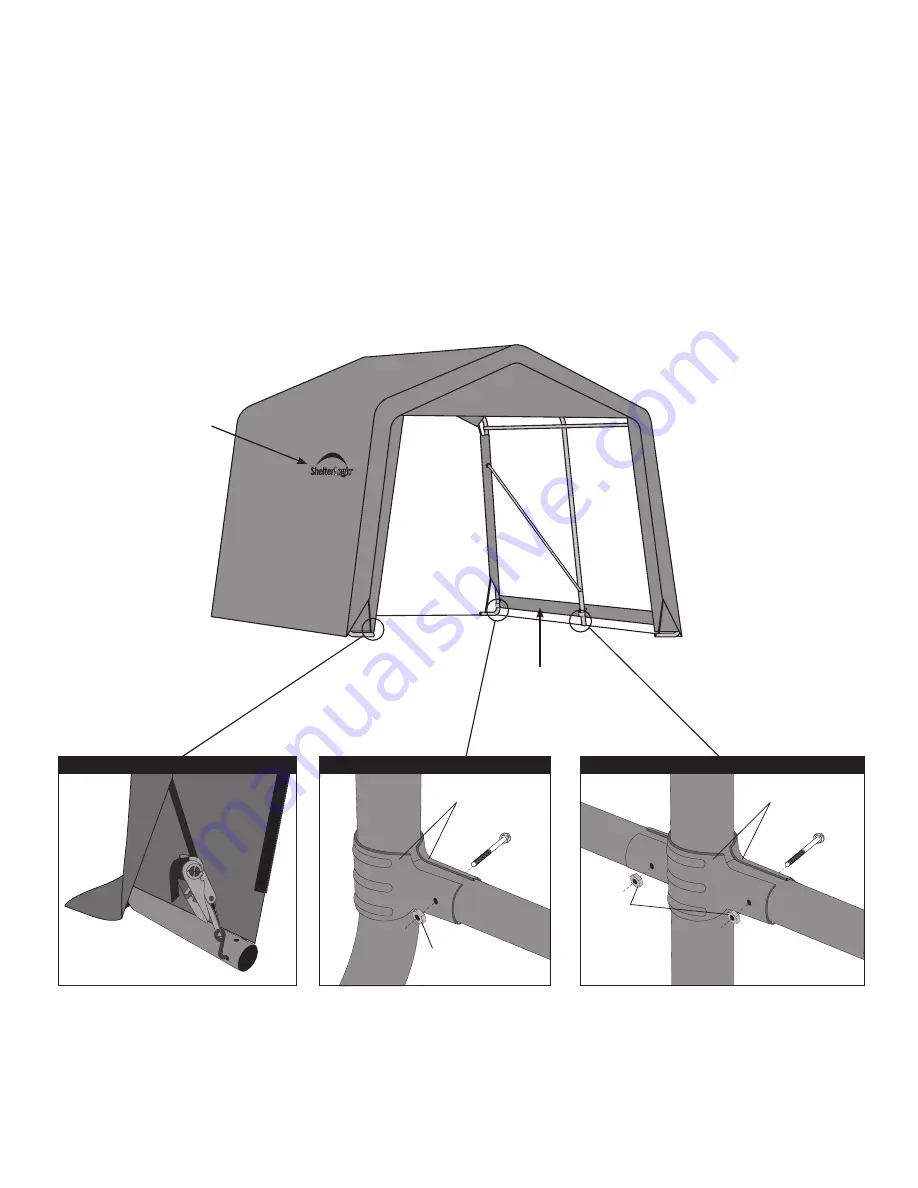
8. InSTAllInG coVeR And coVeR RAIlS

A. 

Lay the cover on the ground next to the frame with inside of the cover (the side with the pipe pockets) facing  

     down and the webbing on the front and rear of the corner of the building.

B. 

Pull cover over the frame, making sure to center cover on frame. There should be an equal amount of over-   

     hang at all four corners.

C. 

Insert the “S”- Hook on ratchet into hole on the leg bend. Insert the webbing into the spindle of the ratchet    

     and pull tight. Wind the ratchet so that the webbing overlaps itself. 

D. 

Disassemble cover rails and slide through fabric pockets at each leg and reattach with clamps to each leg.       

     Repeat this on other side. Push down on cover rails to tighten cover, before tightening bolts completely.

E. 

Check and tighten Ratchets and Cover Rails monthly to ensure the cover is tight.

NOTE:

 The 

ShelterLogic

®

 logo should


 be oriented as shown below.

Webbing and Ratchets Securing Cover

End Rib Cross Rail Clamps

10115

10112

01010

Middle Rib Cross Rail Clamps

10115

10111

01010

Summary of Contents for 10' x 8' x 8' Peak Style Shelter

Page 1: ...6175 Canada 6 4 09 Before you start 2 individual recommended for assembly approximate time 3 hr Please read instructions COMPLETELY before assembly This shelter MUST be securely anchored THIS IS A TE...

Page 2: ...ShelterLogic LLC custom fabric cover included ShelterLogic LLC Shelters offer storage and protection from damage caused by sun light rain tree sap animal bird excrement and light snow Please anchor th...

Page 3: ...UBE 15 X1 5 8 DIA CORNER UPRIGHT TUBE 57 3 4 X1 5 8 DIA BEND CORNER LEG 21 X1 5 8 DIA CROSS RAIL 48 1 2 X1 163 PLAIN ENDS 2 H CROSS RAIL 50 1 2 X1 163 1 SWDG 2 HOLE CROSS RAIL PLAIN END 47 X1 1 8 DIA...

Page 4: ...G 21 X1 5 8 DIA CROSS RAIL 48 1 2 X1 163 PLAIN ENDS 2 H CROSS RAIL 50 1 2 X1 163 1 SWDG 2 HOLE CROSS RAIL PLAIN END 47 X1 1 8 DIA CROSS RAIL PLAIN ENDS 45 3 4 L 2 HOLES CROSS RAIL SWEDGED 48 7 8 X1 1...

Page 5: ...h would be determined by the size shelter you purchased Tie a rope diagonally from corner to corner B Measure across area end to opposite end See Detail A The measurement A and B should be equal 10 10...

Page 6: ...nut onto the bolt and tighten Repeat these steps for the opposite side and all of the remaining ribs The side rails for the last rib will have two plain ends 4 Install Wind Braces A Attach wind brace...

Page 7: ...with the clamps provided 5 Install Top Rail Place the first top rail under each end rib and secure it with a bolt as shown in Detail F The same cross rail should lay on top of the all middle ribs Sec...

Page 8: ...he pocket on each side of end panel pull webbing to remove the slack Be careful not to pull the webbing through the other side of the webbing pocket E Insert the S Hook on ratchet into hole on the leg...

Page 9: ...tchet into hole on the leg bend Insert the webbing into the spindle of the ratchet and pull tight Wind the ratchet so that the webbing overlaps itself D Disassemble cover rails and slide through fabri...

Reviews: