background image

05_62697_0C

Page 4

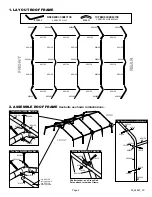
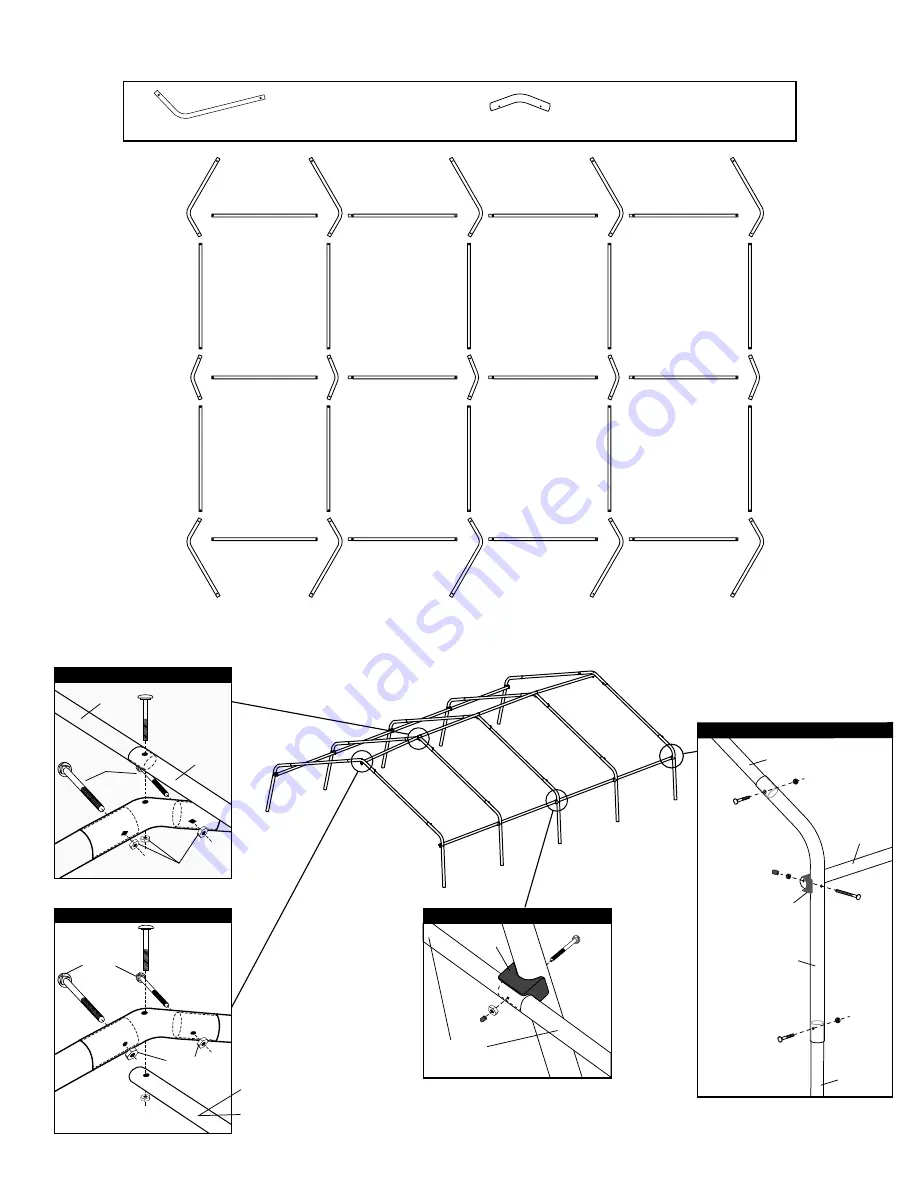
1. lAY oUt rooF FrAMe

2. ASSeMBle rooF FrAMe 

Use bolts as shown in illustrations.

TOP BEND CONNECTOR

SIDE BEND CONNECTOR

802692

802691

USE BOLTS 03032 & 802630

USE BOLTS 03032

F

r

ont

re

A

r

Front

reAr

ShelterLocks

 and Cross Rail 

Poles attach to inside of frame.

Top Cross Rail OvER Middle Ribs

802630

01010

03032

802129

802129

Top Cross Rail UNDER End Ribs

802630

01010

01010

Use 

802130

at Front End Rib  
Use 

802129

at Back End Rib

03032

802692

802691

802691

802691

802691

802691

802692

802130

802130

802130

802130

802130

802130

802130

802130

802130

802130

802130

802130

802130

802129

802129

802129

802129

802129

802129

802129

802129

802129

802692

802692

802692

802692

802692

802692

802692

802692

Side Bend Connector and ShelterLock

01010

01010

10150

01010

800597

03032

10210

802130

03032

802130

802692

802694

Middle Rib ShelterLock

 Assembly

10210

800597

01010

802129

10150

Summary of Contents for 62697

Page 1: ...d for assembly approximate time 2 hr Please read instructions COMPLETELY before assembly This shelter MUST be securely anchored THIS IS A TEMPORARY STRUCTURE AND NOT RECOMMENDED AS A PERMANENT STRUCTURE 150 Callender Road Watertown CT 06795 www shelterlogic com 1 800 524 9970 1 800 559 6175 Canada Recommended Tools 1 5 11 VIEW AN ONLINE INSTRUCTIONAL VIDEO OF A GARAGE BEING BUILT www ShelterLogic ...

Page 2: ...lterLogic LLC Shelters offer storage and protection from damage caused by sun light rain tree sap animal bird excrement and light snow Please anchor this ShelterLogic LLC structure properly See manual for more anchoring details Proper anchoring keeping cover tight and free of snow and debris is the responsibility of the consumer Please read and understand the installation detail warnings and cauti...

Page 3: ... 802692 Cross Rails 46 1 8 802695 Bolts 1 4 x 1 7 8 03032 Bolts 1 4 x 3 10210 Bolts 1 4 x 1 5 8 10115 Round Head Bolts 1 4 x 3 802630 Washer 1 4 01011 Nut 1 4 01010 Middle Poles 49 5 8 802693 White Bungee Cords For holding door open 10066 Half Clamps for Middle Legs 13201 Half Clamps for Corner Legs 13202 802358 Cover 2 Zipper Door Back Panel 10014 15 Auger Anchors Temporary 10016 Cable Clamps 100...

Page 4: ... Cross Rail UNDER End Ribs 802630 01010 01010 Use 802130 at Front End Rib Use 802129 at Back End Rib 03032 802692 802691 802691 802691 802691 802691 802692 802130 802130 802130 802130 802130 802130 802130 802130 802130 802130 802130 802130 802130 802129 802129 802129 802129 802129 802129 802129 802129 802129 802692 802692 802692 802692 802692 802692 802692 802692 Side Bend Connector and ShelterLoc...

Page 5: ...olt 03032 Use Bolt 03032 Use Bolt 10115 802637 Corner Legs 802695 802695 Corner Legs Middle Legs FRONT REAR Middle Rib Cross Rail Clamps 10115 802695 802695 13201 802693 01010 01011 End Rib Cross Rail Clamps 10115 802695 13202 802637 01011 01010 A Place the cover rail 802695 at each leg and secure it at each leg with a cover clamp as shown below B Slide the cover rails so they are 8 inches up from...

Page 6: ...to 2 inches so it can be anchored to the legs If ground is too hard dig a hole with a shovel or post hole tool Optional Fill with cement C Wrap cable provided through the eyelet of the anchor and around the frame as shown below Secure the cable with the clamps provided End Rib Anchors NOTE 15 Augers are for temporary use only For best results ShelterLogic recom mends using our Easy Hooks 10036 4 p...

Page 7: ...o remove the slack Be careful not to pull the webbing through the other side of the webbing pocket D Insert the S Hook on ratchet into hole on the leg bend Insert the webbing into the spindle of the ratchet and pull tight Wind the ratchet so that the webbing overlaps itself Position the end panel so that it is centered on the building before fully tightening the end panel E Tighten ratchets altern...

Page 8: ...ing into the spindle of the ratchet and pull tight Wind the ratchet so that the webbing overlaps itself D Disassemble cover rails and slide through fabric pockets at each leg and reattach with clamps to each leg Repeat this on other side Push down on cover rails to tighten cover before tightening bolts completely E Check and tighten Ratchets and Cover Rails monthly to ensure the cover is tight NOT...

Reviews: