background image


12 


2

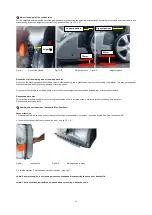
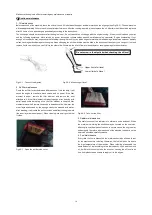
  Adjust the height of the suction inlet 

Pull the height adjustment handle out of the gear position slot and provide the height adjustment range according to the terrain and type of debris you 

are collecting. Select one height position from the 5 positions (See Fig 19-1, 2, 3). 


Fig.19-1      Pull out the handle             Fig.19-2               Height distance   Fig.19-3              Height distance


Precautions for the working area of the whole machine 

Do not use the machine to absorb soft fibers, fabrics, plastic banding, rope, plastic bags, cables or other string like material. This may get wrapped / 

stuck around the impellor and cause damage or running issues.   


Do not work the machine in a rubbish dump or try to collect debris larger than the machine is capable of, or larger piles of debris.   


Reasonable work area 

This machine is recommended for use collecting fallen leaves on hard surfaces or lawn, scattered smaller rubbish on hard surfaces. 

Debris should be dry and loose. 


3

  Auxiliary Hose Instructions (Vacuum & Blow Functions) 


Vacuum function 

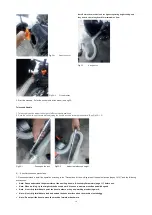
1. Please assemble the auxiliary hose according to the steps in the assembly instructions "Assembly Step 6" Auxiliary Hose Assembly". 

2. Insert the suction port baffle into the suction port.

see fig 30-1, 2


Fig.30-1        Insert baffle              Fig.30-2         Baffle inserted in place


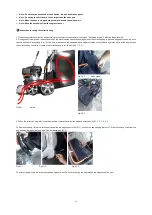
3.


Start the machine, Point the hose mouth at the trash.

see fig 31


Note: Ensure the engine is not running when connecting and disconnecting the hose kit or front baffle. 

Note: The front suction port baffle is only used when vacuuming with the hose kit.   

Height

  up 


Lowest position 

15mm 

Highest position 


50mm 

Summary of Contents for STWV58L

Page 1: ...OWNER S MANUAL WHEELED LEAF VACUUM MODEL STWV58L IMPORTANT IT IS ESSENTIAL THAT YOU READ THE INSTRUCTIONS IN THIS MANUAL BEFORE ASSEMBLING OPERATING AND MAINTAINING THIS PRODUCT...

Page 2: ...2...

Page 3: ...it 4 Suction Port Baffle Optional Extra Included With Hose Kit 5 Hose Bracket 6 Guide Wheel Warning For your own safety please read this manual before using this machine for the first time Failure to...

Page 4: ...void creating any ignition source before the petrol vapor dissipates o Replace all fuel tank caps and container lids Check visually before use to see if the impeller impeller bolt and shaft connection...

Page 5: ...side the house A 5 Please wear protective gloves pay more attention to your hands and feet to avoid injury A 6 When repairing please pick up the spark plug and repair it according to the operation man...

Page 6: ...mbly diagram is not inconsistent with the actual part shape Assembly step 1 Upper handle assembly Please put the upper handle bar assembly 1 on the lower handle bar 2 guide according to the dotted lin...

Page 7: ...es on the upper grab bar assembly Fig 9 1 Assembly guide Fig 9 2 Assembly completion diagram Assembly step 4 Collection bag assembly Slide the upper layer of the collection bag into the collection bag...

Page 8: ...8 Fig 10 4 Fig 10 5 Press the baffle and open the rear cover Fig 10 6 Insert back cover bracket Fig 10 7 Insert in place Fig 10 8 Installation completion diagram Hanging Board Baffle Catch...

Page 9: ...1 Open the cover Fig 12 2 Insert hose connector Fig 12 3 Screw the interface Fig 12 4 Complete the installation diagram Assembly step 6 Placement of the suction port baffle Note This is where the baf...

Page 10: ...ank Capacity 1 L Oil Capacity 0 55 L Engine Speed 3400 r min Collection Bag Capacity 150 L Suction Height 15 50mm Suction Air Velocity 26 m s Air Outlet Speed 43 m s Guarantee sound pressure level 87...

Page 11: ...Fig 14 1 2 If this microswitch is not closed remove and replace bag or ensure the bag collection port is fully closed and locked into place if using with hose kit If bag will not locate or the port d...

Page 12: ...debris larger than the machine is capable of or larger piles of debris Reasonable work area This machine is recommended for use collecting fallen leaves on hard surfaces or lawn scattered smaller rubb...

Page 13: ...machine Note When fully closed check that the rear panel bezel securely locks the rear cover Note When fully closed please check if the switch rocker arm has been closed by the rear cover Note It is...

Page 14: ...g 32 2 Adjust the telescopic height 6 3 Auxiliary hose use precautions 1 Please understand in detail the operation according to the Precautions for the working area of the whole machine pages 14 15 an...

Page 15: ...ause the air to return when the collecting bag is full At this time please open the exhaust window zippers located on the left and right side panel of the bag to make the collection bag ventilate or c...

Page 16: ...ine description See the separate engine manual for engine maintenance instructions Maintain engine oil as described in the engine manual that came with the unit Please read and follow the instructions...

Page 17: ...fire b Start the engine and let it run until it runs out of all remaining petrol c Remove the spark plug Inject 20ml of oil into the combustion chamber using a syringe Pull the starter cord to evenly...

Page 18: ...use If it is too dirty it will cause the engine to start hard black smoke and no power If the filter element is paper remove the filter element and remove the dust attached to it If the filter element...

Page 19: ...e impeller Clean Clean Clean Replace according to the degree of damage Check replace pulley Check Replace according to the degree of damage Engine Check the oil Check fuel Change the oil viscosity 10w...

Page 20: ...d fuel filter for impurities May require a fuel systems clean Air filter components are dirty Clean air purifier components Poor engine idling Air filter components are dirty Clean air purifier compon...

Page 21: ...f the hose or nozzle are blocked Remove hose and clear any blockage Auxiliary hose won t connect or disconnect Lugs on hose connector are not lined up with the recess on hose port Twist hose to line u...

Page 22: ...3 Serial number XXXXXX XXXXXX 4 Applicable EC Directives Machinery Directive 2006 42 EC 5 Used harmonized Standards EN 15503 2009 A2 2015 EN ISO 12100 2010 EN ISO 3744 1995 ISO 11904 1991 EN ISO 1498...

Page 23: ...after Sherpa Tools inspection and verification of a covered defect Any Product to be considered for repair or replacement must be returned by Buyer to a duly authorised Sherpa Tools retail store or se...

Page 24: ...Tools Ltd Wheeled Vacuum STWV58L If you experience any problems with this product please do not return to the store Contact Sherpa Tools direct on our UK helpline UK Helpline 01522 283 020 www sherpat...

Reviews: