background image

OWNER’S MANUAL

824–033   

Rev A

U.S. PATENT NO. 4,323,741, 4,397,610 
PATENTED 1983, CANADA 
AND OTHER PATENTS PENDING 

ELECTRIC, 120 VAC

ULTIMATE


Plus

+


1500

Airless Paint Sprayer

3000 psi (21.0 MPa, 210 bar) Maximum Working Pressure

Model 824–030, Series A

Basic sprayer on upright cart  
without hose or gun

Model 824–031, Series A

Complete sprayer on upright cart with hose, 
gun, RAC IV

  DripLess

 Tip Guard 

and SwitchTip

Model 824–032, Series A

Same as Model 824–030, except 

Patents Pending

The SHERWIN-WILLIAMS COMPANY, CLEVELAND, OHIO 44115

This manual contains important 
warnings and information. 
READ AND RETAIN FOR REFERENCE

Summary of Contents for ULTIMATE 824-030

Page 1: ...Working Pressure Model 824 030 Series A Basic sprayer on upright cart without hose or gun Model 824 031 Series A Complete sprayer on upright cart with hose gun RAC IV DripLess Tip Guard and SwitchTip...

Page 2: ...struction manuals tags and labels before operating the equipment D Use the equipment only for its intended purpose If you are uncertain about usage call your Graco distributor D Do not alter or modify...

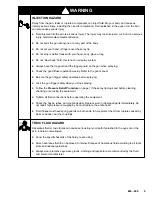
Page 3: ...y Get immediate medical attention Do not point the gun at anyone or at any part of the body Do not put your hand or fingers over the spray tip Do not stop or deflect leaks with your hand body glove or...

Page 4: ...from starting unexpectedly Liquids can be injected into the body by high pressure airless spray or leaks especially hose leaks Keep body clear of the nozzle Never stop leaks with any part of the body...

Page 5: ...ID grounded nylon hose with spring guards on both ends K RAC IV Tip Guard Reverse A Clean RAC tip guard reduces the risk of fluid injection injury L Contractor Gun High pressure spray gun with gun sa...

Page 6: ...gun 3 ft hose 78 and 50 ft hose 79 Don t install spray tip yet 2 Two gun hookup Remove cap 12 from 1 4 npsm m secondary hose outlet and attach mini mum 50 ft long hose For more flexible gun move ment...

Page 7: ...pail and trigger gun into pail to relieve pressure 5 Engage gun safety latch 6 Open any fluid drain valves in system Leave drain valve open until ready to dispense again WARNING INJECTION HAZARD To re...

Page 8: ...weep hole Fig 16 C of pressure control for leakage at start up and during operation If leakage replace o ring as instructed in Pressure Control Transducer and O Ring Replacement on page 17 10 Engage g...

Page 9: ...ear clog Trigger safety latch shown engaged 1 2 Shutdown and Care 1 Check packing nut wet cup daily Relieve pres sure Keep packing nut wet cup A 1 3 full with TSL at all times to help prevent fluid bu...

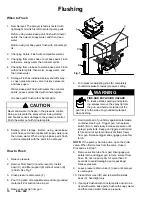
Page 10: ...and screen D Install bowl C and filter support E without screen D to flush See Fig 7 3 Close pressure drain valve F 4 Pour 1 2 gallon of compatible solvent into grounded metal pail Put suction tube i...

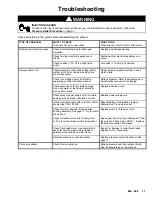
Page 11: ...n or tip instruction manual for tip cleaning Check extension cord for visible damage Use a volt meter or test lamp at extension cord outlet to check Replace extension cord Check sprayer power supply c...

Page 12: ...g around throat packing nut which may indicated worn or damaged packings Replace packings See manual 307 806 Also check piston valve seat for hardened paint or nicks and replace if necessary Tighten t...

Page 13: ...mmutator for excessive pitting burning or gouging A black color on commutator is normal Have commutator resurfaced by qualified motor repair shop if brushes seem to wear too fast 5 Install new brush C...

Page 14: ...14 824 033 Motor Brush Replacement Fig 9 B C D Order part no 110 816 Hook of spring clip Fig 10 B C D E F G 0 4 in minimum Fig 11 H B C D Spring must coil in this direction...

Page 15: ...ads of pump cylinder are flush with face of bearing housing and outlet nipple 75 is straight back Push retaining spring 35 into groove around connecting rod Tighten locknut 38 to 70 ft lb 95 N m WARNI...

Page 16: ...ections If not replace motor 5 Connect black motor leads together 6 Use motor fan to turn motor It should be much harder to turn than in step 4 If there is uneven or no resistance to turning check bru...

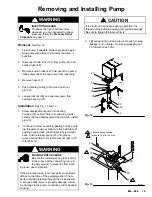
Page 17: ...s list 4 Remove and replace only those components and wires necessary for repair Make a diagram show ing wire hook ups for items removed to insure correct wiring when reinstalling See Fig 17 for wirin...

Page 18: ...d washers 214 4 Seat transducer into o ring by drawing down screws and washers until bracket is flush with motor control surface 5 Carefully remove transducer and verify that o ring is seated correctl...

Page 19: ...ctor from potentiometer to J3 Wires J4 J5 to 15 20 switch Connector from pressure transducer to J6 7169A I1 I2 J3 J5 J4 J6 J7 GND L1 L2 Twisted pair GRN YEL wire E to housing ground Housing ground L E...

Page 20: ...damage to the drive housing Do not drop the gear cluster 9 which may stay engaged in the motor bell or in the drive housing Do not lose the thrust balls 10 or drop them between gears The balls usually...

Page 21: ...033 21 7395A 21 31 18 18b 9 18a 10 10 51 14 F 47 125 37 39 G 30 Fig 18 101 1 3 4 2 Seals 93 located inside conduit 22 Bronze colored washer Apply 6 ounces bearing grease Silver colored washer 4 3 2 1...

Page 22: ...o loosen it from drive housing 18 Pull bearing housing and connecting rod 29 straight off drive housing 4 Remove pail bracket assembly L and reinstall it on new bearing housing 5 Inspect crank H for e...

Page 23: ...let to loosen from motor bell then pull straight off NOTE To avoid damage to the drive housing Do not drop the gear cluster 9 which may stay engaged in the motor bell or in the drive housing Do not lo...

Page 24: ...83 52 80 Ref 6 64 81 82 64 91 2 14 61 10 10 18b 9 18a 18 29 27 49 33 31 32 4 19 38 20 39 100 121 102 42 7 75 47 35 69 51 63 63 21 1 64 63 30 37 6 53 85 34 12 37 26 1 134 1 both sides 3 4 2 Identificat...

Page 25: ...806 1 42 183 423 TUBE INTAKE 1 46 162 453 NIPPLE hex 1 4 npsm x 1 4 npt 1 3 16 long 2 47 235 542 HOSE 3 8 npsm f x 14 1 2 1 48 214 570 FLUID FILTER see manual 307 273 for parts includes one of items 4...

Page 26: ...anual 307 614 for parts 1 55 237 859 TIP GUARD RAC IV included with 1 220 955 see manual 308 644 78 238 358 HOSE grounded nylon 3 16 ID cpld 1 4 npsm f 3 ft 9 m spring guards both ends 1 79 238 361 HO...

Page 27: ...Notes...

Page 28: ...3 214 212 203 204 205 211 206 207 209 210 202 228 23 230 229 23a 1 Torque to 150 in lbs 17 N m 1 2 2 To housing ground Fig 17 231 142 234 3 3 Located this point inside housing 226 227 235 224 225 4 WA...

Page 29: ...pressure control 1 220 104 319 PACKING o ring WARNING See 1 Pressure Control Transducer and O Ring Replacement on page 17 for correct replacement procedure 221 239 428 ELECTRICAL ENCLOSURE KIT 1 222 M...

Page 30: ...h the kit Sleeve Removal Tool 224 788 Required to remove a pump sleeve 5 Gallon 19 Liter Suction Tube Kit 208 920 Includes Ref No Part No Description Qty 1 101 818 CLAMP hose 2 2 160 327 UNION 90 swiv...

Page 31: ...reusable Pump Inlet Size 3 4 npt m Fluid Outlet Size 1 4 npsm from fluid filter Sound Data Sound pressure level at one meter 85 3 db A Sound power level 95 2 db A Measured under maximum operating con...

Page 32: ...buyer agrees that no other remedy including but not limited to incidental or consequential damages for lost profits lost sales injury to person or property or any other incidental or consequential los...

Reviews: