background image

RX-4508

AM/FM STEREO RECEIVER

OPERATING INSTRUCTIONS

Summary of Contents for RX-4508

Page 1: ...RX 4508 AM FM STEREO RECEIVER OPERATING INSTRUCTIONS ...

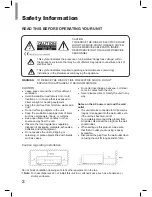
Page 2: ...s clear of items such as newspapers linens or curtains Keep open flame from candles or other sources away from the unit Observe the local regulations regarding disposal of packaging materials exhausted batteries and old equipment Do not expose the unit to dripping or splashing or place objects filled with liquids such as vases Do not let insecticides benzene or thinner come in contact with the uni...

Page 3: ...SYSTEM 16 Listening to Your System 16 Basic Operation 17 Muting the Sound 17 Adjusting the Sound Balance Left and Right 17 Adjusting the Tone Bass and Treble 18 Listening to Radio 18 Selecting the Band 18 Manual Tuning 18 Auto Tuning 18 Manual Presetting 19 Auto Presetting 20 Tuning in to Preset Stations 20 Scanning Preset Stations in Sequence 20 Switching FM Stereo Mono Mode 21 Bluetooth 21 Pairi...

Page 4: ... DISPLAY SEARCH MODE TREBLE CD AUX TONE DIRECT MUTE MEMO ENTER VOLUME PHONO TUNER 1 2 3 4 5 6 7 8 9 0 A B PRESET MO ST SLEEP DIMMER SPEAKER PRESET PRESET T U N E L R BALANCE POWER RC 157 S E L Remote control 1 ea Battery FM Antenna 1 ea AM Antenna 1 ea Warranty User Manual 1 ea Warranty 1 ea Getting Started ...

Page 5: ...xhausted for a longer period of time memorized contents will be cleared In this case you should memorize them again If the battery is placed incorrectly it can cause explosion Remove the battery if the remote control is not used for a long period of time Do not leave the product in a hot or humid place Do not handle and store the battery with metallic tools Operating the Range of the Remote Contro...

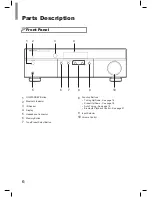
Page 6: ...ton 2 Bluetooth Indicator 3 IR Sensor 4 Display 5 Headphone Connector 6 Memory Button 7 Tune Preset Select Button 8 Function Buttons Tuning Up Down See page 18 Preset Up Down See page 18 Auto Tuning See page 18 Bluetooth Playback Control See page 21 9 Input Selector 10 Volume Control Parts Description ...

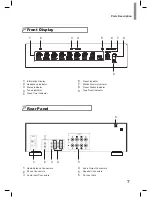
Page 7: ... Indicator 4 Tuned indicator 5 Sleep Timer Indicator 6 Preset Indicator 7 Station Memory Indicator 8 Preset Station Indicator 9 Tone Direct Indicator Rear Panel 1 2 3 4 5 6 1 Radio Antenna Connectors 2 Phono Connectors 3 Audio Input Connectors 4 Audio Output Connectors 5 Speaker Connectors 6 AC Input Cord ...

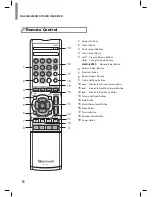
Page 8: ...oth Previous Rewind Button 11 Bluetooth Next Fast Forward Button 12 Bluetooth Play Pause Button 13 Volume Up Down Buttons 14 Mute Button 15 Mono Stereo Select Button 16 Sleep Button 17 Dimmer Button 18 Speaker Select Button 19 Power Button S E L T U N E BASS BLUETOOTH DISPLAY SEARCH MODE TREBLE CD AUX TONE DIRECT MUTE MEMO ENTER VOLUME PHONO TUNER 1 2 3 4 5 6 7 8 9 0 A B PRESET MO ST SLEEP DIMMER ...

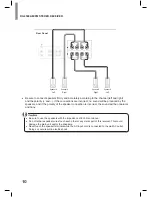
Page 9: ... Place each speaker so that sound is aimed at where listener s ears would be in the main listening position Connecting Speaker Wires 1 Strip away approx 10 mm 3 8 inch of wire insulation and then tightly twist the wire ends 2 Loosen the speaker terminal by turning it counter clockwise 3 Insert the bare part of the wire 4 Tighten the speaker terminal by turning it clockwise Connecting Speakers Care...

Page 10: ...ill be produced by the speakers and if the polarity of the speaker connection is incorrect the sound will be unnatural and tinny Be sure to use the speakers with the impedance of 8 ohms or above Do not let bare speaker wires touch each other or any metal part of this receiver This could damage the main unit and or the speakers Never touch the speaker terminals while the AC input cord is connected ...

Page 11: ...m your source devices Ensure the left L and right R channels and the inputs and outputs are correctly connected To listen to the sound of a connected audio device select AUX as the input source R L TV DVD Player etc Rear Panel Phono Connection You can use the PHONO input jack to connect turntable Turntable with MM type cartridge Rear Panel Do not connect the turntable with MC type cartridge direct...

Page 12: ...STANDBY VOLUME MEMORY TUNE PRESET INPUT PHONES Be careful not to set the volume too high when using headphones Connecting Recording Components You can connect audio recording devices to the AUX OUT jacks You can make an audio recording from the built in tuner or from an audio source connected to the main unit R L AUDIO IN Rear Panel ...

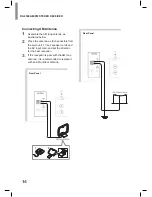
Page 13: ...a To listen to radio stations connect the FM wire antenna and AM loop antenna as illustrated below Connecting FM Antenna To strengthen the signal reception extend the antenna to its full length Indoor Antenna 1 Connect the FM indoor antenna to the FM antenna terminal 2 Change the position of the antenna until you get the best reception of your favorite FM stations Rear Panel ...

Page 14: ...enna as illustrated below 2 Place the antenna as far as possible from the main unit TV set speaker cords and the AC input cord and set the direction for the best reception 3 If the reception is poor with the AM loop antenna it is recommended to replace it with an AM outdoor antenna Rear Panel ...

Page 15: ...ections 15 Connecting Power Make sure to plug in only after you have connected all your components to the main unit Plug the supplied AC power cord into the wall outlet AC power cord To the wall outlet Rear Panel ...

Page 16: ...SLEEP DIMMER SPEAKER When using the headphone press the corresponding speaker button to switch off both A and B speakers 4 Select the input source you want to play back On the main unit press INPUT Each time the button is pressed the display changes in the following order FM AM CD AUX PHONO Bluetooth AUDIO On the remote control press a source select button CD AUX TONE DIRECT MUTE VOLUME PHONO TUNE...

Page 17: ...U N E BASS BLUETOOTH DISPLAY SEARCH MODE TREBLE MEMO ENTER PRESET T U N E L R BALANCE S E L Adjusting the Tone Bass and Treble You can adjust the tone bass and treble as desired 1 Select the tone control mode by pressing TONE DIRECT TON CTRL is displayed on the display panel S E L T U N E BLUETOOTH DISPLAY SEARCH MODE TONE DIRECT MUTE MEMO ENTER VOLUME PRESET PRESET T U N E L R BALANCE S E L If yo...

Page 18: ...ESET PRESET T U N E L R BALANCE S E L Auto Tuning 1 Press and hold TUNE or TUNE for more than 1 second On the main unit press and hold or for more than 1 second The tuner keeps searching until a station with strong signal strength is found The display shows the tuned frequency If the found station is not the desired one simply repeat this operation Stations with weak signal strength are skipped du...

Page 19: ...ored in the memory A stored station is erased from the memory by storing another station in its place S E L T U N E BLUETOOTH DISPLAY SEARCH MODE TONE DIRECT MUTE MEMO ENTER VOLUME PRESET PRESET T U N E L R BALANCE S E L 5 Repeat the above steps 1 4 to store another station Auto Presetting 1 Press and hold MEMO ENTER for more than 2 seconds AUTO MEM blinks and the main unit begins to preset statio...

Page 20: ... the display panel You can select a desired preset number by pressing numeric buttons on the remote control Scanning Preset Stations in Sequence 1 Press Preset The receiver starts scanning the stations in the preset sequence 2 Press Preset again to stop scanning CD AUX PHONO TUNER 4 5 6 7 8 9 0 B PRESET MO ST SLEEP DIMMER Stations with weak signals will not be scanned and will therefore not be sam...

Page 21: ... PAIRING is displayed on the display panel and the Bluetooth indicator blinks 3 Select RX 4508 in the device list If RX 4508 is not displayed repeat from step 1 4 If PIN code is required enter 0000 on the device Depending on the device connection is automatically made without enter the PIN code 5 When pairing is completed CONNECTED is displayed on the display panel and the Bluetooth indicator is t...

Page 22: ... an analog source or vice versa so make sure the components you are recording to from are hooked up in the same way For details on connection see Connecting Playback Components on page 11 The receiver s volume Audio parameters the tone controls for example and surround effects have no effect on the recorded signal Some digital sources are copy protected and can only be recorded in analog 1 Select ...

Page 23: ...ime for the system to be turned off The default setting value is 6H 1 Press and hold SLEEP for more than 3 seconds Each time this button is pressed the auto power control time changes as follows Off 2h 4h 6h CD AUX PHONO TUNER 4 5 6 7 8 9 0 B PRESET MO ST SLEEP DIMMER When you play music via Bluetooth the auto power control does not works Adjusting the Brightness of the Fluorescent Display You can...

Page 24: ...te from another position Avoid exposing the remote sensor on the front panel to direct light The display is dark or off Press DIMMER on the control repeatedly to return to the default setting SOUND Problem Remedy There is no sound from the selected component Check that the component is connected correctly to the audio input jacks of components Ensure that the cords are fully inserted into the jack...

Page 25: ...0 kHz 3 dB Line CD AUX 10 Hz 95 kHz 3 dB Bass Treble control 10 dB FM Tuner Section Frequency range 87 5 108 0 MHz Usable sensitivity S N 30 dB 12 dBu Signal to noise ratio mono stereo 55 dBu 50 dBu Distortion mono stereo 0 7 1 0 Stereo separation 30 dBu 1 kHz Image rejection 20 dB IF rejection 65 dB AM Tuner Section Frequency range 522 1611 kHz Signal to noise ratio 35 dB Usable sensitivity S N 2...

Page 26: ... This system incorporates a sophisticated technology that allows you to create optimum sound quality and sound atmosphere in your personal Home Theater The Bluetooth word mark and logos are registered trademarks owned by Bluetooth SIG Inc and any use of such marks by inkel is under license Other trademarks and trade names are those of their respective owners 2014 CSR plc and its group companies Th...

Page 27: ......

Page 28: ...RX 4508 AM FM STEREO RECEIVER Printed in Vietnam 5707 00000 935 0S ...

Reviews: