background image

28

Clearing the traveling distance

You can clear the traveling distance in the main screen.

1. 

Change the traveling data display to DST and press 

A


for 2 seconds.

2. 

Release the finger when the DST indication starts 
blinking.  
In this state, pressing 

A

 again clears the traveling 

distance.


The DST indicator light stops blinking and the screen takes 
you back to the basic screen after leaving it alone for 5 
seconds.


When the traveling distance is cleared, TIME, AVG, MAX and 
CALORIE are also cleared.

Summary of Contents for STEPS E8000 Series

Page 1: ...UM 72F0A 000 00 User s manual Original instructions E8000 Series Shimano Total Electric Power System...

Page 2: ......

Page 3: ...itches and shift switches 17 Installing and removing the cycle computer 18 Turning the power ON OFF 19 Operating the cycle computer 20 Basic screen display 21 Changing assist mode 23 Switching to WALK...

Page 4: ...ery terminals to get wet Doing so may cause overheating bursting or ignition of the battery Use the Shimano specified charger and observe the specified charging conditions when charging the specified...

Page 5: ...ded for use by persons including children with reduced physical sensory or mental capabilities or lack of experience and knowledge unless they have been given supervision or instruction concerning use...

Page 6: ...E E TUBE PROJECT app for smartphones tablets Firmware software inside each component Cleaning The number found on the battery mount key is necessary when purchasing spare keys Keep it in a safe place...

Page 7: ...hat is compact without loss in visual clarity provides detailed traveling data by color recognition Q Factor comparable to mountain bikes reduces burden on the legs from the MTB rider s experiences Op...

Page 8: ...ry level is running low the level of assistance is lowered to increase the traveling range OFF This mode does not provide power assistance when the power is turned on Since there is no power consumpti...

Page 9: ...0 F Drive unit DU E8000 G Speed sensor SM DUE10 H Drive unit cover SM DUE80 A SM DUE80 B I Battery external type Battery mount external type BT E8010 BM E8010 BT E6010 BM E6010 J Battery charger EC E6...

Page 10: ...website http si shimano com Storage temperature 20 70 C Rated voltage 36 V DC Storage temperature Battery 20 60 C Drive unit type Midship Charging voltage 100 240 V AC Motor type Brush less DC Chargin...

Page 11: ...y cause overheating bursting or ignition of the battery CAUTION When removing the battery charger power plug from the outlet or the charging plug from the battery do not pull it out by the cord When c...

Page 12: ...Battery Charging port Battery charger EC E6000 Battery BT E6010 1 Attach the adapter to the charging plug 2 Plug the charger s power plug into the outlet 3 Plug the adapter into the battery s charging...

Page 13: ...the charging plug into the charging port on the battery mount or the battery Place the battery charger main body on a steady surface such as the floor before charging Stabilize the bicycle to ensure t...

Page 14: ...g Charging error Turned off Battery disconnected 1 hour or more after the completion of charging Charger LED lamp About the battery LED lamps You can check the current charging status on the LED lamp...

Page 15: ...g the battery Charging can be carried out at any time regardless of the amount of charge remaining but you should fully charge the battery at the following times Be sure to use the dedicated charger w...

Page 16: ...ng make sure that the charging port cap is closed To prevent the battery from falling out do not ride the bicycle with the key inserted BT E8020 For the purposes of demonstration these instructions ta...

Page 17: ...e key does not affect the insertion of the battery You can insert it regardless of the key position You cannot remove the key when it is not in the inserting position Key cylinder Key 2 To unlock the...

Page 18: ...the keyhole cap Key hole cap 2 Insert the key into the key cylinder in the battery mount The position of the key does not affect the insertion of the battery You can insert it regardless of the key po...

Page 19: ...ist modes the level of assistance becomes weaker Y2 Shifting gears pedaling becomes lighter SC E6010 SW E6000 X1 Y1 X2 Y2 X1 When switching assist modes the level of assistance becomes stronger When s...

Page 20: ...e cycle computer securely until it clicks into place Bracket To remove the cycle computer push the lever of the bracket firmly while sliding out the cycle computer If the cycle computer is not correct...

Page 21: ...the holder Power cannot be turned on while charging Do not place your foot on the pedals when turning on A system error may result BT E8010 BT E8020 can be forced to power off by holding down the powe...

Page 22: ...ed during system start up and shutdown Operating the cycle computer SW E8000 L SC E8000 X1 Y1 A SC E6010 SW E6000 X1 A Y1 X1 Y1 Used for moving the setting menu cursor adjusting settings etc A Used fo...

Page 23: ...sition Only displays when electronic gear shifting is in use Displays the currently set gear position C Assist gauge Displays the assistance D Assist mode display Displays the current assist mode ECO...

Page 24: ...he battery level on the cycle computer while riding SC E8000 Display Battery level 81 100 61 80 41 60 21 40 1 20 0 The battery level indicator blinks red when remaining battery capacity falls to this...

Page 25: ...E8000 L SC E8000 X1 Y1 SW E6000 SC E6010 SC E8000 SC E6010 BOOST Assist boost TRAIL Assist trail ECO Assist eco OFF Assist off WALK Walk assist Short press X1 Short press Y1 Long press Y1 Short press...

Page 26: ...Y1 SW E6000 SC E6010 NOTE A warning tone will sound while switching is in progress if it is not possible to switch to WALK mode because the current speed is not 0 km h or there is pressure on the peda...

Page 27: ...inactivated To re activate WALK mode momentarily release Y1 and then hold down Y1 The walk assist function can operate at a maximum of 6 km h The assistance level and speed vary with the gear positio...

Page 28: ...26 Current gear and traveling data display A Gear position Only displays when electronic gear shifting is in use B Traveling data display SC E8000 B A SC E6010 A B...

Page 29: ...e 4 A DST CLOCK J B ODO CALORIE I C RANGE POWER H D TIME CADENCE G E AVG MAX F 1 When RANGE is displayed the battery level is not displayed The traveling range should be used as a reference only 2 Opt...

Page 30: ...A for 2 seconds 2 Release the finger when the DST indication starts blinking In this state pressing A again clears the traveling distance The DST indicator light stops blinking and the screen takes yo...

Page 31: ...000 L SC E8000 1 Hold down A when the bicycle is not moving to display the menu list screen A SW E8000 L SC E8000 SW E6000 SC E6010 1 Hold down X1 and Y1 when the bicycle is not moving to display the...

Page 32: ...nection status E Turning the light on off F Display backlight brightness setting G Turning the beep noise on off H Switching between km and miles I Language setting J Adjusting the electronic gear shi...

Page 33: ...on the menu list screen however they are not available for use SC E6010 A Clear Exit K B Clock RD protection reset J C Backlight D Brightness Adjust I E Beep Font color H F Unit Language G In order t...

Page 34: ...W E6000 SC E6010 SC E8000 SC E6010 Configurable items Details Exit Return to the menu list screen DST Clearing the traveling distance SC E6010 Default value set in the SC display setting Configurable...

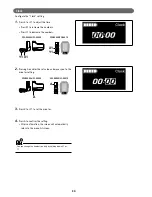
Page 35: ...nd press A to confirm After resetting the screen will automatically return to the menu list screen A reset confirmation screen is not displayed on SC E6010 A SW E8000 L SC E8000 When the traveling dis...

Page 36: ...SC E8000 X1 Y1 SW E6000 SC E6010 2 Pressing A enables the set value and moves you to the minutes setting A SW E8000 L SC E8000 A SW E6000 SC E6010 3 Press X1 or Y1 to set the minutes 4 Press A to conf...

Page 37: ...tart To start Bluetooth LE pairing press A to confirm If you press A during Bluetooth LE pairing the transmission will be interrupted then the screen will return to the menu list screen X1 A Y1 SW E80...

Page 38: ...Y1 A or the screen will automatically return to the menu list screen after awhile Connection successful Connect failure Connection failed 5 When connection is successful the unit name will display in...

Page 39: ...details on ANT connection refer to ANT connection in the section About wireless functions Select Bluetooth LE ANT from the menu list screen and confirm to display current wireless connection status Wh...

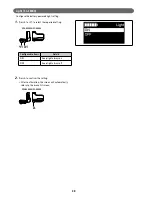
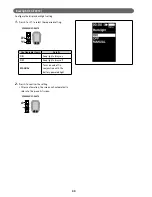
Page 40: ...r Y1 to select the required setting X1 Y1 SW E8000 L SC E8000 Configurable items Details ON Keep light always on OFF Keep light always off 2 Press A to confirm the setting After confirmation the scree...

Page 41: ...the button again to turn the light off Once the light is turned off the icon on the screen disappears When the battery powered light is not connected and Backlight is set to MANUAL pressing the light...

Page 42: ...ng X1 Y1 SW E6000 SC E6010 Configurable items Details ON Keep light always on OFF Keep light always off MANUAL Turns on and off in conjunction with the battery powered light 2 Press A to confirm the s...

Page 43: ...r Y1 to adjust the brightness The brightness can be adjusted in 5 levels X1 Y1 SW E8000 L SC E8000 X1 Y1 SW E6000 SC E6010 2 Press A to confirm the adjusted value After confirmation the screen will au...

Page 44: ...W E6000 SC E6010 Configurable items Details ON Enable beeps OFF Disable beeps 2 Press A to confirm the setting After confirmation the screen will automatically return to the menu list screen A SW E800...

Page 45: ...ed setting X1 Y1 SW E8000 L SC E8000 X1 Y1 SW E6000 SC E6010 Configurable items Details km Displayed in km mile Displayed in miles 2 Press A to confirm the setting After confirmation the screen will a...

Page 46: ...required setting X1 Y1 SW E8000 L SC E8000 X1 Y1 SW E6000 SC E6010 Language English French German Dutch Italian Spanish 2 Press A to confirm the setting After confirmation the screen will automaticall...

Page 47: ...onfigurable items White Black White Black 2 Press A to confirm the setting After confirmation the screen will automatically return to the menu list screen A SW E6000 SC E6010 Adjust You can adjust gea...

Page 48: ...the function of the rear derailleur 1 Press X1 or Y1 to select OK X1 Y1 SW E8000 L SC E8000 X1 Y1 SW E6000 SC E6010 Configurable items Details OK RD Protection Reset will operate Cancel To not execute...

Page 49: ...nd communication with devices The system can be configured and firmware can be updated when the bicycle is connected to a device You need E TUBE PROJECT to configure SHIMANO STEPS and update firmware...

Page 50: ...turned on To confirm whether connection was successful check the Bluetooth LE ANT menu Bluetooth LE connection Generally Bluetooth LE transmission will begin automatically when the cycle computer is t...

Page 51: ...ry decreases sufficiently If the situation does not improve contact the place of purchase Security authentication error This is displayed if a genuine drive unit is not connected This is displayed if...

Page 52: ...hich power assistance is provided may be lower than usual Check that the speed sensor is properly installed If the situation does not improve contact the place of purchase W013 Initialization of torqu...

Page 53: ...r assistance is not provided during riding Contact the place of purchase or bicycle dealer E014 The speed sensor may have been installed in the wrong position Power assistance is not provided during r...

Page 54: ...mputer SC E8000 SC E6010 or assist switch SC E8000 L SW E6000 may be connected incorrectly or there may be a problem with one or more of them Contact the place of purchase Is the speed too high Check...

Page 55: ...battery fully charged If the distance that can be traveled when the battery is fully charged has decreased the battery may have degraded Replace the battery with a new one Pedaling is stiff Are the ti...

Page 56: ...to clean them and then repeat the recharging operation If the battery still cannot be recharged contact the place of purchase The battery does not start recharging when the charger is connected The ba...

Page 57: ...rging The power cannot be turned on while the battery is mounted on the bicycle and being charged Stop charging SC E6010 Is the cycle computer correctly installed to the bracket Install the cycle comp...

Page 58: ...tion Three beeps sound An error or warning is occurring This occurs when a warning or error is displayed on the cycle computer Refer to the section Error messages on the cycle computer and follow the...

Page 59: ...is required should you need to purchase spare keys Enter the key number in the box below and keep in a safe place Key number Please note specifications are subject to change for improvement without n...

Reviews: