background image

10

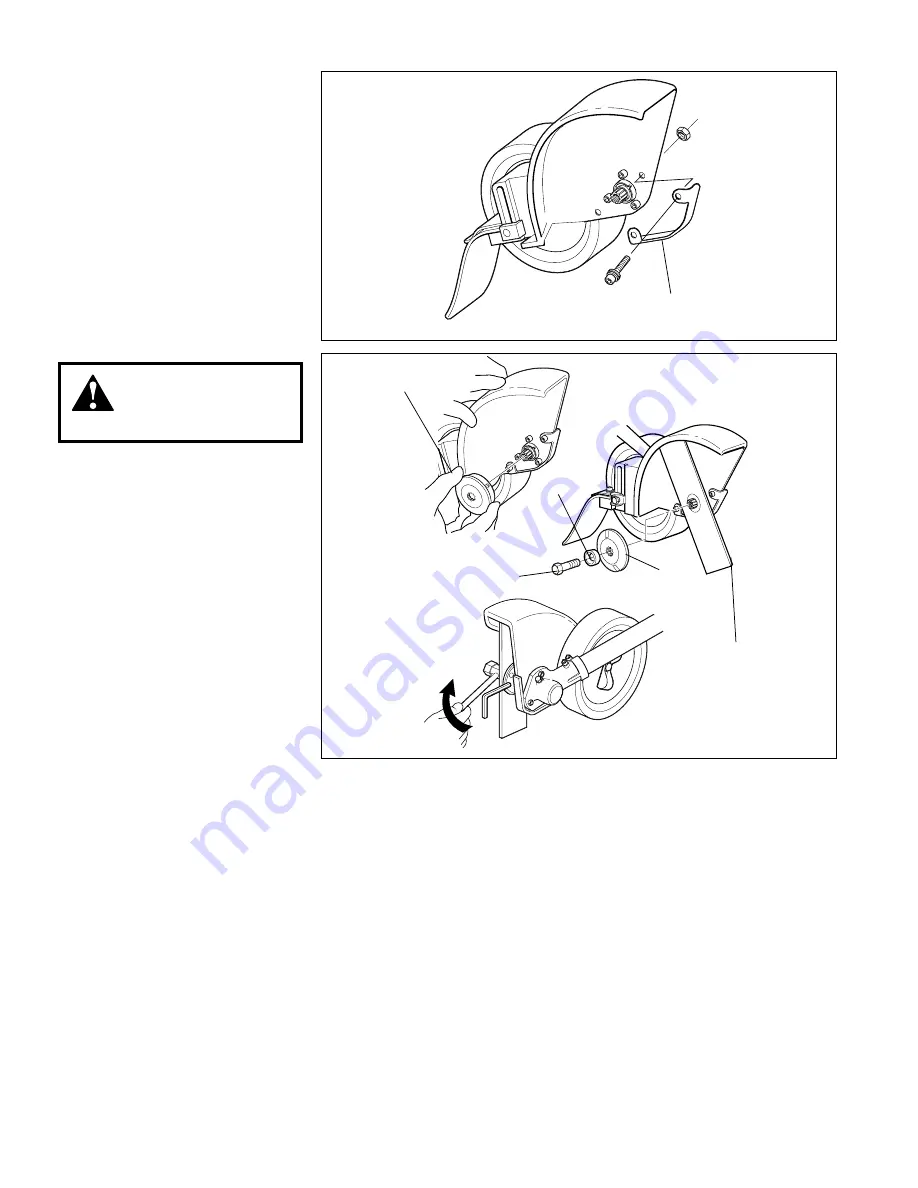
Inspect the Gearcase Protector

The metal gearcase protector (L)


is 

installed to protect the gearcase flange 

from damage when working close to 

sidewalks or other abrasive surfaces, 

and should be routinely inspected for 

damage or excessive wear.  
When replacing the protector, inspect to 

be sure that both of the protector mount-

ing screws are firmly tightened and each 

screw is locked in place with a nut as 

shown.

L

D

B

C

E

Replacing the edger blade

Align the hole in holder A (A) with 

1. 

the matching hole in the gearcase 

and then use a hex wrench to tem-

porarily lock the output shaft. 
Loosen the shaft bolt then remove 

2. 

the output shaft bolt (C), Holder B 

(B) and the edger blade (D) from 

the gearcase.
Mount the edger blade and holder 

3. 

B (B) onto the shaft, and then 

install the bolt guard (E) and shaft 

bolt (turn bolt counterclockwise to 

install). 
Align the hole in holder A (A) with 

4. 

the matching hole in the gearcase, 

and then use a hex wrench to tem-

porarily lock the output shaft. 
Firmly tighten the shaft bolt. 

5. 

Remove the hex wrench.

WARNING!

Always wear gloves when 

handling the edger blade.

A

Summary of Contents for 65010

Page 1: ...AL MULTIPURPOSE EDGER TOOL 65010 X7502880402 12 10 Minimize the risk of injury to yourself and others Read this manual and familiarize yourself with the contents Always wear eye and hearing protection...

Page 2: ...his unit as well as to pro tect you and others from harm These procedures are guidelines for safe operation under most conditions and are not intended to replace any safety rules and or laws that may...

Page 3: ...r Multipurpose Tool Carrier consult the owner s man ual provided with it If it has been lost or misplaced contact a Shindaiwa dealer for a replacement ALWAYS stop the engine immedi ately if it suddenl...

Page 4: ...e Reduce the risk of bystanders being struck by flying debris Make sure no one is within 15 meters that s about 16 paces of an operating attachment IMPORTANT Safety and Information Labels Make sure al...

Page 5: ...ght 793 x 171 x 299 mm 31 2 x 6 7 x 11 8 in Multipurpose Edger Tool less cutting attachment 1 98 kg 4 4 lb Gearcase Lubrication Lithium based grease Gear Reduction 1 36 1 Gearcase Arbor Bolt Size 8 mm...

Page 6: ...case as shown and then fit the shield onto the matching flange on the gearcase See Figure 5 WARNING The edger is intended for right A B C D E M23004 A Place the Multipurpose Tool Carrier A and the Too...

Page 7: ...htly secured 26018 65010 94010_MLE230_07LP 11 21 01 11 19 AM 10 The Multipurpose Edger Tool should now be completely assembled A B C D E F NOTE The numbers C are for reference only they do NOT refer t...

Page 8: ...aced contact Shindaiwa for a replacement Maintenance Using a Hand Held Edger CAUTION Low speed edging can lead to pre mature clutch failure Guidelines for Operating the Edger Before edging make sure t...

Page 9: ...3 Figure 15 Latch Latch Protector Coupler Screw Knob 1 With the unit on a clean flat surface loosen the coupler screw knob The spring loaded coupler protector should pop up 2 Press down on the latch w...

Page 10: ...blade Align the hole in holder A A with 1 the matching hole in the gearcase and then use a hex wrench to tem porarily lock the output shaft Loosen the shaft bolt then remove 2 the output shaft bolt C...

Page 11: ...11...

Page 12: ...WWW SHINDAIWA COM When presenting your unit for Warranty service repairs proof of purchase is required Consumer Product Support If you require assistance or have questions concerning the application...

Reviews:

Related manuals for 65010