background image

3

Work Safely

Trimmers and brushcutters operate at very 

high speeds and can do serious damage 

or injury if they are misused or abused. 

Never allow a person without training or 

instruction to operate your unit!

Stay Alert

You must be physically and mentally fit 

to operate this unit safely.

WARNING!

Never operate 

power equipment of any 
kind if you are tired or if you are under 

the influence of alcohol, drugs, medica-
tion or any other substance that could 
affect your ability or judgment.

General Safety Instructions

ALWAYS

 wear eye protection to shield 

against thrown objects.

NEVER

 operate the engine when trans-

porting the unit.

NEVER

 operate the engine indoors! 

Make sure there is always good ventila-
tion. Fumes from engine exhaust can 
cause serious injury or death.

ALWAYS

 clear your work area of trash 

or hidden debris that could be thrown 
back at you or toward a bystander.

ALWAYS

 use the proper cutting tool for 

the job.

ALWAYS

 stop the unit immediately if 

it suddenly begins to vibrate or shake. 

Inspect for broken, missing or improp-
erly installed parts or attachments.

NEVER

 extend trimming line beyond 

the length specified for your unit.

ALWAYS

 keep the unit as clean as practical. 

Keep it free of loose vegetation, mud, etc.

ALWAYS

 hold the unit firmly with both 

hands when cutting or trimming, and 
maintain control at all times.

ALWAYS

 keep the handles clean.

ALWAYS

 disconnect the spark plug wire 

before performing any maintenance work.

ALWAYS

, if a blade should bind fast in 

a cut, shut off the engine immediately. 
Push the branch or tree to ease the 
bind and free the blade.


WARNING! 

Never make unauthorized 

attachment installations. 

IMPORTANT!

Safety and Operation Information Labels: 

Make sure all information labels are 

undamaged and readable. Immediately 

replace damaged or missing information 

labels. New labels are available from your 

local authorized Shindaiwa dealer.

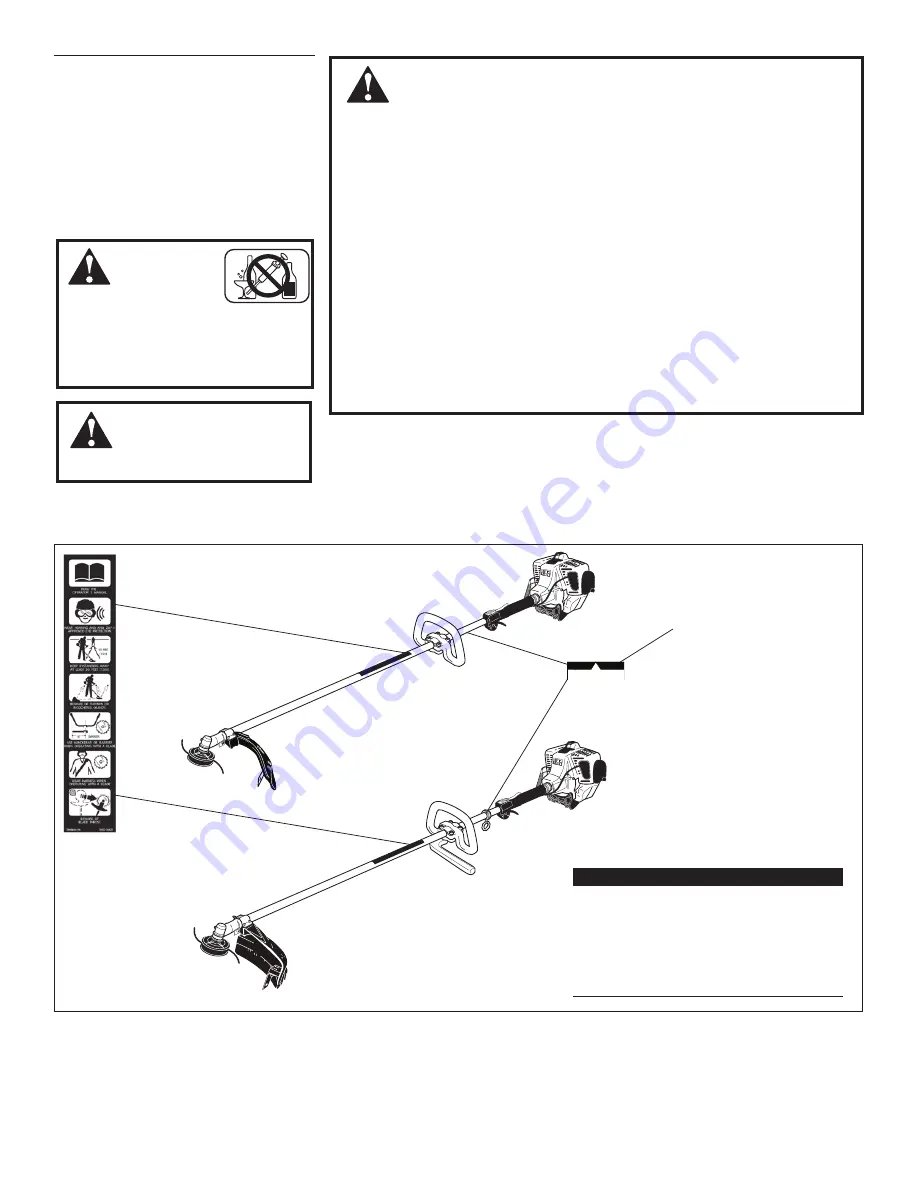
T272X

T272

This label indicates the minimum 

distance between front handle and rear 

grip per ANSI B175.3.

POSITION HANDLE

FORWARD OF THIS LINE

Safety Labels

Figure 1

WARNING!

USE Good JUdGmENt

Summary of Contents for 81606

Page 1: ...X WARNING Minimize the risk of injury to yourself and others Read this manual and familiarize yourself with the contents Always wear eye and hearing protection when operating this unit Part Number 81606 Rev 11 06 T272 EVC TRIMMER T272X EVC TRIMMER ...

Page 2: ... WARNING A statement preceded by the triangular attention symbol and the word WARNING contains informa tion that should be acted upon to prevent serious bodily injury IMPORTANT The information contained in this manual describes units available at the time of publication While every attempt has been made to give you the very latest information about your Shindaiwa product there may be some dif fere...

Page 3: ... stop the unit immediately if it suddenly begins to vibrate or shake Inspect for broken missing or improp erly installed parts or attachments NEVER extend trimming line beyond the length specified for your unit ALWAYS keep the unit as clean as practical Keep it free of loose vegetation mud etc ALWAYS hold the unit firmly with both hands when cutting or trimming and maintain control at all times AL...

Page 4: ...your balance at all times during operation Always make sure the appropriate cutting attachment shield is correctly installed Figure 2 Be Aware of the Working Environment Avoid long term operation in very hot or very cold weather Make sure bystanders or observers outside the 50 foot danger zone wear eye protection Be extremely careful of slippery terrain especially during rainy weather Beware of a ...

Page 5: ...urs for which the engine has been shown to meet Federal emission requirements Category C 50 hours Moderate B 125 hours Intermediate and A 300 hours Extended Engine Code S272E Engine Dry weight T272 less attachment 6 7kg 14 7 pounds Dry weight T272X less attachment 6 7kg 14 8 pounds Engine Type 2 cycle vertical cylinder air cooled Bore x Stroke 34 mm x 30 mm 1 3 in x 1 2 in Displacement 27 2cc 1 7 ...

Page 6: ... the handle Loosen the 4 socket head capscrews on the handle See Figure 5 Position the handle forward of the Handle Positioning Label at the best position for operator comfort usually about 10 inches ahead of the throttle housing Secure the handle by alternately tight ening the four socket head cap screws in a diagonal or criss cross fashion 1 3 Outer Tube Handle Handle Positioning Label 4 Socket ...

Page 7: ...th out the cutting attachment shield installed and tightly secured CAUTION Make sure the clamp screw and retaining nut are securely tightened before tightening the four socket head cap screws NOTE It may be necessary to loosen the retain ing nut and clamp screw to adjust cutting attachment shield mounting plate Fit the two shims and the bracket over the outer tube and loosely install the four sock...

Page 8: ... normal operating position WARNING The blade must fit flat against the holder flange The blade mounting hole must be centered over the raised boss on blade holder A WARNING Never operate the T272X without the safety clip in place Lock the blade in place by centering the safety clip on the output shaft See Figure 14 4 IMPORTANT The machined recess in holder B must completely surround the safety cli...

Page 9: ...ed mixing oils can lead to excessive carbon deposits CAUTION Never use any type of gasoline containing more than 10 alcohol by volume Some types of gaso line contain alcohol as an oxygen ate Oxygenated gasoline may cause increased operating temper atures Under certain conditions alcohol based gasoline may also reduce the lubricating qualities of some 2 cycle mixing oils Generic oils and some outbo...

Page 10: ... tube 1 a b c 3 Make sure the attachment is clear of obstructions and pull recoil starter handle upward Hold the unit firmly WARNING Never start the engine from the operating position WARNING The cutting attachment may rotate when the engine is started IMPORTANT If the engine fails to start after several attempts with the choke in the closed posi tion the engine may be flooded with fuel If floodin...

Page 11: ... 3 000 250 min 1 rpm 3 Checking Unit Condition NEVER operate the unit with the cutting attachment shield or other protective devices harness ignition switch blade retention clip etc removed Use only authorized Shindaiwa parts and accessories with your Shindaiwa trimmer or brushcutter Do not make modifica tions to the unit without the written approval of Shindaiwa Inc WARNING A cutting attachment s...

Page 12: ...or clear ing weeds and light brush features three nylon blades attached to the head by pivots NOTE For proper operation always refer to the instructions accompanying the trim mer head being used NOTE Additional hardware may be required to mount the Fixed Line or the Flail type trimmer heads CAUTION Do not push the rotating line into trees wire fences or any material that could tangle or break line...

Page 13: ...ttle while cutting Best fuel efficiency is obtained by releasing the throttle when swinging back after a cut To prevent possible engine damage do not allow the brushcutter to run at high speeds without a load Avoid operating the engine at low speeds Doing so can lead to rapid clutch wear In addition slow speed operation tends to cause grass and debris to wrap around the cutting head The blade rota...

Page 14: ...ure wear 10 Hour Maintenance CAUTION Do not operate the machine if the air cleaner or element is damaged or if the element is water soaked 10 15 Hour Maintenance CAUTION Before removing the spark plug clean the area around the plug to prevent dirt and dust from getting into the engine s internal parts Remove and clean the spark plug Adjust the spark plug electrode gap to 0 6 0 7mm If the plug must...

Page 15: ... old grease is pushed out Use only lith ium base grease such as Shindaiwa Gearcase Lubricant or equivalent Fuel Filter Maintenance Use a hooked wire to extract the fuel filter from inside the fuel tank Remove the filter element Before reinstalling the new filter ele ment inspect the condition of all the fuel system components fuel pick up line fuel return line tank vent line tank vent fuel cap and...

Page 16: ...rn or damaged parts Remove the air cleaner element from the carburetor and clean it thoroughly with soap and water Let dry before reinstalling the element Store the unit in a clean dust free area CAUTION Gasoline stored in the carburetor for extended periods can cause hard start ing and could also lead to increased service and maintenance costs When the blade s cutting edges become slightly dull t...

Page 17: ...n switch is in O OFF position Shorted ignition ground Faulty ignition unit If the plug is wet excess fuel may be in the cylinder The plug is fouled or improperly gapped Consult with an authorized servicing dealer Tighten and re test Consult with an authorized servicing dealer Refill with fresh clean unleaded gasoline with a pump octane of 87 or higher mixed with 50 1 Shindaiwa Premium 2 cycle mixi...

Page 18: ...an or replace the air filter Tighten or replace the spark plug Restart Check the Product Specifications page in this manual for the correct spark plug for this unit Repair or replace fuel filter and or fuel line Water in the fuel Piston seizure Faulty carburetor and or diaphragm Overheating condition Improper fuel Carbon deposits in the combustion chamber Check fuel octane rating check for presenc...

Page 19: ...park plug for your unit Clean or replace the air filter Replace the fuel filter Consult with an authorized servicing dealer Reset the switch and re start Overheated engine Engine idle too high Broken clutch spring or worn clutch spring boss Loose attachment holder Warped or damaged attachment Loose gearcase Poor acceleration Engine stops abruptly Engine difficult to shut off Cutting attachment mov...

Page 20: ...control system for your particular Shindaiwa engine may also include certain related hoses and connectors 1 3 4 Owners Warranty Responsibilities As the small off road engine owner you are responsible for the performance of the required maintenance listed in this owners manual Shindaiwa Corporation recommends that you retain all receipts covering maintenance on your small off road engine but Shinda...

Page 21: ...l volante Convertidor catalítico si está originalmente equipado El sistema de control de emisión de su motor Shindaiwa puede también incluir ciertas mangueras y conexiones particulares 1 3 4 Responsabilidades de Garantía del Propietario Como propietario del motor pequeño no para el uso en automóviles es usted responsable por el rendimiento del mantenimiento requerido y mencionado en este manual de...

Page 22: ...pie o reemplace el filtro de aire Cambie el filtro de combustible Consulte con un agente de servicio autorizado Ajuste 2 750 250 min 1 Restablezca el interruptor y vuelva a arrancar Motor sobrecalentado Ralentí demasiado alto Resorte del embrague roto o resalte desgastado Soporte del accesorio suelto Accesorio torcido o dañado Caja de engranajes suelta Deficiente aceleración El motor se detiene ab...

Page 23: ...ce el filtro de aire Apriete o cambie la bujía Consulte la sección Especificaciones para la bujía correcta Vuelva a arrancar Repare o cambie el filtro o el conducto de combustible Agua en el combustible Pistón gripado Carburador y o diafragma defectuoso Sobrecalentamiento Combustible inadecuado Depósitos de carbonilla en la cámara de combustión Revise el índice de octanaje del combustible revise s...

Page 24: ...ombustible en el cilindro La bujía está obstruida o tiene una separación de electrodos incorrecta Consulte a un agente de servicio de Shindaiwa Apriete y pruebe otra vez Consulte con un agente de servicio autorizado Consulte a un agente de servicio de Shindaiwa Rellene con gasolina sin plomo reciente y limpia con un octanaje de 87 o superior mezclada con aceite Premium de Shindaiwa para motores de...

Page 25: ...o y libre de polvo PRECAUCION Gasolina almacenada en el carbura dor por períodos largos puede causar un arranque duro y puede conducir a un aumento en costo de servicio y mantenimiento Cuando los bordes de corte de un disco pierdan su filo pueden ser afilados rápi damente con una lima Para mantener el disco balanceado todos los bordes de corte deben ser afilados uniformemente Lima redonda Direcció...

Page 26: ...silenciador Silenciador Tornillo de silenciador de 5 mm Protección Trasera del Silenciador Malla del guardachispas Tornillo de protección trasera del silenciador Figure 31 Mantenimiento Cada 135 Horas Cada 135 horas de operación retire y limpie el silenciador Retire el protector de la bujía Retire los tornillos de 4mm de la tapa del motor dos en la parte trasera y dos en la parte delantera de la t...

Page 27: ...esté firmemente asegurado Revise la máquina entera en busca de goteo de combustible o grasa Retire toda suciedad y desechos del motor revise las aletas de enfría miento y el filtro de aire y límpielos de ser necesario Cuidadosamente retire cualquier acu mulación de suciedad o desecho del silenciador y del tanque de combustible La acumulación de suciedad en dichas áreas puede ocasionar el sobrecale...

Page 28: ...disco MANTENGA SU CUERPO FUERA DE LA TRAYECTORIA DEL DISCO Figura 26 ADVERTENCIA Al efectuar cortes verticales nunca permita que el disco sobre pase la altura de su cintura ADVERTENCIA Rebote de Disco El rebote de disco es un movimiento repentino de lado a lado o hacia atrás de la desmalezadora Tal movimiento puede ocurrir cuando el disco se enreda o coje un objeto tal como ramas o troncos de árbo...

Page 29: ...enos a 100º hacia la izquierda NOTA Para la operación adecuada consulte siempre las instrucciones incluídas en el cabezal de corte Estilos de cabezal de corte Semi Automático La línea de corte es indexada cuando el op erario toca el suelo con el cabezal de corte durante el uso Manual El operario suelta manu almente el cable con la podadora completamente detenida Fijo El operario debe apagar el mot...

Page 30: ...s hasta que caliente 1 Si tiene un tacómetro disponible la marcha mínima debe ajustarse a 3 000 250 rpm min 1 3 Verifique La Condición De La Unidad NUNCA opere la unidad sin el protector del accesorio de corte o sin equipo de protección arnés interruptor de encen dido el gancho retén del disco etc Advertencia El protector del accesorio de corte o equipo de protección no garantiza protección contra...

Page 31: ...l motor desde la posición de operación Advertencia El accesorio de corte puede accionarse cuando encienda el motor Importante Si el motor falla en arrancar después de varios intentos con la palanca del obtu rador en posicion cerrada puede que el motor esté ahogado con combustible Si esto se sospecha mueva la palanca del cebador a la posición abierta y repetida mente jale el arrancador retráctil pa...

Page 32: ...to rendimiento y no deben ser usados en su motor Shindaiwa Use solamente gasolina fresca limpia y sin plomo con índice de octanaje de 87 o superior Mezcle todo el combustible con aceite de mezclar para motores de 2 tiem pos enfriados por aire que cumpla o exceda aceites clasificados ISO L EDG y o JASO FC a proporción de 50 1 gasolina aceite Ejemplos de cantidades de mezcla a proporción de 50 1 El ...

Page 33: ... operador cuando la unidad esté en la posición normal de operación ADVERTENCIA El disco debe encajar en forma plana contra el borde del sujetador La muesca de montaje del disco debe estar centrada sobre el patrón elevado en el sujetador de disco A ADVERTENCIA Nunca opere la MACHINE sin el retén de seguridad instalado Asegure el disco en su lugar centrando el retén de seguridad en el eje de sal ida...

Page 34: ...NCIA JAMAS utilice esta maquina sin el protector secundario cuando el cabezal esté en uso PRECAUCIÓN Asegurase que el protector secundario este completamente enganchado con el receptor del gancho Protector Secundario T272X ADVERTENCIA Una podadora de grama normal con mango circular NUNCA debe ser operada con accesorios tipo cuchilla Para usar cuchilla la podadora debe estar equipada con un mango t...

Page 35: ...órese de que tenga todos los componentes necesarios para armar una máquina completa e inspeccione la unidad y componentes en busca de danos Ensamblaje del motor y eje Protector del Accesorio de Corte Accesorio de corte Caja conteniendo el soporte y utensilios de metal para montar el protector del accesorio de corte este manual del propi etario operador y juego de herramientas para mantenimiento ru...

Page 36: ...a modificaciones o alteraciones no autorizadas a ninguna de éstas máquinas ni a sus componentes Cabezal de Nylon Código del Motor Motor S272E Peso sin combustible T272 sin accesorios 6 7 kg 14 7 libras Peso sin combustible T272X sin accesorios 6 7 kg 14 8 libras Tipo 2 tiempos cilindro vertical enfriado por aire Diámetro x Carrera 34 mm x 30 mm Cilindrada 27 2 cc 1 7 pulg Cúbicas Potencia Máxima 1...

Page 37: ...roveen protección adicional y son altamente recomendados No use ropa holgada o joyas que puedan atascarse en la máquina o en la vegetación NUNCA use pantalones cortos Esté Alerta del Area de Trabajo Evite trabajar durante largo tiempo bajo tempero turas extremas Cerciórese de que los transeúntes u observadores estén fuera de la zona de peligro de 50 píes usen protección de ojos Tenga extremado cui...

Page 38: ...o de corte apropiado SIEMPRE pare el motor inmediata mente si repentinamente empieza a vibrar Inspeccione el accesorio de corte por partes quebradas faltantes o instaladas incorrectamente NUNCA extienda el cable de nylon más allá de lo especificado para su máquina SIEMPRE mantenga la máquina lo más limpia posible Manténgala libre de vegetación barro etc SIEMPRE sujete la máquina firme mente con am...

Page 39: ... 272 y la unidad descrita en este manual Shindaiwa Inc se reserva el derecho de realizar cam bios a sus productos sin previo aviso y sin la obligación de hacer modificaciones a máquinas fabricadas previamente NOTA Toda información precedida por la pal abra NOTA contiene información útil que puede hacer su trabajo más fácil Advertencia Las emisiones emitidas por el tubo de escape de este producto c...

Page 40: ...C Podadora T272X EVC T272X T272 Numero de part 81606 Rev 11 06 Advertencia Disminuya el riesgo de su frir lesiones o causar lesiones a otros Lea este manual y familiarícese con su contenido Siempre use protección para los ojos y oídos cuando opere esta máquina ...

Reviews: