8
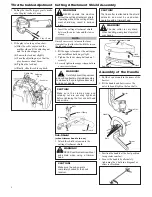
Throttle Cable Adjustment
WARNING!
NEVER operate this machine
without the cutting attachment shield.
Operating without the cutting attach-
ment shield may result in serious
injury.
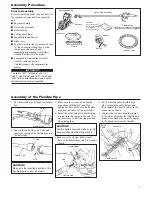
Cutting Attachment Shield Assembly
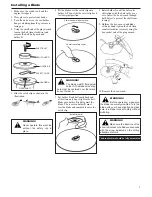
1. Insert the cutting attachment shield
between the outer tube and the lower
clamp.
NOTE:
It may be necessary to loosen the lower
clamp bolt so that the shield will fit between
the tube and clamp.
2. Fit the upper clamp over the outer pipe
and install four bolts finger tight.
3. Tighten the lower clamp bolt and nut
securely.
4.
Securely tighten four upper clamp bolts in
a crisscross fashion.
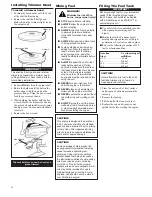
Sub-Shield
(when trimmer head is in use)
1. Attach the shield extension to the
cutting attachment shield.
CAUTION!
Make sure the sub-guard is
completely hooked at the hook
receiver.
WARNING!
NEVER use this machine without
sub-shield when using a trimmer
head.
WARNING!
Carefully inspect the gearcase
and cutting attachment shield assembly
to make sure they are tightened securely
and do not wobble.
CAUTION!
Make sure the clamp screw and
retaining nut are securely tightened
before tightening the four socket head
cap screws.
CAUTION!
The line cutter is attached to the shield
extension and must be used when
operating with a trimmer head.
WARNING!
The line cutter is very sharp.
When handling, wear gloves to protect
your hands.
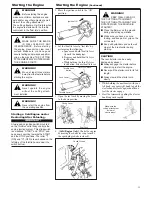
Assembly of the Handle
1. Put the 4 square nuts in the frame of the
barrier.
2. Fit the handle and barrier over the
outer tube and tighten the four bolts.
Square Nut
Barrier
Handle
Bolt
Barrier
3. Position the handle at the best position
for operator comfort.
4. Secure the handle by alternately
tightening the 4 bolts in a diagonal or
crisscross fashion.
Cutting Attachment Shield
Hook
Receiver
Hook
Sub-shield
1. Pulling the throttle trigger gently, make
sure the play is about 5 mm.
Play = 5 mm
2. If the play is too long or too short:
(a) Slide the cable cap toward the
muffler side until the adjusting nut
and the lock nut appear.
(b) Loosen the lock nut slightly.
(c) Turn the adjusting nut so that the
play becomes about 5 mm.
(d) Tighten the lock nut.
(e) Finally, slide the cable cap back.
Cable Cap
Adjusting
Nut
Lock Nut
Bolt
Upper Clamp
Spacer
Nut
Safety Guard


