16
Before you start
U-handle
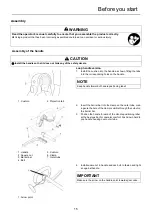
1.
Use the 4 mm L-wrench to remove the lower cap retaining
screws from the handlebar bracket. Remove the cap from
the bracket, and note the position of the two spacers in-
stalled between the bracket halves.
2.
Position the handle on the outer tube forward of Handle po-
sitioning label as shown in figure. Reassemble the lower cap
to the handlebar bracket in the reverse order of disassembly.
3.
Locate the handle in the best position for operator comfort.
4.
Firmly tighten both lower cap retaining screws.
5.
Secure the cable to the outer pipe with the 2 bands as the
illustration shows. The 2 bands are in the tool bag.
Adjust throttle lever free play
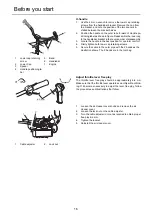
The throttle lever free play should be approximately 4-6 mm.
Make sure that the throttle lever operates smoothly without bind-
ing. If it becomes necessary to adjust the lever free play, follow
the procedures and illustrations that follow.
1.
Loosen the air cleaner cover knobs and remove the air
cleaner cover.
2.
Loosen the lock nut on the cable adjuster.
3.
Turn the cable adjuster in or out as required to obtain proper
free play 4-6 mm.
4.
Tighten the locknut.
5.
Reinstall the air cleaner cover.
1.
Lower cap retaining
screw
2. Lower
Cap
3. Spacer
4.
Handle positioning la-
bel
5. Band
6. Handlebar
7. Engine
1. Cable
adjuster
2. Lock
nut
Summary of Contents for C310S
Page 2: ...2...
Page 39: ...37 X750 017 692 X750 282 680 2 2010 1Notes and rear cover MEMORANDUM...
Page 120: ...40 Konformit tserkl rung...
Page 121: ...41 X750 017 692 X750 282 680 2 2010 1Notizen und hintere Umschlagseite NOTIZEN...
Page 161: ...39 X750 017 692 X750 282 680 2 2010 1Note e quarta di copertina MEMORANDUM...
Page 163: ...3...

