background image


- 8 - 


Engine


Warranty


Owner’s and 
Operator’s 
Manual 

Door Key 

1 Set 

Engine

 Key 

1 Set 

Accessories


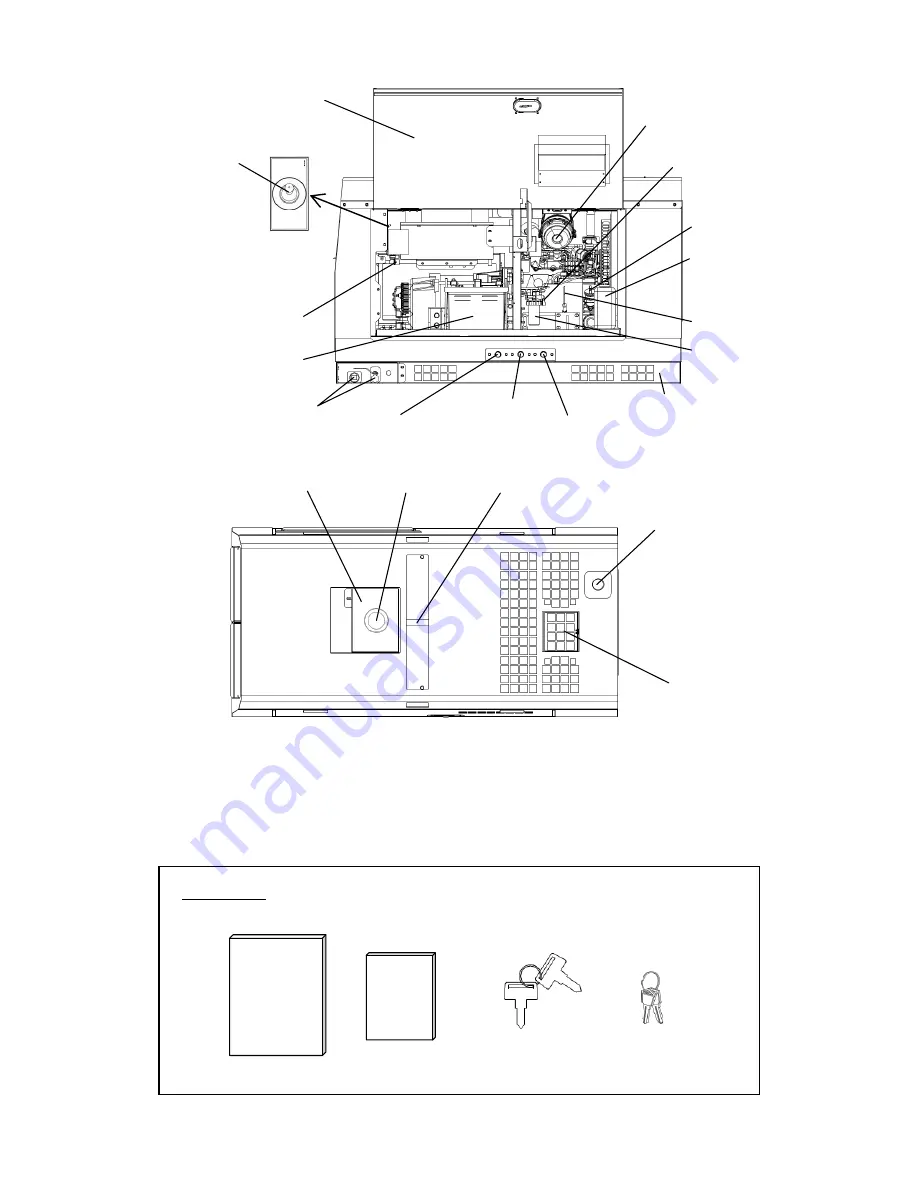
Fuel Inlet Cover 

Fuel Inlet 

Lifting Lug 

Muffler 

Top Plate 

Right Door 

Fuse 
(60A,20A) 

Oil Gauge 

Battery 

Fuel Lever 
(Fuel Strainer) 

Spill Containment Drain 

Fuel Drain Plug 

Oil Drain Plug 

Water Drain Plug 

Spill Containment 

Fuel Filter 

Sub Tank 

Oil Plug 
Oil Inlet 

Air Cleaner 

Frequency 
Selector 

50Hz 

60Hz 

Summary of Contents for DGW400DMK

Page 1: ...ical Water Cooled 4 Cycle Diesel Engine DGW400DMK S1 X753 005 84 0 X753803 070 0 CAUTION Do not operate the Generator Welder or any other appliance before you have read and understood the instructions for use and keep near for ready use ...

Page 2: ......

Page 3: ...ily accessed at all times to order parts or arrange for repair Contact the retail outlet where this equipment was purchased if any parts are lost the equipment becomes soiled or is otherwise damaged in any manner Consult with the retail outlet where the equipment was purchased if any of the points are unclear or you would like further information Be sure to note the model name and serial number of...

Page 4: ...7 3 Fuel Inspection 17 7 4 Spill Containment Inspection 18 7 5 Inspection for Fuel Oil Cooling Water Leakage 18 7 6 Battery Inspection 18 8 Operating Procedures 19 8 1 Starting the Engine 20 8 2 Stopping the Engine 21 8 3 Emergency Stop 21 9 Using as a Welder 21 9 1 Welding Cable Selection 21 9 2 Welding Polarity 22 9 3 Welding Cable Connection 22 9 4 Duty Cycle 23 9 5 Welding Work 23 10 Using as ...

Page 5: ...earth leakage circuit breakers operate Always be sure to stop the engine and remove the engine key before performing any equipment check or maintenance Warning Fire Always be sure to stop the engine when inspecting fuel or refueling and absolutely never perform such tasks near fire or other open flame Wait until the engine has completely cooled before inspecting fuel or refueling Always be sure to...

Page 6: ...ause the battery generates ignitable gas Warning Electromagnetic Interference Persons using a heart pacemaker are not allowed near the welder or welding work area while welding is being performed without the permission of a doctor The welder generates a magnetic field while energized that can negatively affect pacemaker operation Caution Suffocation from Exhaust Fume Do not direct the engine exhau...

Page 7: ...wly and directly straight above Wear a helmet safety shoes gloves and similar protective gear when performing lifting work Do not stand or get under the equipment while it is suspended Securely fix the equipment with rope or similar item so that it cannot move when transporting by truck or other vehicle Caution Injury to Eyes and Skin Always be sure to wear arc proof glasses clothes that completel...

Page 8: ...specified locations Order the necessary labels by numbers in parentheses 1 Suffocation from Exhaust Fume No X505 007590 2 Suffocation from Welding Fume No X505 007600 3 Electric Shock No X505 007610 4 Injury No X505 007630 5 Burn No X505 007620 6 Fire No X505 007650 7 Injury No X505 007550 8 Burns No X505 007660 4 1 2 3 5 8 7 6 ...

Page 9: ...ertical Water Cooled 4 Cycle Diesel Engine Displacement L 0 898 Rated Output kW min 1 15 0 3000 17 6 3600 Fuel ASTM No 2 D Diesel Fuel or Equivalent Lubricant Oil API Class CD or better Lubrication Oil Volume L 3 6 Effective 1 7 Cooling Water Volume L 4 0 Sub Tank Capacity 0 6 L included Starting Method Starter Motor Battery 46B24L Japanese Industrial Standard Fuel Tank Capacity L 37 Dimen sion Le...

Page 10: ...mp Starter Switch Idle Control Switch AC Meter DC Meter Output Control Dial ECO Drive Display Single Dual Selector Weld Mode Selector Arc Control Dial AC Meter Selector Emergency Stop Switch 1 P 230 240V Receptacle Earth Leakage Circuit Breaker ELCB 1 P 230 240V Breaker Bonnet Grounding Terminal 1 P 110 115V Receptacle 1 P 110 115V Breaker ...

Page 11: ...Fuel Inlet Cover Fuel Inlet Lifting Lug Muffler Top Plate Right Door Fuse 60A 20A Oil Gauge Battery Fuel Lever Fuel Strainer Spill Containment Drain Fuel Drain Plug Oil Drain Plug Water Drain Plug Spill Containment Fuel Filter Sub Tank Oil Plug Oil Inlet Air Cleaner Frequency Selector 50Hz 60Hz ...

Page 12: ...le laws and regulations 5 2 Idle Control The equipment includes an idle control function You can use the idle control switch to select an engine speed setting of ECO AUTO or HIGH 1 ECO Drive The equipment includes an eco drive function in order to reduce noise save fuel and reduce exhaust gas emission When the idle control switch is set to ECO and only welding is being performed the engine operate...

Page 13: ...ed CV Constant Voltage You can use the equipment as a power source for semi automatic arc welding MIG MAG and self shielded DROOP Drooping Characteristic The weld current can be adjusted by manipulating the welding rod due to being able to increase or decrease the current for changing the arc length thereby allowing you to adjust the arc status and weld beads The arc start is good and the arc is s...

Page 14: ...e of an extension cord used for the remote control to any other device besides the remote controller Set the breaker to ON if the cord reel is equipped with one 5 5 Meter The equipment includes a DC meter that provides digital display of both weld current and voltage and an AC meter that provides digital display of voltage current and frequency of single phase 110 115V generated output 1 DC Ammete...

Page 15: ...r parts are extremely hot during operation and immediately after stopping the equipment Never touch hot parts Never open the radiator cap during operation or immediately after stopping the equipment Hot cooling water and steam will spurt out Always be sure to stop the engine and allow it to cool before inspecting or changing the engine oil Opening the oil gauge or oil plug during operation will re...

Page 16: ...itor lamps WATER TEMP CHARGE and OIL PRESS light up Refer to section 4 Part Names for fuse location If a fuse has blown it is probable that there is a fault in an electric part or the wiring Request repair at the retail outlet where the equipment was purchased 4 Spill Containment Monitor Lamp The spill containment monitor lamp SPILL CONTAINMENT lights up if the level of liquid in the spill contain...

Page 17: ...d check that used devices are connected to ground Securely ground the bonnet grounding terminal to the metal frame of the vehicle if transporting the equipment by truck or trailer 3 If an Earth Leakage Circuit Breaker Operates Caution Electric Shock Injury Always be sure to turn off the power switches of all devices using the equipment when turning on the equipment breakers after an earth leakage ...

Page 18: ...t the equipment with any heavy items such as a trailer gas canister and additional fuel tank added to the equipment Always be sure to use the lifting lug when lifting the equipment and lift slowly and directly straight above Wear a helmet safety shoes gloves and similar protective gear when performing lifting work Do not stand or get under the equipment while it is suspended Always be sure to fix ...

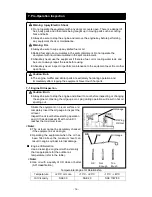
Page 19: ...ing the equipment Never touch hot parts 7 1 Engine Oil Inspection Caution Burn Always be sure to stop the engine and allow it to cool before inspecting or changing the engine oil Opening the oil gauge or oil plug during operation will result in hot oil spurting out Situate the equipment on a level surface and completely insert the oil gauge to inspect the oil level Inspect the oil level before sta...

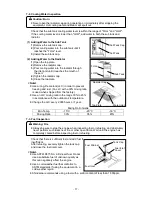
Page 20: ...ped from the factory Use an LLC mixing ratio in the range 30 to 45 in accordance with the outdoor air temperature Change the LLC every 2 000 hours or 1 year Mixing Ratio Guide Min Temp 15 C 20 C 30 C Mixing Ratio 30 35 45 7 3 Fuel Inspection Warning Fire Always be sure to stop the engine when inspecting fuel or refueling and absolutely never perform such tasks near fire or other open flame Wait un...

Page 21: ... accumulates in the spill containment Although the fluids that can leak internally consist of oil fuel and cooling water the spill containment does not have a function that can separate rainwater that has leaked into the equipment from these internally leaked fluids Properly dispose of liquid drained from the spill containment in a manner according to the applicable laws and regulations 7 5 Inspec...

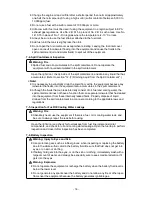
Page 22: ...ine exhaust fume includes components that are harmful to humans Warning Fire Keep any ignitable items such as fuel gas and paint or inflammable items away from the equipment because the muffler exhaust fume and other parts attain high temperatures Provide at least 1 meter 3 feet of distance between the equipment and walls and other obstacles and operate the equipment on a flat surface Caution Suff...

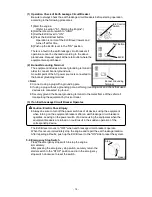
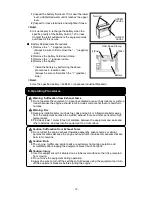
Page 23: ...mately 5 minutes Note Do not crank the starter motor for 15 seconds or more continuously If repeating starter switch operation wait 30 seconds or more between operations After the engine starts do not turn the starter switch to START during operation Restarting after Stopping due to Running Out of Fuel The equipment includes an automatic air bleeding device You can easily restart the engine accord...

Page 24: ...nt suffers an operating fault and similar circumstances Note After stopping the engine using the emergency stop device turn the starter switch to STOP Do not strike the emergency stop switch with a hammer or similar tool Only use the emergency stop switch for emergency stop purposes If the engine does not stop when the emergency stop switch is pressed turn the fuel lever to CLOSE The engine will s...

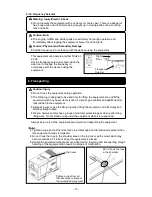
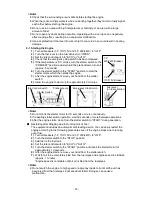
Page 25: ...he welding cables to the weld terminals Refer to the following table explaining the welding cable connection locations 4 Close the terminal covers Polarity Rod Indication Applications Connecting Method Straight Polarity DC Shielded metal arc welding of structures and similar items Scratch Start TIG Welding positive terminal Earth Base material negative terminal Holder welding rod Reverse Polarity ...

Page 26: ...le The duty cycle is the percentage of time the load is being applied in a 10 minute period For example a 60 duty cycle represents 6 minutes of load and 4 minutes of no load in a 10 minute period Note Continuing to weld beyond the rated duty cycle with the rated output can result in equipment overheating and corresponding malfunctions 9 5 Welding Work Warning Suffocation from Welding Fume Always b...

Page 27: ...OUGING Welding of pipes tanks and similar items Gouging CC CELLULOSE ROD SCRATCH START TIG Welding of structures and finishing welding TIG welding Horizontal and Downward STANDARD ROD Welding of heavy structures and thick plates Note This equipment allows for 2 person simultaneous welding For 2 person simultaneous welding select a weld mode and adjust the weld output in accordance with each type o...

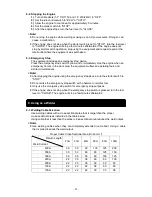
Page 28: ...s is 10 7kVA 2 1 Phase 230 240V The equipment includes two 1 phase 230 240V receptacles The total maximum output available from the two receptacles is 10 7kVA 10 2 Usable Device Capacities Usable capacity varies depending on the type and performance of the electrical tool or household appliance being used Overview of Usable Device Capacities 50 60Hz Device Used Standard Capacities Units kW 1 Phase...

Page 29: ...wer switch of a device using the equipment when the equipment breakers are turned on could result in the sudden operation of the corresponding device Do not leave on the power switch of a device using the equipment and do not connect a device to an AC output receptacle Caution Physical and Secondary Damage If using the equipment as a power source for medical equipment you must check with the medic...

Page 30: ... the ON position Note Refer to section 10 2 Usable Device Capacities and be careful of overloading 11 Simultaneously Welding and Using as AC Power Source Due to the fact that breakers only function for AC power output the engine can become overloaded if simultaneously welding and using the equipment as an AC power source Refer to the table below and limit the use of AC power accordingly Overview o...

Page 31: ...edical attention if it gets into the eyes Warning Explosion Do not operate the equipment or recharge the battery when the battery fluid level is below the minimum level Do not generate any sparks near the battery and do not allow any fire or other open flame near the equipment because the battery generates ignitable gas Caution Burn The engine muffler and similar parts are extremely hot during ope...

Page 32: ...ange Cooling Water or 1 year 7 Clean Fuel Strainer 1st time 2nd time and after 8 Replace Fuel Element 9 Drain Water from Clean Fuel Tank 10 Inspect for Fuel Oil Cooling Water Leakage 11 Inspect Add Battery Fluid 12 Clean Air Element 1st time 2nd time and after 13 Replace Air Element 14 Drain Liquid from Spill Containment 15 Adjust V belt Tension 1st time 2nd time and after 16 Replace V belt or 2 y...

Page 33: ...ompleted 2 Changing the Oil Filter 1 Drain the engine oil according to the procedures of 1 Changing the Engine Oil 2 Remove the oil filter using a filter wrench 3 Apply a thin layer of oil to the gasket of a new oil filter 4 Screw in the oil filter by hand and securely tighten by hand do not use a filter wrench after the gasket contacts the seal surface 5 Add engine oil Note Contact the retail out...

Page 34: ... cup and element 3 Remove any water or foreign material from the cup and clean the element using compressed air Or replace the element 4 Install in the reverse order of removal Note Check that no foreign material is adhering to the packing then install the cup After installation turn the fuel lever to OPEN and check that there is no fuel leakage After checking turn the fuel lever to CLOSE Element ...

Page 35: ...to catch the liquid 2 Remove the plug R 1 2 of the spill containment drain valve and turn the lever to OPEN 3 After draining the liquid turn the lever to CLOSE and apply sealing agent to the plug R 1 2 or wrap it with sealing tape before tightening the plug Note Secure the drain valve body using a spanner or similar tool so that it does not loosen when removing installing the plug by turning it It...

Page 36: ...ment and set the equipment on a level surface 4 Clean the inside of the spill containment using a high pressure washer or similar equipment 5 Drain the cleaning liquid from the spill containment 6 Remove any rust that has formed in the spill containment and paint it again 7 Pour water into the spill containment and check that there is no leakage After checking drain the water you have used 8 Insta...

Page 37: ... similar parts are extremely hot during operation and immediately after stopping the equipment Never touch hot parts Always be sure to stop the engine and allow it to cool before inspecting or changing the engine oil Opening the oil gauge or oil plug during operation will result in hot oil spurting out Perform the following maintenance procedures if not using the equipment for two months or more 1...

Page 38: ...r other open flame Warning Injury to Eyes and Skin Use protective gear such as rubber gloves when inspecting or replacing the battery due to the dilute sulfuric acid in the battery fluid Be sure that fluid does not get into eyes or on skin or clothing If battery fluid gets into the eyes or on the skin or clothing immediately wash with a large amount of water and always be especially sure to seek m...

Page 39: ...ously as AC power source 6 Welding cable short circuit 7 Frequency selector is wrong setting 1 Set to SINGLE 2 Connect securely 3 Replace with cable according to Welding Cable Selection 4 Connect securely 5 Do not use as AC power source 6 Remove the cause of the short circuit 7 Set to proper frequency Strong welding arc 1 Single Dual selector is set to SINGLE 2 Arc control setting is excessively s...

Page 40: ...l the alternator down Display will change E07 to after engine run for approx 10 minutes Then stop and restart the engine When the alternator will not cool down insufficiently E07 is displayed again and repeat the remedy Engine rpm remains the same when this failure happens although position of the idle control switch is changed The rpm is unchanged after the sensor detects overheat until it is fix...

Page 41: ... 38 15 Engine Wiring Diagram ...

Page 42: ... 39 16 Generator Wiring Diagram P 1 2 ...

Page 43: ... 40 P 2 2 ...

Page 44: ... 41 MEMO ...

Page 45: ... 42 MEMO ...

Page 46: ... 43 MEMO ...

Page 47: ... 44 ...

Page 48: ... 45 2015 ...

Reviews: