5
24003
24005
24004
24002
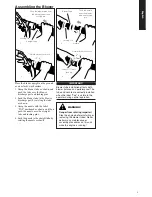
Assembling the Blower
Danger from rotating impeller!
Stop the engine before installing or
removing the blower tubes! Never
perform any maintenance or
assembly procedures on this unit
while the engine is running!
Place the blower upright on the ground
or on a sturdy work surface.
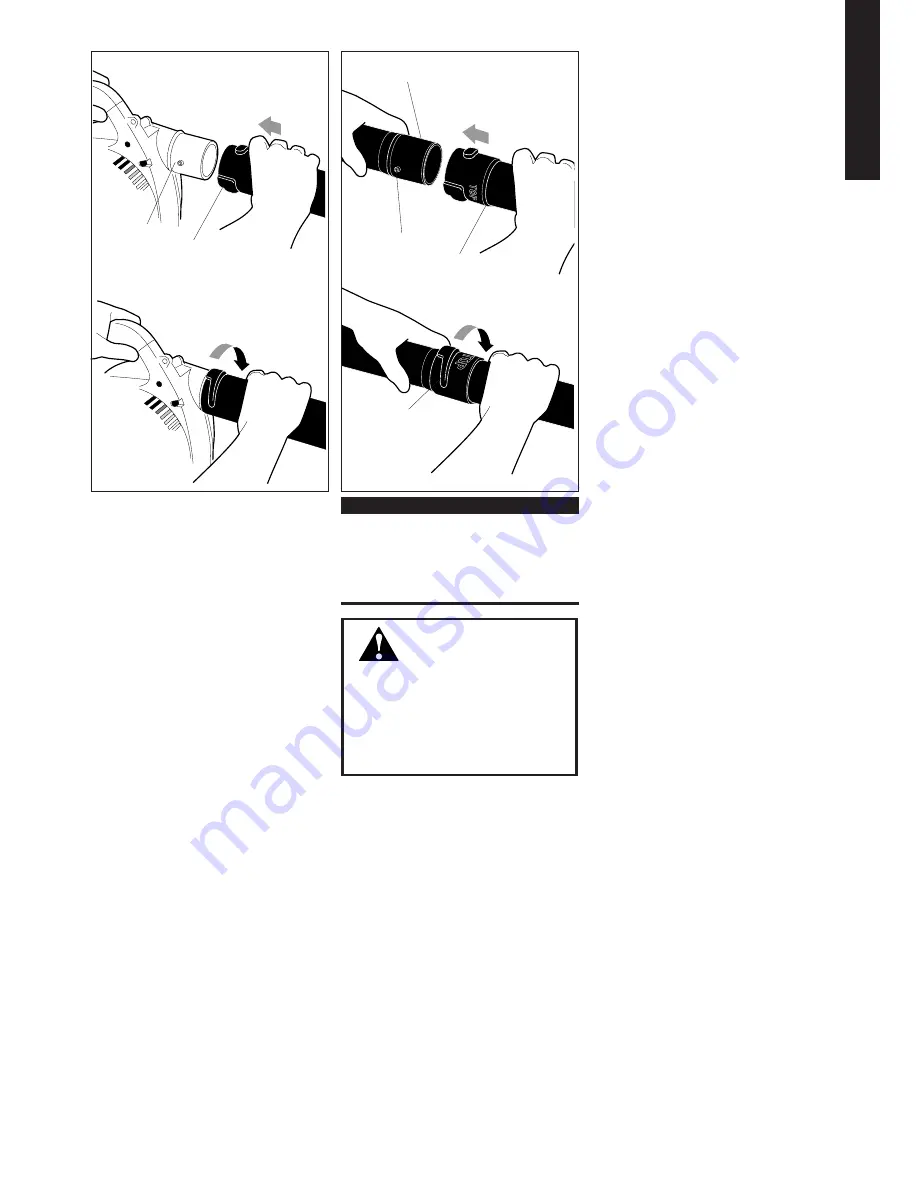
1. Grasp the blower tube as shown, and
push the tube over the blower
discharge port and locking pins.
2. Lock the blower tube to the blower
discharge port by rotating the tube
as shown.
3. Grasp the nozzle with the label
“TOP” positioned as shown, and then
push the nozzle over the straight
tube and locking pins.
4. Lock the nozzle to the straight tube by
rotating the nozzle as shown.
IMPORTANT!
Blower tube installation affects both
blower balance and performance! The
tube and nozzle are correctly installed
when the label “Top” is visible to the
operator during normal operation.
Straight Tube
Locking Pin
Push the blower tube over
the discharge port and
locking pin
Rotate clockwise to lock
Nozzle
Locking Pin
Blower Tube
Push the nozzle
over the blower
tube and locking
pin
Rotate clockwise to lock
Label “TOP” must
face up
1
3
2
4
WARNING!
English
5
24003
24005
24004
24002
Armado del soplador
¡Peligro con el impulsor
giratorio!
Antes de instalar o remover los
tubos del soplador, detenga el
motor. Nunca lleve a cabo ningún
procedimiento de mantenimiento
o armado en este equipo mientras
el motor esté funcionando.
Coloque el soplador verticalmente
sobre el suelo o sobre una superficie de
trabajo firme.
1.
Tome el tubo del soplador tal como
se muestra y empújelo por encima
del puerto de descarga del soplador y
los pasadores de seguridad.
2.
Trabe el tubo del soplador contra el
puerto de descarga del soplador
girando el tubo tal como se muestra.
3.
Tome la boquilla que tiene el rótulo
“PARTE SUPERIOR” ubicado tal
como se muestra y luego empuje la
tobera por encima del tubo recto y
los pasadores de seguridad.
4.
Trabe la boquilla contra el tubo
recto girando la misma tal como
se muestra.
¡IMPORTANTE!
La instalación del tubo soplador incide
tanto sobre el equilibrio como sobre el
rendimiento del soplador. El tubo y la
boquilla están correcta-mente
instalados cuando el rótulo “PARTE
SUPERIOR” es visible
para el operador durante la operación
normal.
Tubo recto
Pasador de
seguridad
Empuje el tubo soplador
por encima del puerto de
descarga y el pasador
de seguridad
Para trabar, gire
hacia la derecha
Boquilla
Pasador de
seguridad
Tubo soplador
Empuje la boquilla
por encima del
tubo soplador y el
pasador de
seguridad
Para trabar, gire hacia
la derecha
El rótulo “PARTE
SUPERIOR” debe
quedar hacia
arriba
1
3
2
4
¡ADVERTENCIA!
¡PRECAUCIÓN!
Algunas gasolinas contienen alcohol
como oxigenante. Los combustibles
oxigenados pueden ocasionar un
aumento de la temperatura de
funcionamiento. En ciertas
condiciones, el alcohol puede
también reducir las propiedades
lubricantes de algunos aceites de
mezclado. Nunca utilice ningún
combustible que contenga más de
10 % de alcohol en volumen.
Los aceites genéricos y algunos
aceites para motores fuera de borda
pueden no estar concebidos para
motores de alto rendimiento de 2
ciclos enfriados por aire y no
deberán utilizarse nunca en su
motor Shindaiwa.
¡PRECAUCIÓN!
Este motor está diseñado para
operar solamente con una mezcla
50:1 consistente de gasolina sin
plomo y un aceite Premium de
mezcla para motores de 2 ciclos. La
utilización de aceites no aprobados
de mezclado puede conducir a
excesivos costos de mantenimiento
o daños al motor.
■
Utilice solamente gasolina sin plomo
fresca y limpia con un octanaje de 87
o superior.
■
Mezcle gasolina en una proporción
de 50:1 con aceite de mezclado
Shindaiwa Premium para motores de
2 ciclos o con un aceite de mezclado
equivalente de alta calidad para
motores de 2 ciclos.
Ejemplo de cantidades para mezclas
50:1:
■
1 –galón de gasolina con 2.6 onzas de
aceite de mezclado.
■
5 litros de gasolina con 100 ml de
aceite de mezclado.
Mezclado del
combustible
Español
Summary of Contents for EB240S
Page 2: ...Espa ol...
Page 4: ...Espa ol...
Page 6: ...Espa ol...
Page 8: ...Espa ol...
Page 10: ...Espa ol...
Page 12: ...Espa ol...
Page 14: ...Espa ol...
Page 15: ...15 NOTES...
Page 16: ......

