8
24009
Adjusting Engine Idle
IMPORTANT!
Blower tubes and intake cover must be
installed while adjusting engine idle!
Engine idle speed will also be affected
if either the intake cover or blower
tubes are blocked, damaged or
incorrectly installed! A clean and
unrestricted airflow is essential to your
blower’s engine performance and
durability! Before attempting any
carburetor idle adjustments, inspect
and clean the engine air cleaner as
described on page 9 of this manual.
1. Start the engine by following the
procedures described on the preced-
ing pages.
2. Run the engine at idle speed until
operating temperature is reached (2-3
minutes).
3. Use a screwdriver to adjust the
engine idle speed to 2,500
(
Ⳳ
250) rpm (min
-1
).
■
Turn the idle screw clockwise to
increase engine idle speed.
■
Turn the idle screw counter-
clockwise to decrease engine
idle speed.
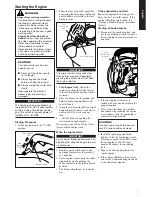
Idle Speed
Adjustment
Screw
(accessible
through cowl
louver)
Carburetor fuel mixture adjustments
are preset at the factory and cannot
be serviced in
the field.
NOTE:
2. Stop the engine by moving the
ignition switch to the “O” (OFF)
position.
IMPORTANT!
If the engine continues to run with the
ignition switch in the “O” (OFF) posi-
tion, stop the engine by pulling the
choke control out to the fully closed
position. See the troubleshooting
section on page 11 of this manual.
Stopping the Engine
1. Cool the engine by allowing it to run
at idle for 2 to 3 minutes.
Using the Blower
In the hands of an experienced operator,
the EB240S can efficiently move a wide
variety of debris ranging from grass
clippings to gravel. As a general rule, try
to operate your EB240S at the
lowest
throttle
setting
necessary to get the job
done:
■
Use low throttle settings when
clearing lightweight materials from
around lawns or shrubbery.
■
Use medium to higher throttle
settings to move lightweight
grass or leaves from parking
lots or walkways.
■
Use full throttle when moving heavy
loads such as dirt or snow.
IMPORTANT!
Blower noise increases at higher
throttle settings! Always use the lowest
throttle setting required to get the job
done!
Maintenance
WARNING!
Before performing any maintenance,
repair or cleaning work on the unit,
make sure the engine is completely
stopped. Disconnect the spark plug
wire before performing service or
maintnenance work.
WARNING!
Non-standard parts may not operate
properly with your unit and may
cause damage and lead to personal
injury.
NOTE:
Using non-standard replacement
parts could invalidate your Shindaiwa
warranty.
IMPORTANT!
MAINTENANCE, REPLACEMENT OR
REPAIR OF EMISSION CONTROL
DEVICES AND SYSTEMS MAY BE
PERFORMED BY ANY REPAIR
ESTABLISHMENT OR INDIVIDUAL;
HOWEVER, WARRANTY REPAIRS
MUST BE PERFORMED BY A
DEALER OR SERVICE CENTER
AUTHORIZED BY SHINDAIWA
KOGYO CO., LTD. THE USE OF
PARTS THAT ARE NOT EQUIVALENT
IN PERFORMANCE AND DURABIL-
ITY TO AUTHORIZED PARTS MAY
IMPAIR THE EFFECTIVENESS OF
THE EMISSION CONTROL SYSTEM
AND MAY HAVE A BEARING ON THE
OUTCOME OF A WARRANTY CLAIM.
English
8
24009
Ajuste del motor en marcha lenta
¡IMPORTANTE!
Cuando se ajusta la marcha lenta del
motor, los tubos del soplador y la tapa
de la admisión deben estar instalados.
La velocidad en marcha lenta del motor
se verá también afectada si ya sea la
tapa de admisión o los tubos del
soplador están bloqueados, dañados o
incorrectamente instalados; un flujo de
aire limpio y sin restricciones es
esencial para el rendimiento y la
durabilidad del motor de su soplador.
Antes de intentar cualquier ajuste del
carburador en marcha lenta,
inspeccione y limpie el limpiador de
aire del motor tal como se describe en
la página 9 de este manual.
1.
Arranque el motor siguiendo los
procedimientos descritos en las
páginas anteriores.
2.
Opere el motor en marcha lenta hasta
que alcance la temperatura de
funcionamiento (2 a 3 minutos).
3.
Use un destornillador para ajustar la
velocidad en marcha lenta del motor
a 2,500 (
Ⳳ
250) rpm (minutos
-1
).
■
Gire el tornillo de marcha hacia la
derecha para aumentar la velocidad
de marcha del motor.
■
Gire el tornillo de marcha hacia la
izquierda para disminuir la velocidad
de marcha del motor.
Tornillo de ajuste
de la velocidad
de marcha
(accesible a
través de la
abertura de la
cubierta)
Los ajustes de la mezcla de com-
bustible en el carburador son de
fábrica y no pueden ser modificados
por el usuario.
NOTA:
Cómo parar el motor
1.
Enfríe el motor dejándolo funcionar
en marcha lenta durante 2 a
3 minutos.
Mantenimiento
¡ADVERTENCIA!
Antes de realizar cualquier trabajo
de mantenimiento, reparación o
limpieza en el equipo, asegúrese de
que el motor esté totalmente
detenido. Desconecte el cable de la
bujía antes de realizar trabajos de
inspección o mantenimiento.
¡ADVERTENCIA!
Las piezas no estándar pueden no
operar correctamente en su equipo
y pueden ocasionar daños y
lesiones personales.
NOTA:
El empleo de repuestos no estándar
podría invalidar su garantía Shindaiwa.
¡IMPORTANTE!
EL MANTENIMIENTO, REEMPLAZO
O REPARACIÓN DE DISPOSITIVOS Y
SISTEMAS DE CONTROL DE
EMISIONES PUEDE SER REALIZADO
POR CUALQUIER
ESTABLECIMIENTO O PERSONA
DEDICADOS A ELLO; SIN EMBARGO,
LAS REPARACIONES CUBIERTAS
POR LA GARANTÍA DEBEN SER
LLEVADAS A CABO POR UN
DISTRIBUIDOR O CENTRO DE
SERVICIO AUTORIZADO POR SHIN-
DAIWA KOGYO CO., LTD. EL
EMPLEO DE PIEZAS QUE NO SON
EQUIVALENTES EN RENDI-MIENTO
Y DURABILIDAD A LAS PIEZAS
AUTORIZADAS PUEDE REDUCIR LA
EFECTIVIDAD DEL SISTEMA DE
CONTROL DE EMISIONES Y PUEDE
AFECTAR EL RESULTADO DE UNA
RECLAMACIÓN DE GARANTÍA.
2.
Detenga el motor llevando la llave de
encendido a la posición “O”
(APAGADO).
¡IMPORTANTE!
Si el motor continúa funcionando con
la llave de encendido en la posición
“O” (APAGADO), detenga el mismo
tirando hacia afuera del control del
cebador hasta la posición totalmente
cerrada. Consulte la sección de
localización de fallas en la página 11
de este manual.
Uso del soplador
En las manos de un operador
experimentado, el EB240S puede
desplazar eficientemente una amplia
variedad de residuos que van desde
pasto cortado a grava. Como regla
general, trate de operar su EB240S en
la
configuración más baja
del
regulador
que sea necesaria para
realizar el trabajo:
■
Utilice bajas configuraciones de
regulador cuando despeje materiales
livianos presentes sobre el césped o
entre matorrales.
■
Utilice configuraciones de regulador
intermedias a altas para desplazar
pasto liviano u hojas desde lotes de
estacionamiento o andadores
peatonales.
■
Utilice el regulador al máximo
cuando desplace cargas pesadas,
tales como suciedad o nieve.
¡IMPORTANTE!
El ruido del soplador aumenta a
configuraciones superiores del
regulador. Siempre utilice la
configuración más baja requerida del
regulador que permita realizar un
determinado trabajo.
Español
Summary of Contents for EB240S
Page 2: ...Espa ol...
Page 4: ...Espa ol...
Page 6: ...Espa ol...
Page 8: ...Espa ol...
Page 10: ...Espa ol...
Page 12: ...Espa ol...
Page 14: ...Espa ol...
Page 15: ...15 NOTES...
Page 16: ......

