
SHINDAIWA LIMITED WARRANTY STATEMENT FOR
SPRAYERS SOLD IN USA AND CANADA BEGINNING 01/01/2010
ECHO, INC'S RESPONSIBILITY
ECHO Incorporated’s (ECHO, INC.) Limited Warranty provides to the original end user purchaser that this Shindaiwa product
is free from defects in material and workmanship. Under normal use and maintenance from date of purchase, ECHO, INC.
agrees to repair or replace at it’s discretion, any defective product free of charge at any authorized Shindaiwa servicing dealer
within listed below application time periods
LIMITATIONS AND EXCLUSIONS
THIS LIMITED WARRANTY IS ONLY APPLICABLE TO SHINDAIWA PRODUCTS SOLD BY AUTHORIZED
SHINDAIWA DEALERS. IT IS EXTENDED TO THE ORIGINAL END USER PURCHASER ONLY, AND IS NOT TRANSFERABLE
TO SUBSEQUENT OWNERS.
Repair parts and accessories replaced under this warranty are warranted only for the balance
of the original unit or accessory warranty period. Any damage caused by improper use, modifications, installation or maintenance
is not covered by this warranty. All parts or products replaced under warranty become the property of ECHO, INC. For a list
of Authorized Shindaiwa Dealers refer to WWW.SHINDAIWA.COM or call 1-877-986-7783.
OWNER’S RESPONSIBILITY
To ensure trouble free warranty coverage it is important that you register your Shindaiwa equipment on-line at
WWW.SHINDAIWA.COM or by filling out the warranty registration card supplied with your unit. Registering your product confirms
your warranty coverage and provides a direct link if we find it necessary to contact you. The owner shall demonstrate reasonable
care and use, and follow preventative maintenance, storage instructions, and as prescribed in the Use & Care Manual. Should
a product difficulty occur, you must, at your expense, deliver or ship your Shindaiwa unit to an authorized Shindaiwa servicing
dealer for warranty repairs (within the applicable warranty period), and arrange for pick-up or return of your unit after the repairs
have been made. For your nearest authorized Shindaiwa servicing dealer, call Shindaiwa’s Dealer Referral Center, at 1-877-
986-7783 or you can locate a Shindaiwa servicing dealer at WWW.SHINDAIWA.COM. Should you require assistance or have
questions concerning Shindaiwa’s Warranty Statement, you can contact our Consumer Product Support Department at 1-800-
673-1558 or contact us through the web at WWW.SHINDAIWA.COM.
PRODUCT WARRANTY PERIOD
RESIDENTIAL APPLICATION
• 2 YEAR WARRANTY -
Units for residential, or non-income producing use will be covered by this limited warranty for two (2)
years from date of purchase.
EXCEPTIONS:
• Failure to read and follow Use & Care Manual
• Failure to follow all chemical manufacturers’ instructions included on their label or elsewhere
• Damage caused by:
Failure to follow Storing/Maintaining Your Sprayer section in Use & Care Manual
Use of powder based chemicals with or in a piston pump sprayer
Wear items including but not limited to: seals, gaskets, pistons, hoses, diaphragms, straps or any wear item. These items are
covered for 90 days from date of purchase.
Any mis-use of product in not covered including but not limited to: using un-approved chemicals or parts, un-approved uses,
using damaged or missing units/parts during operation, or modifying your sprayer in any manner
COMMERCIAL APPLICATION
• 2 YEAR WARRANTY -
Units for commercial, institutional, agricultural, industrial, or income producing use will be covered
by this limited warranty for two (2) years from the date of purchase.
EXCEPTIONS:
Damage caused by:
• Failure to read and follow Use & Care Manual
• Failure to follow all chemical manufacturers’ instructions included on their label or elsewhere
• Failure to follow Storing/Maintaining Your Sprayer section in Use & Care Manual
Use of powder based chemicals with or in a piston pump sprayer
Wear items including but not limited to: seals, gaskets, pistons, hoses, diaphragms, straps or any wear item. These items are
covered for 90 days.
Any mis-use of product in not covered including but not limited to: using un-approved chemicals or parts, un-approved uses,
using damaged or missing units/parts during operation, or modifying your sprayer in any manner
RENTAL APPLICATION - 90 DAYS WARRANTY
• Units for rental use will be covered against defects in material and workmanship for a period of 90 days from the date of
purchase except for any one of the above listed EXCEPTIONS
PURCHASED REPAIR PARTS AND ACCESSORIES
• 90-day all applications except for any one of the above listed
EXCEPTIONS. Your receipt of purchase including date, model and serial number must be maintained and presented to an
authorized Shindaiwa servicing dealer for warranty service. Proof of purchase rests solely with the customer. Some states do
not allow limitations on how long an implied warranty lasts, so the above limitations may not apply to you. Some states do not
allow the exclusion or limitation of incidental or consequential damages, so you may also have other specific legal rights which
vary from state to state. This limited warranty is given by ECHO Incorporated, 400 Oakwood Rd., Lake Zurich, IL 60047.
DISCLAIMER OF IMPLIED WARRANTIES
THIS LIMITED WARRANTY IS IN LIEU OF ALL OTHER EXPRESSED OR IMPLIED WARRANTIES, INCLUDING ANY
WARRANTY OF FITNESS FOR A PARTICULAR PURPOSE OR USE AND ANY IMPLIED WARRANTY OF MERCHANTABILITY
OTHERWISE APPLICABLE TO THIS PRODUCT. ECHO, INC. AND ITS AFFILIATED COMPANIES SHALL NOT BE LIABLE
FOR ANY SPECIAL INCIDENTAL OR CONSEQUENTIAL DAMAGE, INCLUDING LOST PROFITS. THERE ARE NO
WARRANTIES EXTENDED OTHER THAN AS PROVIDED HEREIN. THIS LIMITED WARRANTY MAY BE MODIFIED ONLY
BY ECHO, INC.
1F
UNE MAUVAISE UTILISATION OU NE PAS SUIVRE LES INSTRUCTIONS
PEUT ENTRAÎNER UNE DÉFAILLANCE DU PRODUIT OU DES BLESSURES.
POUR UTILISER CE PRODUIT SANS DANGER, VOUS DEVEZ LIRE ET SUIVRE
TOUTES LES INSTRUCTIONS AVANT L'UTILISATION.
RÈGLES D'UTILISATION SÉCURITAIRE
Avant d'assembler et de faire fonctionner votre pulvérisateur, lisez attentivement toutes les
instructions. Lorsque vous travaillez avec de l'équipement sous pression, vous devez toujours suivre
attentivement les précautions de sécurité, y compris :
• NE JAMAIS pulvériser de matériaux inflammables ou de produits chimiques produisant du gaz
et de la pression.
• TOUJOURS lire l'étiquette des produits chimiques avant de remplir le pulvérisateur car certains
produits chimiques peuvent être dangereux lorsqu'ils sont utilisés avec ce pulvérisateur.
• TOUJOURS porter des lunettes, des gants, une chemise à manches longues, un pantalon long et
des chaussures protectrices entières lorsque vous pulvérisez. Avant toute réparation, nettoyez le
réservoir du pulvérisateur avec de l'eau en le remplissant et en pulvérisant l'eau dans un endroit
approprié à l'extérieur ou dans un contenant.
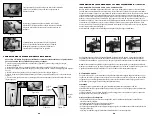
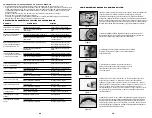
• VÉRIFICATION PRÉ-UTILISATION : vérifier l'étanchéité de l'écrou du boyau pour s'assurer que
le boyau est bien fixé à l'assemblage d'arrêt. S'assurer que le boyau est bien fixé au réservoir en
resserrant la pince du boyau au besoin. Assurez-vous que tous les raccords de la buse et du tube
sont bien serrés. Assurez-vous que la large pince de la pompe est serrée. Insérez les 2 boulons
utilisés pour attache le levier de pompe à l'arbre de pompe sont serrés.
• NE PAS laisser un pulvérisateur sous pression au soleil ou à un endroit situé près d'une source
de chaleur. La chaleur peut produire une accumulation de pression et le pulvérisateur risque de
s'enflammer ou d'exploser, entraînant des blessures ou la mort.
• NE JAMAIS mettre le pulvérisateur sous pression par tout autre moyen que la pompe d'origine.
Toute surpression peut faire exploser le pulvérisateur et provoquer des blessures ou la mort.
• NE PAS essayer de modifier ou réparer ce produit sauf avec les pièces originales du fabricant.
AVERTISSEMENT :
Manipuler les pièces de laiton de ce produit vous exposera au
plomb, un produit chimique qui de l’avis de l’État de la Californie cause des
anomalies congénitales et d’autres problèmes reproductifs.
Lavez-vous les mains
après toute manipulation.
REMARQUE : le réservoir et le boyau peuvent contenir de l'eau résiduelle suite au
test de qualité du pulvérisateur.
MISE EN GARDE!
AVERTISSEMENT