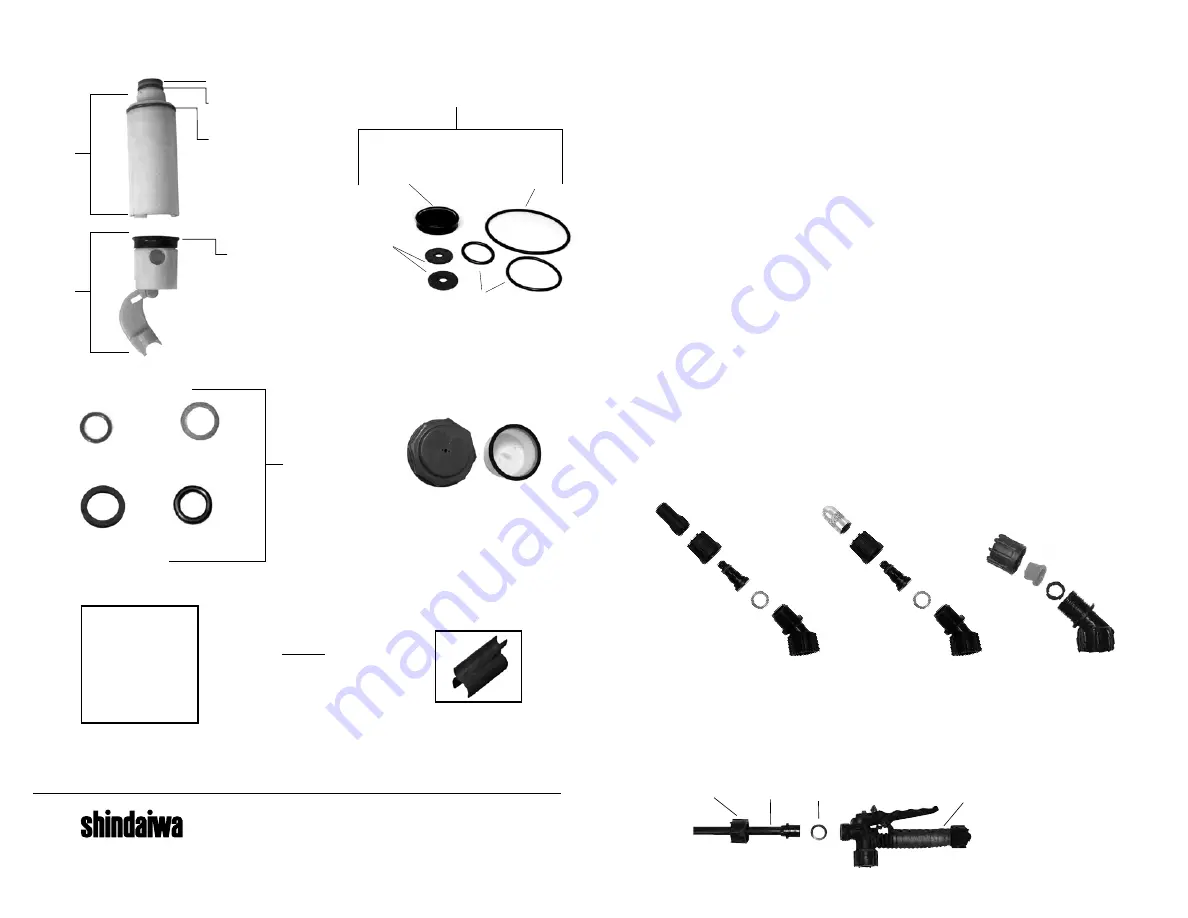
background image

Wand

Shut-off

Valve

Retaining Nut

O-ring

NOZZLE ASSEMBLY

Figure 1-2

Unscrew the nozzle cap 

(1)

 from the nozzle body 

(3)

 with retaining  nut 

(2)

 fastened tightly to

the elbow 

(5)

. Unscrew the retaining nut 

(2)

.  Push the nozzle body 

(3) 

with the nozzle gasket

(4)

 out of the  retaining nut 

(2)

. To reinstall the nozzle, reverse the above instructions.

Figure 3

Unscrew the retaining nut from the elbow and push the fan nozzle tip and gasket out of the retaining
nut. To reinstall the nozzle, reverse the above instructions.

  APPLICATIONS & USE FOR YOUR SPRAYER

Avoid using a sprayer for general cleaning purposes if plant protection or herbicide chemicals
have already been used in the sprayer. If a sprayer has been used for plant protection or as an
herbicide, clean the sprayer completely (see cleaning section) before using.

Plant Food:

 Use different spray patterns for optimum foliage feeding or for fungicide and

pesticide application.

Herbicides:

 Reduce weeds and unwanted plants but avoid using the same sprayer for plant

feeding or protection without thoroughly cleaning (see cleaning section) the sprayer first.

General Household Use:

 Apply detergents, vinegar, cleaning solutions, warm water (do not

exceed 120°F/49°C) or nontoxic household cleaning chemicals for carpets, floors, walls, glass,
counter tops and ceilings. DO NOT use sprayer that has been used with herbicides, pesticides or
other toxic chemicals for household applications.

General Outdoor Use: 

Use the sprayer for cleaning windows or with a detergent for general

purpose cleaning. Other applications include wood preservatives, waxes, water proofing, and
diluted household bleach (max. 1 part household bleach to 9 parts water solution).

2E

3. Nozzle

Body

2. Retaining

Nut

5. Elbow

4. Nozzle

Gasket

Figure 1

Figure 2

Figure 3

1.  Poly

Nozzle Cap

1. Brass

Nozzle Cap

Elbow

Nozzle

Gasket

Fan Nozzle Tip

Retaining Nut

2. Retaining

Nut

3. Nozzle

Body

4. Nozzle

Gasket

5. Elbow

  SPRAYER COMPONENTS & USE INFORMATION

WAND ASSEMBLY

1. Make sure the o-ring is installed on the end of the wand.
Insert the wand into shut-off valve.
2. Turn and tighten the retaining nut clock-wise onto the shut-off valve.

Joint torique

du tube

Joint torique du coude

Joint d’étanchéite

de boyau

Joint

d’étanchéité

de buse

569014

Trousse de

joint torique

Plaque porte-

soupape

Joint torique

supérieur

Joint torique

inférieur

Collier de

piston

569004

Assemblage du

piston à pompe

569003

Assemblage du

cylindre

du piston

569002

Panier du filtre et bouchon

569000

Trousse de réparation de

pompe à piston

Joint torique 

-

cylindre du piston

Joint torique -

chambre de pression

Collier -

pompe à piston

Plaque

porte-

soupape -

cylindre

du piston

569016

Pinces du tube

INFORMATION DE COMMANDE DE PIÈCES DE RECHANGE

569001

Sangles

Shindaiwa

400 Oakwood Road, Lake Zurich, IL 60047

www.shindaiwa.com

Shindaiwa is a registered trademark of Echo, Inc. Specifications subject to change without notice.

Summary of Contents for SP40BPS

Page 1: ...011305 R0910 Carefully Read These Instructions Before Use WARNING Model SP40BPS 4 0G 15 1L Use and Care Manual Backpack...

Page 2: ...rvice Shindaiwa autoris appelez le Centre de r f rence des concessionnaires Shindaiwa au 877 986 7783 ou vous pouvez en trouver un WWW SHINDAIWA COM Si vous avez besoin d aide ou si vous avez des ques...

Page 3: ...with herbicides pesticides or other toxic chemicals for household applications General Outdoor Use Use the sprayer for cleaning windows or with a detergent for general purpose cleaning Other applicati...

Page 4: ...ght hand shown Figure 5 Right Hand Figure 4 Left Hand STOWAWAY PUMP HANDLE Base Tube Lumbar Support INSTALLING THE SHOULDER STRAP The backpack strap is provided with multiple features including should...

Page 5: ...N Continued FILLING THE SPRAYER Make sure the filter basket is in place to keep debris from entering the tank Determine the amount of mixture needed for your application Add the proper amount of water...

Page 6: ...e boyau 3 Retirez le filtre dans le r servoir du cylindre de pression qui se trouve l int rieur du r servoir fig 1 4 Retirez les 2 boulons rattachant le levier du pivot l arbre de la pompe et retirez...

Page 7: ...tored out of direct sunlight in a cool dry space Before freezing weather make sure to drain all liquid in the tank pump pressure cylinder hose shut off valve wand and nozzle to avoid liquid expansion...

Page 8: ...nspectez r guli rement le tuyau le tube la pompe la cuve et le robinet d arr t pour tout signe d usure de dommages ou de fuites et r parez rapidement les probl mes Difficult d activation du levier de...

Page 9: ...ulv risation continue enfoncez la poign e et d placez le m canisme de verrouillage rouge en position de verrouillage comme indiqu dans la fig 2 Pour d sengager enfoncez la poign e et remettez le m can...

Page 10: ...e du cylindre de pression voir la section d monter et r parer le cylindre de pression Lorsque le cylindre de pression est retir le filtre de l tape 3 peut tre retir pour son nettoyage voir la Figure 3...

Page 11: ...a nuit sec Si ceci n enl ve pas la contamination remplacez par de nouvelles courroies Figure 2 Fixation de la sangle du dos matelass Figure 3 Dos matelass amovible Tube de base Support lombaire Figure...

Page 12: ...me pulv risateur pour nourrir ou prot ger les plantes sans bien nettoyer voir la section de nettoyage d abord le pulv risateur Utilisation r sidentielle g n rale appliquez des d tergents du vinaigre...

Page 13: ...t covered including but not limited to using un approved chemicals or parts un approved uses using damaged or missing units parts during operation or modifying your sprayer in any manner RENTAL APPLIC...

Page 14: ...nte antes de utilizarlo ADVERTENCIA Modelo SP40BPS 4 0G 15 1L Manual de uso y cuidado 011305 R0910 MISE EN GARDE Avertissement lisez attentivement ces instructions avant l utilisation Mod le SP40BPS 4...

Page 15: ...sados en polvo con o en un rociador de bomba de pistones Desgaste incluyendo de manera enunciativa sellos empaques pistones mangueras diafragmas cintas u otro art culo de desgaste Estos art culos est...

Page 16: ...Uso general en exteriores utilice el pulverizador para limpiar ventanas o para aplicar alg n detergente para prop sitos de limpieza general Otras aplicaciones incluyen conservadores de madera ceras im...

Page 17: ...deje de noche seco Si esto no quita la contaminaci n substituya por las nuevas correas Figura 1 Montaje de la correa Correa para hombros Almohadilla para la espalda Correa de pecho Apoyo lumbar Cintur...

Page 18: ...r la presi n antes de retirar la manguera del dispositivo de cierre Es mejor tener una cantidad m nima o nada de l quido en el cilindro de presi n antes de retirar y reinstalar el filtro de cierre de...

Page 19: ...nque del cilindro de presi n ubicado dentro del tanque figura 1 4 Retire los 2 tornillos que unen la manija de pivote al eje de la bomba y retire el montaje del pist n figuras 2a y 2b 5 Retire la abra...

Page 20: ...sista en que usen piezas de repuesto originales Verifique con regularidad el desgaste de la manguera la varilla la bomba el tanque y la v lvula de cierre en busca de da os o fugas y repare los defecto...

Reviews: