5E
SPRAYER COMPONENTS & USE INFORMATION, Continued
HELPFUL SPRAYING INFORMATION
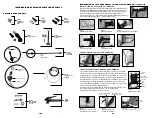
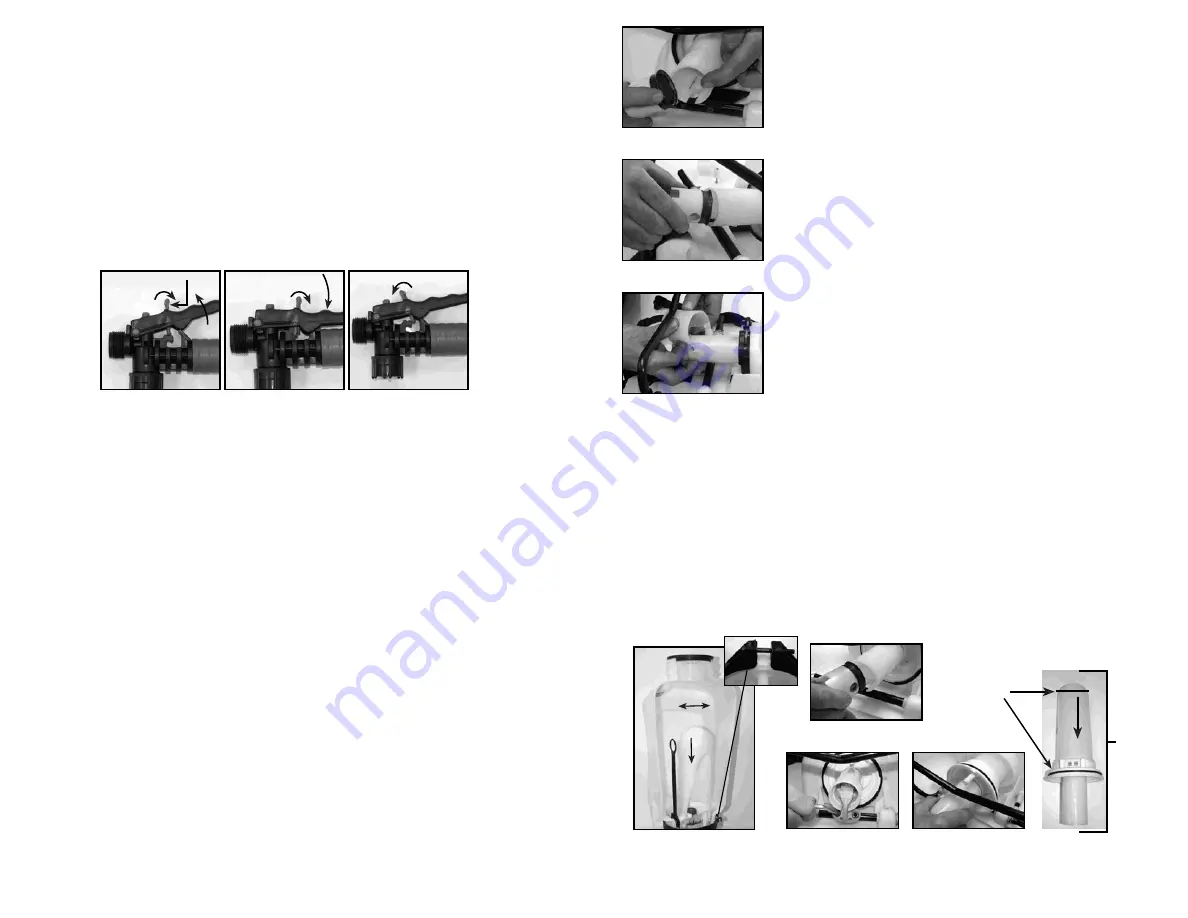
Use RAPID pump strokes to prime the pump. You will know the pressure chamber is filling with liquid
when you feel firm resistance from the pump. The air in the pressure chamber is compressed from
repeated strokes. By pressing the hand lever on the shut-off, the valve opens. For safety lock-off feature
(no-spraying), pull up on handle and move red locking mechanism into lock-off position as shown in fig.
1. To disengage, push down on handle and return red locking mechanism to neutral position as in fig. 3.
For lock-on feature (continuous spraying), push down on handle and move red locking mechanism into
lock-on position as shown in fig. 2. To disengage, push down on handle and return red locking
mechanism to neutral position as shown in fig. 3.
LOCK-OFF POSITION
LOCK-ON POSITION
NEUTRAL POSITION
Locking Mechanism
Handle
Up
Handle
Down
Figure 1
Figure 2
Figure 3
8F
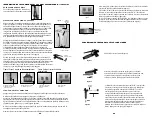
7) Appliquez un peu de pétrolatum à l'intérieur de la paroi du
cylindre du piston et sur le collier, et réinstallez l'assemblage du
piston dans le cylindre du piston.
8) Insérez le piston incliné par rapport au bord d'entrée du
collier placé sur la fente du cylindre du piston. Boulonnez
l'assemblage du piston à l'arbre de la pompe en utilisant les
boulons du levier.
9) Replacez le bouchon protecteur. Resserrez l'écrou et le
boulon. Réinstallez la poignée de la pompe. Replacez le
boyau et fixez fermement la pince du boyau en place.
Figure 9
Figure 8
Figure 7
DÉMONTER ET RÉPARER L'ASSEMBLAGE DE LA POMPE
B
Figure 2b
Figure 3a
Figure 3b
Figure 1
Joint torique
de la
chambre de
pression
Figure 2a
Pince
Assem-
blage de
pompe
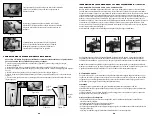
Ne retirez le cylindre de compression que si le filtre à cartouche est bloqué ou si le pulvérisateur
fuit à l'endroit où le cylindre de pression et la cuve se joignent.
DÉMONTER ET RÉPARER L'ASSEMBLAGE DE LA POMPE
1. Dégagez la pression du pulvérisateur et retirez tout le liquide de la chambre de pression et de la cuve.
2. Retirez le boyau.
3. Retirez le filtre dans le réservoir du cylindre de pression (qui se trouve à l'intérieur du réservoir - fig.1).
4. Retirez les 2 boulons rattachant le levier du pivot à l'arbre de la pompe et retirez l'assemblage du piston
(fig. 2a et 2b).
5. Retirez la large pince retenant la chambre de pression et la cuve ensemble (fig. 1).
6. Faites basculer la chambre de pression d'avant à arrière et enfoncez pour le libérer de la cuve (fig. 1).
7. Après l'avoir libéré, tout l'assemblage de la pompe peut Ítre retiré en le faisant passer à travers
l'armature de base (fig. 3a et 3b).
For easy pump action use the END of the pump handle. The amount of liquid delivered during spraying
depends on the rate of pump stroke. The fan nozzle tip is rated at .4 gpm at 40psi. This is the nominal
operating pressure of the sprayer.
Note:
If you experience a rapid drop in pressure, drain the sprayer completely and pump the handle
with an empty tank. The pressure chamber will fill with the required volume of air to repressurize.
Perform this procedure from time to time as routine maintenance.
POWDER-BASED CHEMICALS
Powder-based chemicals (powder mixed with liquids to make the spraying agent) are usually abrasive
and can cause wear. When you use a powder-based chemical in your sprayer, make sure it is thoroughly
dissolved in the liquid solution. Thoroughly clean and flush the sprayer with water to extend the life of
the sprayers parts.
CLEANING
1) Always empty the sprayer and clean the tank thoroughly after each use.
2) Pump the sprayer handle until all of the contents and air exit through the nozzle (minimum of 30
strokes).
3) Fill tank half way with water and pump the water out as explained in step 2 (repeat several times as
necessary).
Other Cleaning Hints:
• Improper spray distribution usually means the nozzle is clogged, remove the nozzle and clean it.
• Soap can be added to the water to clean the tank.
• Do not use strong cleaning agents or abrasives.
• If you use a chemical agent to clean the tank follow the manufacturer’s recommendations for the
disposal of the waste water.
• Follow the chemical manufacturers instructions for clean up.
If the shut-off fails, place wand into tank until pressure is completely exhausted.


