75(77)
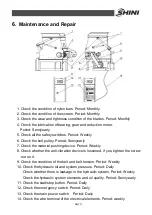
plate; inspect scrapping nylon bar and adjust it to make it fit with top face of
pushing block; inspect wear condition at two sides of pushing block, replace it
if serious damage.
6.5 Cleaning Up
Please be careful of not touching blades while dismantling feed hopper,
which is extremely sharp and liable to cause human injury.
1) Check if crushing chamber empties material before shutdown.
2) Turn off main power switch.
3) Clean feed port then clear side walls and pushing block.
4) Open storage hopper then pull out screen frame.
Attention!
Screen frame is supported by air spring and it would not drop down.
Watch out during working to avoid air spring sudden failure, causing
personal injuries.
5) Clean interior of crushing chamber and residuals on blades.
6) Dismantle storage hopper.
7) Unscrew bolts in screen fixed block and take it off.
8) Unscrew fixed bolts in screen.
9) Hold the screen and pull it out outwards.
10) Clean storage hopper, screen and frame.
11) Clean interior and exterior of crushing chamber.
12) Clean conveyor belt.
13) Dismantle motor baffle, clean pulley via dedust agent.
Reinstall after cleaning up
Attention!
Be careful of crushing injury when close screen frame!
1) Fix screen into frame and place frame below discharge port.
2) Lift frame and fix it with fixed block.
3) Pull up frame and install air spring to frame and left side plate, then insert
Summary of Contents for SGS-6080S
Page 1: ...SGS S Single shaft Shredders Date May 2014 Version Ver B English...
Page 2: ......
Page 8: ...8 77...
Page 24: ...24 77 2 3 3 Cutting Chamber Structure Picture 2 8 Cutting Chamber Structure...
Page 31: ...31 77 2 3 12 Pushing Device Assembly Picture 2 12 Pushing Device Assembly...
Page 37: ...37 77 2 4 Wiring Diagram 2 4 1 Wiring Diagram Picture 2 16 Wiring Diagram...
Page 38: ...38 77 2 4 2 Control Wiring Diagram Picture 2 17 Control Wiring Diagram 1...
Page 39: ...39 77 Picture 2 18 Control Wiring Diagram 2...
Page 40: ...40 77 2 4 3 Electrical Components Layout Picture 2 19 Electrical Components Layout 1...
Page 41: ...41 77 Picture 2 20 Electrical Components Layout 2...

