EinScan HX User Manual
47
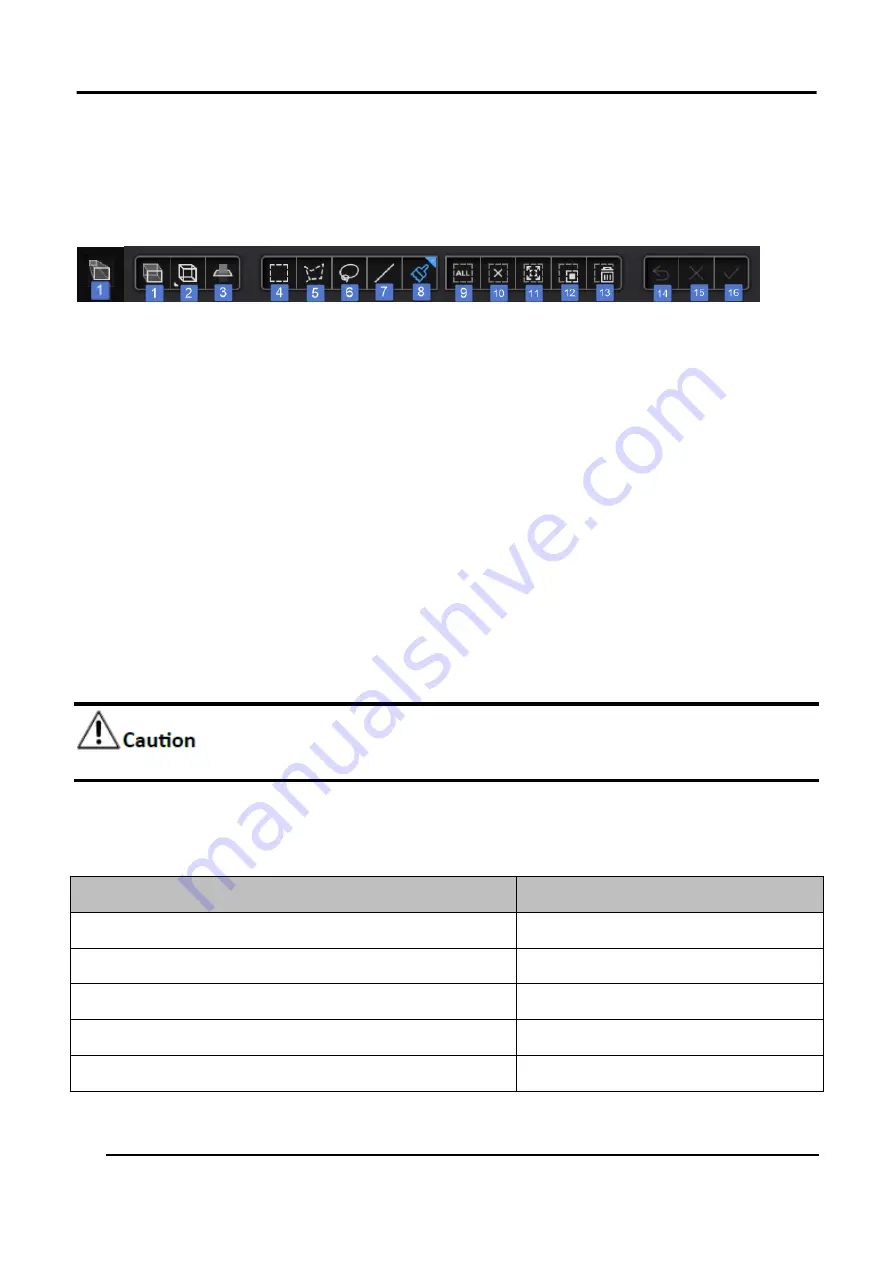
3.4.3 Edit Model
Buttons
Figure 3-33 Buttons for Edition
1.
Orthographic/
Perspective projection
2.
Multi view
3.
Create cutting plane
4.
Rectangular
5.
Polygon
6.
Lasso
7.
Straight line
8.
Paint Brush
9.
Select all
10.
Cancel selection
11.
Connected domain
12.
Revert selection
13.
Delete selection
14.
Undo the last step
15.
Cancel edit
16.
Apply edit
Orthographic/ Perspective projection
Orthographic projection:
the edge of the object is big when near and small when far.
Perspective projection:
The distance to each edge of the object is equal.
Connected Domain:
Select all of connected data to edit. To delete the redundant data and
noise, select one part of them, click
Connected Domain
button to select all of connected
garbage data and then delete.
The initial data will be cleared once the processing is confirmed.
Shortcut Keys
Table 3-10 Instruction for Shortcut Keys
Shortcut keys
Instruction
Hold down the left mouse button and move the cursor
Rotate the model
Hold down the middle mouse button and move the cursor Pan the model
Roll the mouse wheel up and down
Zoom in and zoom out the model
Space bar
Confirm editing
Delete
Delete selected data or the red regions
Summary of Contents for EinScan HX
Page 25: ...EinScan HX User Manual 24 Figure 3 12 Different Ways of Sticking Markers ...
Page 27: ...EinScan HX User Manual 26 3 2 3 Workflow ...
Page 41: ...EinScan HX User Manual 40 Table 3 9 Preview Too bright X Good ...
Page 54: ...EinScan HX User Manual 53 Figure 3 39 Manual Marker Alignment ...
Page 57: ...EinScan HX User Manual 56 4 Click Apply to mesh ...
Page 83: ...EinScan HX User Manual 82 ...


