Shining Technology CitiDISK HDV Quick Usage Guide v11.0 Shining Technology CitiDISK HDV Quick Usage Guide v11.0
External FireWire Hard Disk Before Editing
•
Disconnect the FireWire cable from the camcorder and re-connect it to
a FireWire port (4-pin or 6-pin type) equipped computer, PC or Mac.
•
The CitiDISK HDV appears as an external FireWire hard disk in
desktop( Mac ) or “My Computer” folder ( PC ) for file archiving,
backing-up and/or other video editing functions. For PC user, it is also
recommended having a “File system integrity check” every time
connecting the CitiDISK HDV to the computer by selecting the drive
icon in “MyComputer” folder, right-mouse click it, select “Properties”,
select “Tools”, click “Check now”, check “Automatically fix file system
errors” and click “Start” function. The whole process may be long
depends on the quantity of the information stored in the CitiDISK HDV
for the first time.
•
CitiDISK HDV is PLUG-and-PLAY specification compliant; no driver is
needed.
Note: Manufacturer recommends user copy/paste all the captured clips in
“Media” folder to an internal/second hard disk before editing.
Although dragging unwanted video clips into “Recycle Bin” and
emptying the Recycle Bin will re-claim your hard disk space, but the
directory holding the clip names will not. Manufacturer also
recommends use either “QuickErase” function to erase the entire
“Media” folder’s contents or use the Shining Utility program to re-
format the unit prior to next video capturing project.
Quick Erase Function
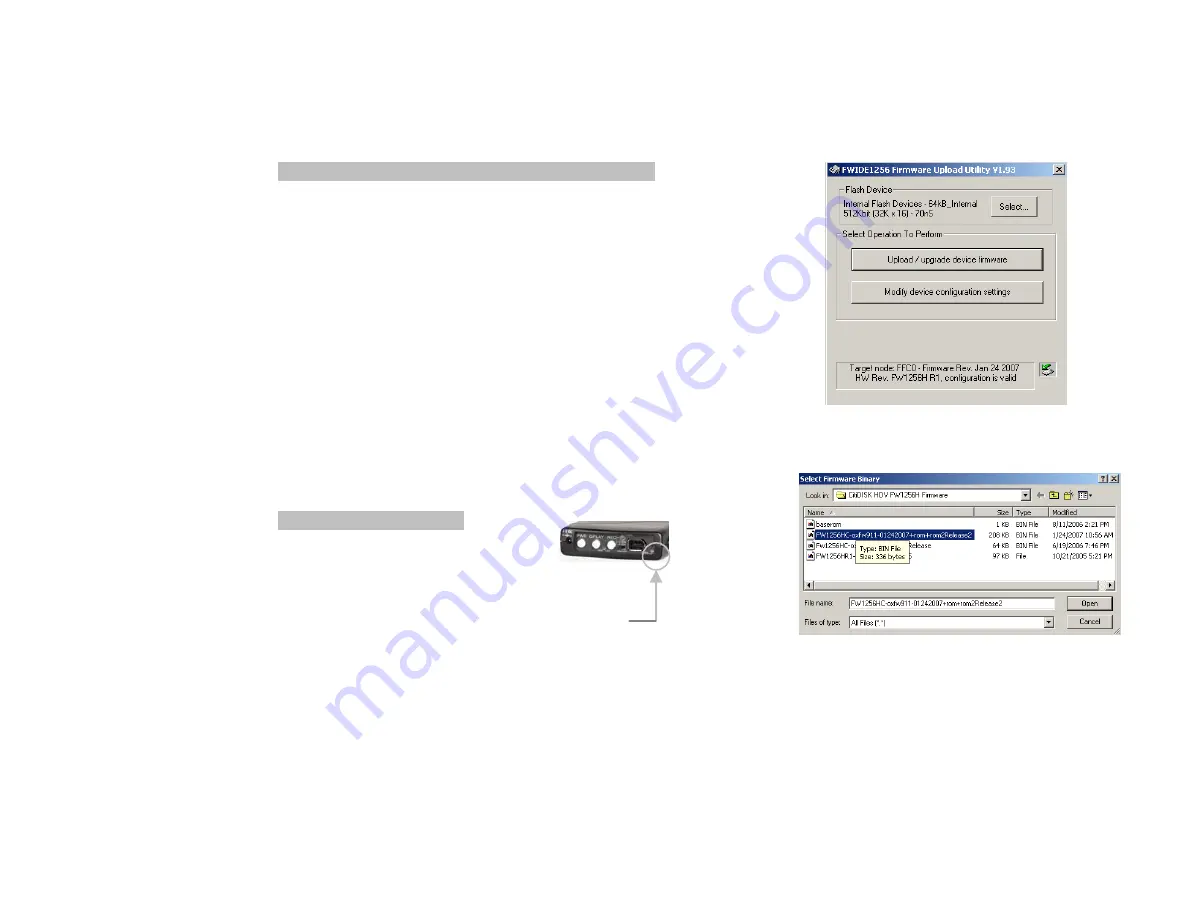
7). Click on the
“Upload / Upgrade Device Firmware
” button.
Follow the instructions and the system will ask for the firmware target.
Click on the file named as “FW1256H-oxfw911-
mmdd2007Release” as the example shown above with the
“Binary” or “bin” file extension. Click on “Open” to
continue. Once the upload process is finished( “Ready”
status shows up ), the CitiDISK HDV will re-synchronize
itself to the system and
GREEN
lights will turn on and stay
solid.
P13
•
Connect the FireWire cable (4-pin end) to the
camera’s iLink port.
•
Connect the FireWire cable (6-pin end) to the CitiDISK HDV
and set the camera to either “Camera” or “VCR” mode.
•
Use a pencil or hard sharp object firmly press and hold the
button( right on the top of blue charging light ) for more than
5 seconds.
•
Release the “QuickErase” button.
•
The power-access light will change color between
PURPLE
and
BLUE
for up to 2 minutes depends on how many clips stored
in “Media” folder.
•
User must wait till the “PowerAccess” stop changing color to
PURPLE
, in other words -- in solid
BLUE
for over 5 seconds,
then power off the unit.
Note:
All of the files inside the “Media” folder are subject to be
erased. Manufacturer suggests that you back up the clips to an
internal hard disk first and “Quick Erase” the entire folder’s
contents before next video capturing project.
P8


