background image

Chapter 5. Error Handling


5-12

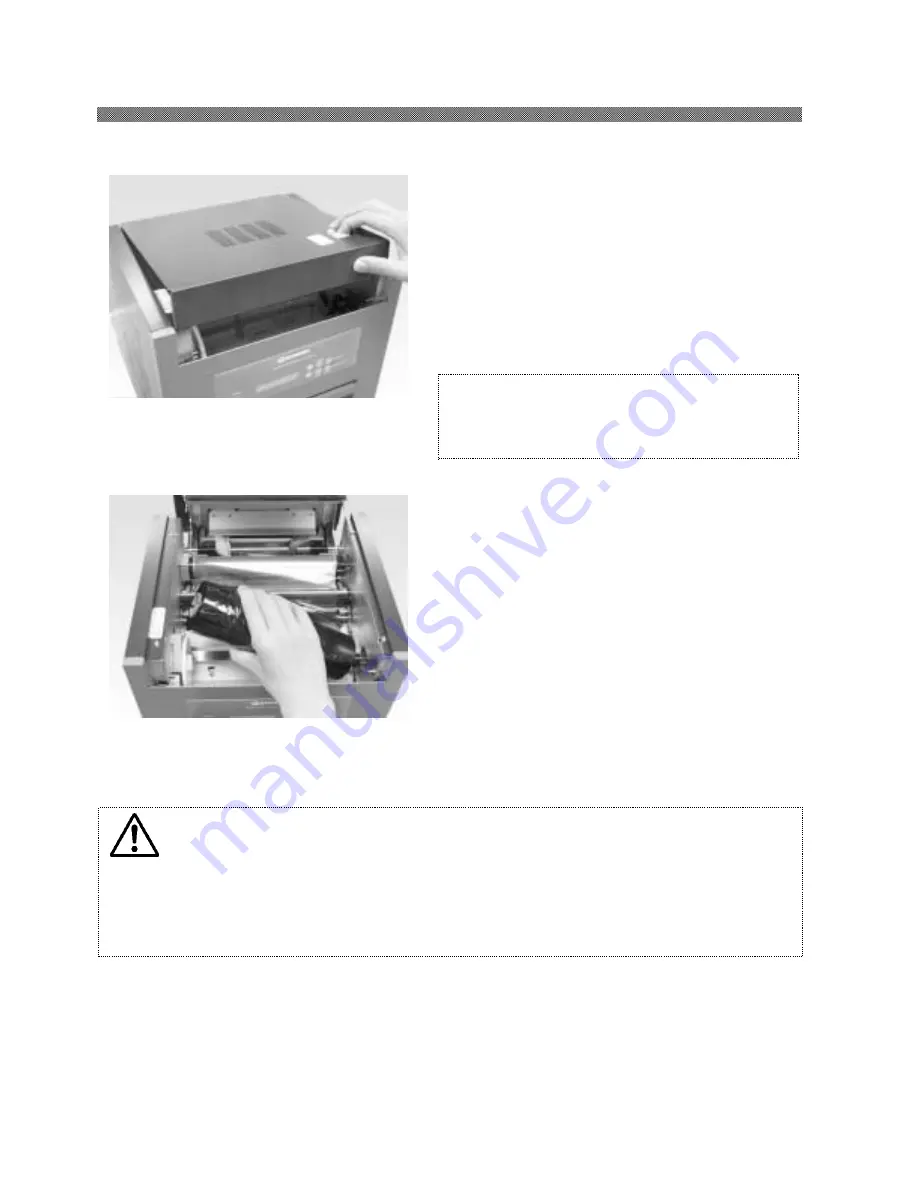
3. Open the upper cover. 

Pull the upper cover open lever. 

4. Remove the ink ribbon. 

Attention: Do not open the Upper Cover 

abruptly or forcefully past the 

90

°

 angle. 

Caution: 

Thermal head reaches high temperature just after printing.  Do not touch directly 

by hand. 

Be careful not to be hurt by the projections of the printer. 

Ink ribbon may be stick to the paper so that please peel it off slowly. 


Summary of Contents for CHC-S1245

Page 1: ...First edition January 25 2005 Latest edition May 10 2007 Revision Revision 4 SHINKO ELECTRIC CO LTD Digital Photo Printer CHC S1245 Operation Manual ...

Page 2: ...r copied in any form or by any means including translation without the written permission of Shinko Electric Co Ltd 2 The specifications in this operation manual are subject to change without prior notice 3 In case of having any difficulties or finding the fault in this manual your information to Shinko will be highly appreciated ...

Page 3: ... as the printer in the manual Read this manual thoroughly to understand how to install and operate the printer before using it Keep this manual near the printer and operators can refer to this manual periodically In case lost or damaged this manual contact your dealers In the case of transfer do not forget to put this manual together with the printer Notice ...

Page 4: ...er 2 Installing and Set Up 2 1 Procedure for Unpacking and Set up 2 1 Unpacking 2 2 Finding Accessories 2 3 Parts Name and Function 2 4 Removing the Protective Materials for transportation 2 7 Loading Ink Ribbon 2 10 Loading Paper 2 13 Connecting Power Cord 2 17 Connecting USB Cable 2 19 Chapter 3 Operation Panel 3 1 Power Switch 3 1 Operation Panel 3 1 LED Display 3 2 Operation Button 3 2 LCD Dis...

Page 5: ...ning of Outer Cabinet 4 4 Cleaning of Filter 4 4 Chapter 5 Error Handling 5 1 Error Message and Corrective Action 5 1 Paper Jam 5 2 Streaking in the Printed Output 5 7 Ink Ribbon and Paper Not Detected Correctly 5 8 Power Supply Interrupted during Printing 5 11 Chapter 6 After sales Service 6 1 ...

Page 6: ...peration or maintenance which are not described in this manual all the concern for the safety have to be taken care of at the customer side Operations and the notification for the maintenance described in this manual and other documents are for the proper use of the printer In case of using the printer for the other purpose all the concern for the safety has to be taken care of at the customer sid...

Page 7: ...n Do not place the printer on rickety place and or inclined place Printer may fall down or tumble and it can cause injury Caution Do not place the printer under humid or dusty place It can cause a fire electric shock or printer problem Do not place the printer with dust sand and high humidity such as bathing place bathroom hot spring on the street Warning Do not put vase flowerpot and cup with wat...

Page 8: ... transportation Warning Be careful when you transport the printer on the slippery floor Warning In case you drop the printer firstly turn off the power of the printer and remove the power cord then contact the dealers or service center To use the printer without any checking can cause the fire or electric shock Attention At installation appropriate interface cable will be required with your comput...

Page 9: ...e printer mechanism In such case please do not use the printer Warning Do not attempt to service the printer beyond the instruction specified in this document In case impossible to recover from the problem please contact to the dealers or service center Warning Make sure to use the power cable supplied with the printer If your facility can not provide three wire grounded power receptacles it can c...

Page 10: ...ore printing to avoid the fingerprints Attention Ink Ribbon Handling Use the ink ribbon specified by Shinko Electric Store the ink ribbon in cool place to avoid the direct sunlight Temperature less than 30 C Humidity lass than 60 Attention Printed Output Handling Store the printed output in a dark place to avoid the direct sunlight Store the printed output away from the organic fluid such as benzi...

Page 11: ...Chapter 1 Important Safety Instruction 1 6 MEMO ...

Page 12: ...acking Procedure 1 Open the carton box and take out the printer and accessories 2 Check the name of the each part and function of the printer 3 Take out the protect materials for transportation 4 Install the dust box 5 Install the print catcher 6 Load the ink ribbon in the printer 7 Set the paper to the paper flange Set the paper flange to the printer 8 Connect the USB cable 9 Connect power cable ...

Page 13: ...printer box Attention Do not throw away the packing materials You can use them again to transport the printer in its original box Cardboard box Dust box Paper Flange with gear blue Paper Flange without gear gray Print Catcher Printer Cushioning Power cord Cushioning Operation Manual ...

Page 14: ...inding Accessories Take out the accessories from inside the carton box and printer to make sure the following items are included Paper flange without gear gray Operation manual Power cord Dust box Paper flange with gear blue Print catcher ...

Page 15: ...nstalling and Set Up 2 4 Parts Name and Function Front View Rear View Upper Cover Operation Panel Dust Box Power Switch USB Connector Power Connector Filter Filter Upper Cover Open Lever Paper Cover Print Catcher ...

Page 16: ...Chapter 2 Installing and Set Up 2 5 Internal View Cleaning Roller Paper Supply Side Platen Roller Cleaning Roller Paper Roll Up Side Thermal Head ...

Page 17: ...ch is pressed the power is turned off Caution Once the printer is turned off wait at least 3 seconds before turning it on again Paper Cover Open this cover to replace paper in the paper box Caution Open and close this cover carefully Power Connector To be used to connect the power cord USB Connector To be used to connect the USB cable Thermal Head Print Head for thermal transfer printing Caution D...

Page 18: ...als are attached to the printer Attention Please keep these protective materials When transporting the printer make sure to attach these materials to avoid the damage for the printer 1 Peel off the two tapes which fixing the upper cover 2 Open the upper cover Pull upper cover open lever Attention Do not open the upper cover abruptly or forcefully past the 90 angle ...

Page 19: ...Chapter 2 Installing and Set Up 2 8 3 Take away the thermal head protective air cushion 4 Peel off the two tapes that fix the paper cover 5 Take away silica gel Protective air cushion Silica gel ...

Page 20: ...sheets for 8x12 size paper If more is printed be sure to take out these prints from the print catcher Please take out a paper one by one when 1 Paper is ejected during paper loading 2 Printing 8 x 6 8 x 5 and 8 x 4 sizes Dust box Print catcher If the print catcher for 8x12 size with the adjustment screw on the back side is used loosen the screw and adjust the position of the print stopper 8x10 siz...

Page 21: ...t up procedure Attention Do not open the upper cover abruptly or forcefully past the 90 angle Attention When abandon the ink ribbon please handle it as harmful industrial waste Caution Thermal Head reaches high temperature just after printing Do not touch directly by hand When fingerprint stick to the heat element it can damage the thermal head Do not touch directly by hand Be careful not to be hu...

Page 22: ...printer Push the ink ribbon core into the right ink ribbon core receiver 4 Set the ink ribbon core in the left ink ribbon core receiver Align the notch of ink ribbon core with the projection of the ink ribbon core receiver 5 Turn the knob of supply side of ink ribbon to the front side to take away the slack of the ink ribbon Attention The slack of the ink ribbon can cause paper jam Be sure to take...

Page 23: ...Chapter 2 Installing and Set Up 2 12 6 Close the upper cover Pressing the center close the upper cover slowly and confirm it cricks Caution Take care not to put the fingers when you close upper cover ...

Page 24: ...rinter automatically rewinds the paper into the paper box this step is not necessary at the first set up procedure 2 Open the paper cover 3 Remove the used paper and insert the new one this step is not necessary at the first set up procedure Attention Do not open the paper cover abruptly Attention When abandon the paper please handle it as harmful industrial waste PAPER REWIND button ...

Page 25: ...e protection 5 Insert the paper flange with gear blue into the paper Align the notch of the paper with the projection of the paper fFlange The opposite side of the paper has no notch Align them correctly 6 Insert the paper flange without gear gray into the opposite side of the paper Projection ...

Page 26: ...et Up 2 15 7 Load the new paper into the paper cassette 8 Peel of the sticker which is fixing the edge of paper 9 Set the edge of the paper along with the mark on the paper guide Paper guide mark With gear blue Without gear gray ...

Page 27: ...ust every time exchange the paper 11 Close the paper cover slowly 12 Push the PAPER SET button on the operation panel The printer automatically loads the paper Attention During loading the paper part that cannot be used for printing is ejected Do not touch the paper until it is completely ejected PAPER SET button Paper Feeding Knob Red line ...

Page 28: ...akage In case impossible to have grounded power please contact the dealers or service center Warning Make sure to insert the power cord correctly If not it can cause the fire or the printer problem Warning Do not make any damage or any modification to the power cord Put the heavy items on the power cord give a strong pull to the power cord and twist the power cord can cause the fire and electric s...

Page 29: ... have no connection with other devices Otherwise the power cord might be damaged and it can cause the fire and electric shock Also there is a possibility to fall down caught by the cord Warning Avoid piled up connection It can cause the fire and electric shock Warning In case of not using the printer for a long time remove the power cord for safety ...

Page 30: ...make sure that the printer is in the waiting status Removing the USB cable during data transfer may not be able to print data correctly Connect the USB cable from the personal computer to the USB connector located on the left rear side of the printer Be sure to insert the USB cable all the way ...

Page 31: ...Chapter 2 Installing and Set Up 2 20 MEMO ...

Page 32: ...ar and turn on when press to upper and turn off when press to lower Operation Panel The buttons LEDs and LCD display on the operation panel are shown below POWER Lamp READY Lamp ERROR Lamp Button Button ENTER Button MENU Button PAPER SET Button PAPER REWIND CLER Button LCD Ready 8 10 ...

Page 33: ...from the paper cassette Paper Rewind Clear Button Press this button to rewind the paper back to the Paper Cassette In case of Set Up Mode escape from the Menu by pressing this button Menu Button In waiting status move into Set Up Mode by pressing this button Also use this button to select the menu in Set Up Mode Enter Button Press this button to enter the menu in Set Up Mode Button By pressing thi...

Page 34: ...Chapter 3 Operation Panel 3 3 ...

Page 35: ...is changed depending on ink ribbon being set in the printer Initializing Printer is in initialization Winding Ribbon Winding the ink ribbon Printing Printing Thermal Protect Temperature of Thermal Head gets higher than the specified level Feeding Paper Loading the paper from the Paper Cassette Winding Paper Rewinding the paper in the printer back to the Paper Cassette ...

Page 36: ...Y To enter to Set Up Mode press Menu Button when ready status To escape from Set Up Mode press Clear Button Comes to Test Print Mode By pressing Enter Button test print will start Press MENU button to shift the next menu Comes to the number of remaining paper mode XXX in the display shows the number of remaining paper and YYY shows the total number of the copies in one roll Press MENU button to sh...

Page 37: ...o shift the next menu This figure shows the revision number of main control firmware mode Press MENU button to shift the next menu This figure shows the DSP control firmware revision Press MENU button to shift the next menu Display is changed as below depending on the revision number of firmware 1 up to MAIN Firm 3 DSP Firm 1 Return to Test Print Mode 2 MAIN Firm 4 DSP Firm 2 or more to the next p...

Page 38: ...Print Mode Press MENU button to shift the next menu Mode Standard Pressing MENU button the Print Mode is changed Mode Fine Pressing ENTER button the LCD is flashing in a moment and Print Mode is set Display is changed as below depending on the revision number of firmware 1 up to MAIN Firm 9 DSP Firm 5 Return to Test Print Mode 2 MAIN Firm 10 DSP Firm 6 to the 3 8 page 3 MAIN Firm 11 DSP Firm 7 or ...

Page 39: ...e next menu Mode Glossy Pressing MENU button the Gloss Matte Mode is changed Mode Matte Pressing ENTER button the LCD is flashing in a moment and Gloss Matte Mode is set Level Adjust Press MENU button to shift the Level Adjust menu Level Adjust menu is displayed only when Matte mode menu is selected is setting value The initial value for is 0 This value is changed by button or button The adjustabl...

Page 40: ...om firmware revision MAIN Firm 10 DSP Firm 6 Cleaning Print Pressing Enter Button Cleaning print will start Now Cleaning After Cleaning Print is done Initializing automatically starts and move into Ready status It takes approximately 2 minutes Caution Cleaning Print uses the paper and ribbon for one picture ...

Page 41: ...ng Roller once in a month 1 Open Upper Cover Pull Upper Cover Open Lever Attention Do not open the Upper Cover abruptly or forcefully past the 90 angle 2 Using gauze clean the heat element glass bar of the thermal head with isopropyl alcohol or ethyl alcohol Caution Thermal Head reaches high temperature just after printing Do not touch directly by hand When fingerprint stick to the heat element it...

Page 42: ...clean the rubber part of Platen with isopropyl alcohol or ethyl alcohol 5 Cleaning Roller located at the front side and rear side and they can be pull out by using the black knob on the center Attention Dirt or ink on Platen can cause mis registration Printing should be performed after the alcohol dried up completely approx 5 minutes ...

Page 43: ...ginal position and push the black knob until confirm it clicks Attention If the dirt stick around Cleaning Roller it can cause the lack of printing Printing should be performed after the alcohol dried up completely approx 5 minutes 8 Close Upper Cover Pressing the center close the Upper Cover slowly and confirm it cricks Caution Take care not to put the fingers when you close upper cover ...

Page 44: ...ning Continuous use under the abnormal condition such as high temperature smoke and strange smell can cause the fire and electric shock Turn off the power and make sure to remove the power cord then contact the dealers or service center Warning In case the foreign substance get into the printer turn off the power of printer remove the power cord and contact the dealers or service center Continuous...

Page 45: ...ice center Incorrect Ribbon A different type of ink ribbon is used Check the type of ink ribbon Upper Cover Open Upper cover is open Close the Upper Cover correctly Paper Cover Open The paper cover is open Close the Paper Cover correctly Mecha Error XX Trouble of printer Mechanism Contact the dealers or service center Control Error XX Trouble of printer control board Contact the dealers or service...

Page 46: ... printer has some paper left In the case of no paper In the case of no paper In the case of no paper In the case of no paper Go to Step 4 In the case of unused paper In the case of unused paper In the case of unused paper In the case of unused paper Go to Step 8 Attention Do not open the Upper Cover abruptly or forcefully past the 90 angle Paper ...

Page 47: ...Pressing the center close the upper cover slowly and confirm it cricks 5 Turn on the power of the printer 6 Rewind the paper into the paper cassette Push the PAPER REWIND button on the operation panel The printer automatically rewinds the paper into the paper box Caution Take care not to put the fingers when you close upper cover PAPER REWIND button ...

Page 48: ... ink ribbon If the ink ribbon is entangled around the roller removing the ink ribbon immoderately can cut it Holding the ink ribbon directly by hand pull it out slowly 9 Take out the jammed paper If the paper is entangled around the roller take out the paper slowly Attention Pulling out the ink ribbon hastily can cause a printer failure Be sure to pull it out slowly Attention Pulling out the paper...

Page 49: ...the paper may jam again or the ink ribbon can be cut during printing Be sure to cut the wrinkles or printed portion of the paper Cut the paper straightly in crosswise direction Caution Thermal head reaches high temperature just after printing Do not touch directly by hand When fingerprint stick to the heat element it can damage the Thermal head Do not touch directly by hand Be careful not to be hu...

Page 50: ...matically rewinds the paper into the paper box If the message Paper Jam still appears after rewinding the paper push the PAPER REWIND button again 14 Open the upper cover and insert the ink ribbon cassette again Follow the instruction of Loading Paper in Chapter 2 Attention If paper jam happens often please contact the dealers or service center PAPER REWIND button ...

Page 51: ...pened due to the dirt on Cleaning Roller Clean the Cleaning Roller according to the instruction in Chapter 4 Routine Maintenance Can be happened due to the dirt inside of Paper Cover Using gauze clean the inside of Paper Cover with isopropyl alcohol or ethyl alcohol Clean the cleaning roller and the inside of the Paper Cover bottom plate all of the inside of the cover etc After that Cleaning Print...

Page 52: ...inter is not out of paper If ribbon mark sensor and or paper sensor is not clean ink ribbon and paper will be detected incorrectly Clean the ribbon mark sensor the ribbon mark sensor reflecting sticker and the paper sensor according to the following instruction If can not be recovered from the error after the cleaning please contact the dealers or service center Sensor may be damaged 1 Turn off th...

Page 53: ...g 5 9 3 Remove the ink ribbon 4 Wipe the ribbon mark sensor using cotton bud with isopropyl alcohol or ethyl alcohol soaked 5 Wipe the ribbon mark sensor reflection sticker by soft cloth Reflection Sticker Ribbon Mark Sensor ...

Page 54: ...nsert Ink Ribbon again Follow the instruction of Loading Paper in Chapter 2 7 Close Upper Cover Pressing the center close the Upper Cover slowly and confirm it cricks Caution Take care not to put the fingers when you close upper cover ...

Page 55: ...ing Thermal Head will be kept pushing to Platen Laving this situation for a long time shape of Platen can be warped In order to avoid this situation please follow the instruction below 1 Turn off the power of the printer 2 When the message Paper Jam appears on the LCD on the operation panel turn off the power switch LCD ...

Page 56: ...on Attention Do not open the Upper Cover abruptly or forcefully past the 90 angle Caution Thermal head reaches high temperature just after printing Do not touch directly by hand Be careful not to be hurt by the projections of the printer Ink ribbon may be stick to the paper so that please peel it off slowly ...

Page 57: ...are by scissors Refer to Paper Jam in this Chapter 6 Close the upper cover and turn on the power of the printer then rewind the paper to Paper Cassette Press REWIND Button and paper will automatically winded 7 Open Upper Cover and insert Ink Ribbon again Refer to Chapter 2 PAPER REWIND button ...

Page 58: ... the center close the upper cover slowly and confirm it cricks Caution Take care not to put the fingers when you close upper cover If the electric power failure will go on for a long time keep upper cover open until it will recover from the electric power failure ...

Page 59: ...Chapter 6 After sales Service 6 1 Contact your dealers or service center for the details about after sales service ...

Page 60: ......

Page 61: ...YTE8 J0124E Revision Fourth edition ...

Reviews: