1
Check and ensure that no raised grain or splinters are
evident on timber components. Sand down any
raised grain or splinters using fine grade sandpaper.
2
Check that all screw, nail and pin heads are properly
tapped home and are not proud of the timber surface.
3
Check and ensure that no screws, nails or pins
protrude through any panel.
4
Check and ensure that all parts are properly secured
against reasonable force.
5
Do not apply decorative wood finish/treatments to wet
or damp timber. Please observe the instructions of the
wood finish/treatment manufacturer.
6
Adults need to check the playhouse regularly and
maintain the playhouse in good condition to provide a
safe play environment. Do not use if damaged. If
damaged the playhouse should be properly and
safely repaired before further use by children.
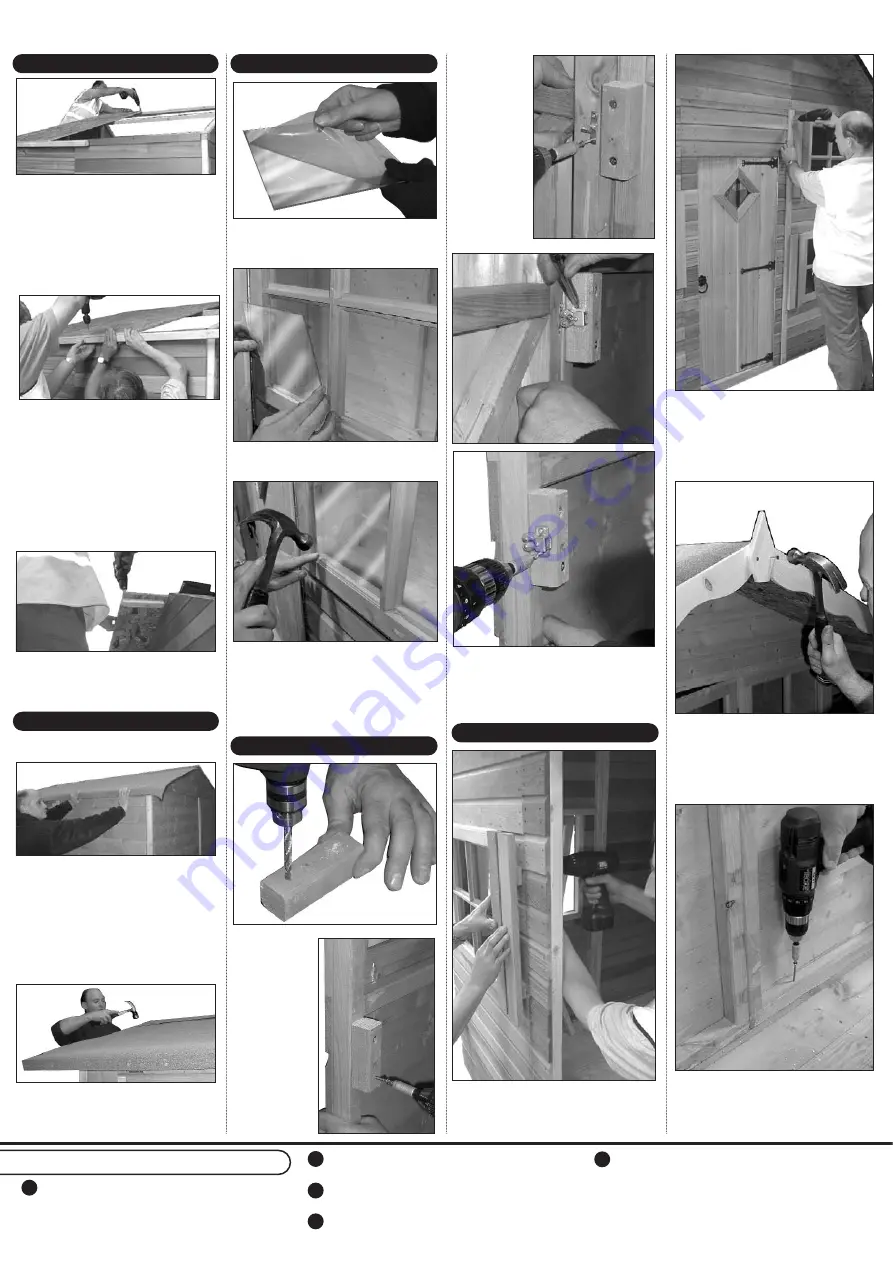
Assembly Completion Checklist
L
-
Glazing
M - Door Catch Assembly
1 Remove protective film from both sides of
each glazing pane of window glazing
material (B3).
2 Place glazing material (B3) into the
aperture of each window.
3 Hold into position with four pieces of
beading (B4). The beading may need to
be swapped around to get the best fit.
When satisfied secure into position using
2x 15mm panel pins per piece of
beading.
1 Drill x 2
holes into
the wood
block and
secure to
inside of
door
opening
flush with
the aperture
using 2x
60mm
screws.
2 Secure door
catch to inside
of door
approximately
centrally
alongside the
wood block
and secure
using 2x
25mm screws.
3 Close the door and attach the door
catch together and mark the required
position of the door catch housing.
Secure using 2x 25mm screws.
1
Fit shutters (B1).
One person to hold
in place and another to secure from the
inside using 4x 25 mm screws, 2 into
each block.
N
-
Finishing Touches
4 Drill and screw all side panels to the
floor on the inside of the building using
1x 60 mm screw per panel, into a floor
joist if possible.
2 Fit coverstrips (G) over each panel join
and in each corner, using 3x 40 mm
nails per piece. There are two small
coverstrips to cover over the gable
joins. Secure using 2x 40 mm nails per
piece.
3 Fit facia and diamond to front and back
roof edging. The profiled facia (J1)
goes at the front of the building. Secure
using 3x 40 mm nails for each length of
facia and 2x 40 mm nails for each
diamond (K).
2 Attach a further roof piece (H) and a
further piece of edging framework (H1).
Attach using 3x 25mm screws in each
bearer and 2x 25mm screws into each
roof edging piece.
3 Fit the final roof piece as previous, using
2x 25mm screws into each roof bearer
and roof edging, and 3x 25mm screws
into the front wall. This roof piece will
leave an overhang. Repeat on the other
side.
4 Fit 2 small roof blocks (H3) to centre of
overhang and 1 block half way along
each half roof. Secure in position using
2x 25mm screws per piece.
2 Measure out and cut at 2000mm x 3
strips. Lay one piece of felt along the
longest lowest edge of the roof. An
overhang of approx 40mm should be
allowed on each of the 3 sides. Secure
using 13 mm felt nails at approximately
100 mm intervals, but do not nail down
along the centre of the building.
3 Repeat on the other side.
4 Place the final strip over the ridge
overlapping the other 2 pieces already
laid. Secure using 13 mm felt nails as
previously.
J
-
Fit Roof
1 Attach a piece of framework (H1) to one
edge of one large roof piece (H) using 4x
25mm screws. Place this roof panel in
position at the rear of the building. Ensure
that the roof is flush with the back wall
and point of gable. Screw into place using
3 x 25mm screws into the back wall and
2 x 25mm screws in each roof bearer
(H3). Repeat for other side.
K
-
Felt Roof
1 Break open roll of felt (I) and lay out on
an even surface.


