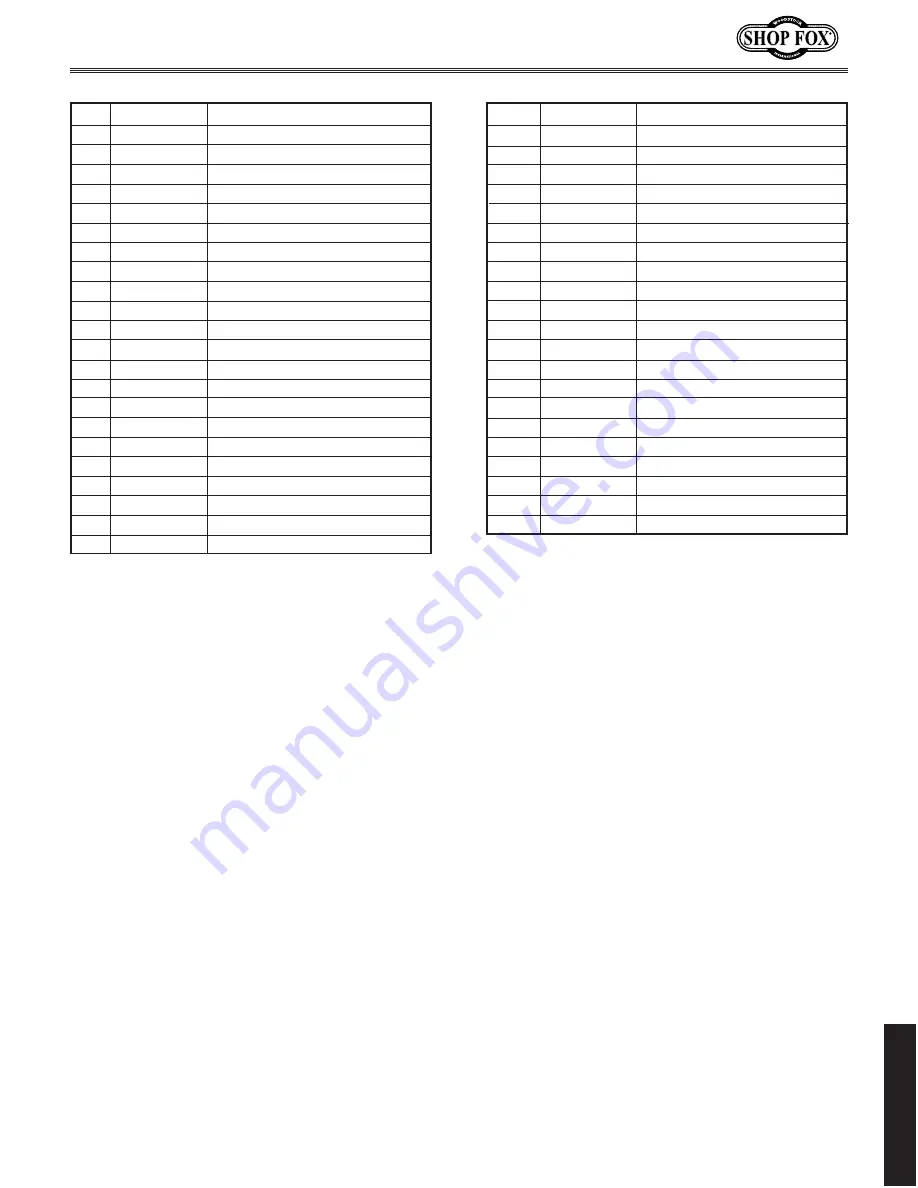
background image

-45-

REF 

PART # 

DESCRIPTION

REF 

PART # 

DESCRIPTION

PARTS

222  X1678222 

MAGNETIC SWITCH

223  X1678223 

ON SWITCH

224  X1678224 

OFF SWITCH

226  X1678226 

LOAD AMP METER

260  X1678260 

VS MOTOR CIRCUIT BOARD

300 X1678300  CRANK

301 X1678301  HANDLE

302 X1678302  COLLAR

303  XPSS11 

SET SCREW 

1

4

"-20 X 

1

4

"

304  XPSS08 

SET SCREW 

5

16

"-18 X 

1

2

"

305  X1678305 

WORM GEAR 10 TEETH

306  X1678306 

SHAFT MOUNT

307  XPSB05 

CAP SCREW 

1

4

"-20 X 

3

4

"

308 X1678308  BUSHING

309  X1678309 

ADJUSTMENT PLATE

310  XPB18 

HEX BOLT 

3

8

"-16 X 1"

311  XPW02 

FLAT WASHER 

3

8

"

312  X1678312 

DUST COVER

313 XPS06 

PHLP HD SCR #10-24 X 

3

8

"

314 XPS06 

PHLP HD SCR #10-24 X 

3

8

"

315  X1678315 

CONTROL BOX

316  XPS01 

PHLP HD SCR #10-24 X 

1

2

"

317  XPLWO3 

LOCK WASHER 

3

16

"

318 

XPN07 

HEX NUT #10-24

319 

XPB58 

HEX BOLT 

3

8

"-16 X 2"

320 

XPW07 

FLAT WASHER 

3

8

"

321 

XPSW10 

STRAIN RELIEF 

3

4

"

322 

X1678322  WIRING PANEL

323 

XPS17M 

PHLP HD SCR M4-0.7 X 6MM

324 

X1678324  CONTROL PANEL

325 XPS06 

PHLP HD SCR #10-24 X 

3

8

"

328 

X1678328  EMERGENCY STOP SWITCH

332 

X1678332  WIRING BLOCK

334 

XPS22 

PHLP HD SCR #10-24 X 

5

8

"

335 

XPN07 

HEX NUT #10-24

336 

X1678336  CABLE MARKER

337 

X1678337  MAIN PWR CBL 14' 12-GA

340 

X1678348  LABEL (ELECTRICITY)

342  X1678350 FUSE 

3

4

" 10A, 250V

343 

X1678351  DUST PLUG

344 

X1678352  STRAIN RELIEF 

5

8

"

346  X1678346 RHEOSTAT

347  X1678347  LABEL (READ MANUAL)

348V2 X1678348V2 

CONTACTOR SDE MA-09 220V

349 

X1678349  NYLON CABLE TIES

Summary of Contents for SHOP FOX W1678

Page 1: ...OPYRIGHT MAY 2003 BY WOODSTOCK INTERNATIONAL INC REVISED DECEMBER 2014 MN WARNING NO PORTION OF THIS MANUAL MAY BE REPRODUCED IN ANY SHAPE OR FORM WITHOUT THE WRITTEN APPROVAL OF WOODSTOCK INTERNATION...

Page 2: ...g grinding tool integrity and the usage of personal protective equipment The manufacturer will not be held liable for injury or property damage from negligence improper training machine modifications...

Page 3: ...ndles 13 Control Box 13 Crank and Handle 13 ADJUSTMENTS 14 Drums and Pressure Rollers 14 Dust Scoop Gap 20 V Belt Tension 21 Conveyor Belt 22 OPERATIONS 23 Overview 23 Control Panel 23 Basic Sanding 2...

Page 4: ...ease contact Woodstock International Technical Support at 360 734 3482 or send e mail to tech support shopfox biz Our knowledgeable staff will help you troubleshoot problems or process warranty claims...

Page 5: ...arable Speed Conveyor Drive Sprocket and Chain Conveyor Surface Speed 0 20 FPM Maximum Lumber Dimensions 41 2 Thick x 26 Wide Minimum Lumber Dimensions 1 8 Thick x 9 Long Dust Port O D 4 Conveyor Tabl...

Page 6: ...d or when distracted ELECTRICAL EQUIPMENT INJURY RISKS You can be shocked burned or killed by touching live electrical components or improperly grounded machinery To reduce this risk only allow an ele...

Page 7: ...with moving parts or flying debris make sure they are properly installed undamaged and working correctly FORCING MACHINERY Do not force machine It will do the job safer and better at the rate for whi...

Page 8: ...rkpiece while the sander is running ALWAYS replace the sandpaper when it is worn and only use undamaged sandpaper ALWAYS inspect the workpiece for nails staples knots imbedded stones and other materia...

Page 9: ...y from conveyor and the underside of the stock Figure 3 NEVER stand in the path of potential workpiece kickback Figure 4 ALWAYS keep yourself and bystanders away from the path of potential workpiece k...

Page 10: ...8 Figure 7 NEVER sand stock using a sled another board under the workpiece SAFETY Figure 8 ALWAYS sand the workpiece with it sitting flat against the conveyor belt...

Page 11: ...least 27 Amps Remember other machines using this circuit add to the total electrical load applied to the circuit If this total amperage load exceeds the amperage rating of the circuit breaker or fuse...

Page 12: ...ly 1 W1678 26 Double Drum Sander 1 2 Control Box 1 3 Crank Wheel 1 4 Dust Port Concave Base 1 5 Crank Handle 1 6 Dust Port Flat Base 1 7 Hand Knobs 2 8 Hardware and Tool Bag 1 Self Tapping Screw 8 X 1...

Page 13: ...d people in your shop Otherwise injury or death can occur Initial Cleaning If the sander has any dust or slight stains from shipping DO NOT use a mineral spirit solvent or chlorine based cleaner to cl...

Page 14: ...ity dust collector is used Make sure you connect flexible ducting to the dust ports This ducting allows you to open the dust hood change sandpaper and service your sander without having to disconnect...

Page 15: ...le is used to raise and lower the conveyor For each revolution of the crank the conveyor moves 0 021 To install the crank and handle do these steps 1 Thread the handle into the crank and use a 1 2 wre...

Page 16: ...drums are square with the feed conveyor belt surface See Figure 18 To adjust the drum to conveyor squareness do these steps 1 Make two gauge blocks from a quality piece of straight two by four hardwo...

Page 17: ...justment plate 1 8 turn at a time to raise the bearing block height at the low end of the drum Remember adjusting one drum end slightly affects the adjustment at the opposite end See Figure 20 11 Repe...

Page 18: ...pproximately 1 2 See Figure 23 If the difference between the two measurements is less than 1 8 skip Steps 2 through 4 and go to Step 5 If the distance is greater than 1 8 go to Step 2 2 Loosen the bea...

Page 19: ...eld against the front drum 8 Tighten the nuts in an alternating pattern 9 Repeat Steps 5 through 8 on the opposite endofthereardrum Alternatetheadjustment until the 25 8 gauge block has the same snug...

Page 20: ...sting lock lever and turn the micro adjusting knob so the rear drum lowers until it just barely touches the gauge block 5 Repeat Step 14 at both ends of the rear drum Figure 28 The 30 gauge block posi...

Page 21: ...handwheel counter clockwise exactly 21 2 turns 5 Turn the pressure roller height bolt until the pressure roller just contacts the gauge block See Figure 31 6 Hold the height bolt in position and tigh...

Page 22: ...and dust scoop See Figure 35 4 Raise the table until the rear drum just touches the gauge blocks 5 Loosen the dust scoop mounting bolts and slide the scoop up or down until it is 1 32 above the gauge...

Page 23: ...Grab the belts one at a time twist them and use a flashlight to inspect the inside and outside of the belt If you see deep cracks fraying chunks missing or the belt is brittle and glazed replace both...

Page 24: ...ght start the conveyor and slightly turn the right side conveyor roller adjustment bolt counter clockwise If the feed conveyor belt tracks to the left start the conveyor and slightly turn the left sid...

Page 25: ...essure on the workpiece grit of sandpaper used and the species of wood being sanded Emergency Stop Button Allows you to turn the main power ON or OFF to the double drum sander and shut down the machin...

Page 26: ...ately 0 021 See Figure 43 Remember heavy cuts and or a feed rate that is too fast can jam or burn the workpiece instantly burn the sandpaper slip the drive belts and give poor sanding results See Figu...

Page 27: ...Y adjust the sander when it is OFF and unplugged ONLY restart the sander when you are sure the problem is corrected 3 Start your dust collector 4 Place the workpiece on the conveyor table and turn the...

Page 28: ...n mark a squiggly line on the workpiece and sand it to test for even sanding Look for uniform removal of the line If the line is not removed uniformly adjust the sander accordingly Figure 50 Load mete...

Page 29: ...the drum drive motor The feed conveyor will not start or it operates incorrectly The main power emergency stop button is pulled out or it is faulty The power supply is insufficient or the circuit brea...

Page 30: ...r the edges Reduce the force the drums are applying on the workpiece surface The wood thickness is uneven from side to side The drums are not square to the table The sandpaper is worn or clogged uneve...

Page 31: ...to combinations of successive group types A common selection for a workpiece that is planed before it is sanded is the 100 150 grit combination Overall the general rule of thumb is to sand a workpiece...

Page 32: ...e zerk and squirt two pumps of high quality lithium base grease into the bearing DO NOT over grease the bearing 5 Coat the exposed areas of the table lead screws with dry powdered graphite 6 Coat the...

Page 33: ...OTENUSE TAPER ANGLE Figure 56 Finding sandpaper taper angle Sandpaper Replacement The Model W1678 Double Drum Sander is designed for rolls of 3 wide hook and loop sandpaper To change the sandpaper do...

Page 34: ...s and the set screws See Figure 57 3 Lift the drum and slide the bearing block and bearing from the drum shaft 4 Clean and inspect the drum shaft for cracks burrs wear and other damage replace repair...

Page 35: ...See Figures 57 and 61 10 Slide DO NOT hammer the bearing block and bearing onto the drum shaft 11 Lower the drum and bearing block onto the mounting studs and install the flat washers and the nuts Ti...

Page 36: ...and vacuum or compressed air to carefully blow out built up sawdust 4 With the dust collector OFF dampen a cloth with warm water and mild dish soap and wipe dusty surfaces clean To clean grease from...

Page 37: ...s Otherwise serious personal injury may occur Seek assistance from a qualified electrician if you do not understand the wiring diagram in this manual Always follow the applicable electrical codes and...

Page 38: ...ING PANEL CONTROL BOX GROUND BLACK WHITE L3 5 L2 3 L1 1 WHITE BLACK GREEN GREEN GREEN CONV MOTOR SWITCH CONV MOTOR SPEED CIRCUIT BOARD WIRING BLOCK DRUM MOTOR SWITCH 10 A WHITE BLACK FUSE AMMETER FEED...

Page 39: ...ifferent and safety rules should be considered as they apply to your specific situation We recommend you keep this manual for complete information regarding Woodstock International Inc s warranty and...

Page 40: ...56 49 39 56 10 3 43 44 52 54 12 11 55 59 47 51 36 50 29 61 64 65 23 68 59 50 64 36 51 29 61 74 32 32 32 66 64 74 74 61 29 51 61 29 51 64 74 36 36 37 37 37 37 76 75 17 67 62 57 32 63 1 40 41 2 42 32 77...

Page 41: ...X1678044 SPROCKET 16 TEETH 45 X1678045 TABLE 46 XPFH12 FLAT HD SCREW 1 4 20 X 1 47 XPLN02 LOCK NUT 1 4 20 49 X1678049 TABLE FRAME 50 X1678050 LEFT ROLLER END GUARD 51 X1678051 ROLLER BRACKET 52 XPSS1...

Page 42: ...4 74 106 81 151 142 143 146 146 148 88 145 145 127 128 130 141 140 123 121 122 116 126 125 141 140 111 110 110 93 92 101 117 129 115 136 137 137 133 135 138 139 137 133 123 119 120 113 118 112 127 128...

Page 43: ...118 AXLE 119 X1678119 BEVEL GEAR 120 X1678120 BEVEL GEAR 121 XPSS29 SET SCREW 10 24 X 1 4 122 X1678122 THRUST BEARING SEAT 123 X1678123 THRUST BEARING 51101 124 XPR09M EXT RETAINING RING 20MM 125 XPSS...

Page 44: ...7 5 4 7 6 7 6 8 238 9 13 14 15 16 19 20 201 202 203 204 205 206 205 208 210 211 291 230 231 235 236 237 236 239 240 241 245 244 246 244 250 249 248 251 297 259 261 259 261 271 272 273 274 279 282 280...

Page 45: ...3 8 235 X1678235 DUST SCOOP 236 XPB02 HEX BOLT 1 4 20 X 5 8 237 XPN05 HEX NUT 1 4 20 238 X1678238 TABLE LEAD SCREW 3 4 16 239 X1678239 GEAR 25 TEETH 240 XPK06M KEY 5 X 5 X 10MM 241 XPLN06 LOCK NUT 1 2...

Page 46: ...340 222 336 320 319 318 348V2 334 334 260 334 332 335 335 335 325 226 328 224 223 315 322 323 321 5 0 1 2 3 4 6 7 10 9 8 346 342 344 349 337 302 300 301 314 312 313 309 311 310 308 306 305 307 303 30...

Page 47: ...314 XPS06 PHLP HD SCR 10 24 X 3 8 315 X1678315 CONTROL BOX 316 XPS01 PHLP HD SCR 10 24 X 1 2 317 XPLWO3 LOCK WASHER 3 16 318 XPN07 HEX NUT 10 24 319 XPB58 HEX BOLT 3 8 16 X 2 320 XPW07 FLAT WASHER 3...

Page 48: ...NOTES...

Page 49: ......

Page 50: ...tape along edges please do not staple Fold along dotted lIne Fold along dotted lIne Woodstock international inc p o box 2309 bellingham Wa 98227 2309 place stamp Here...

Page 51: ...he scope of Woodstock International Inc s warranty then the original owner must bear the cost of storing and returning the product This is Woodstock International Inc s sole written warranty and any a...

Page 52: ...High Quality Machines and Tools Woodstock International Inc carries thousands of products designed to meet the needs of today s woodworkers and metalworkers Ask your dealer about these fine products...

Reviews: