background image

Model W1777  2

 1

2

" 16 Gauge Finish Nailer

-14-

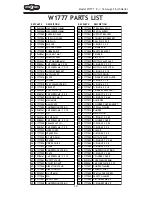
W1777 PARTS LIST

REF PART�#

DESCRIPTION

REF PART�#

DESCRIPTION

1

XPAW05M HEX�WRENCH�5MM

49 X1777049 STEEL�BALL�DW=2

2

XPAW04M HEX�WRENCH�4MM

50 X1777050 SPECIAL�SCREW

3

X1777003 CARRYING�CASE

51 X1777051 SUPPORT�BRACKET

4

X1777004 AIR�PLUG�COVER

52 X1777052 CONNECTING�BRACKET

5

X1777005 AIR�PLUG

53 X1777053 ROLL�PIN�3�X�28

6

X1777006 END�CAP

54 X1777054 O-RING�2�X�2.5

7

X1777007 END�CAP�GASKET

55 X1777055 TRIGGER�PIN

8

X1777008 RUBBER�GRIP

56 X1777056 SAFETY�BRACKET

9

XPLN03M LOCK�NUT�M6-1

57 X1777057 TRIGGER

10 X1777010 SUPPORT�SEAT

58 X1777058 PIN�C3�X�17

11 XPW03M

FLAT�WASHER�6MM

59 X1777059 SWITCH�VALVE�SEAT

12 XPSB02M CAP�SCREW�M6-1�X�20

60 X1777060 O-RING�20.3�X�2.3

13 XPSB17M CAP�SCREW�M4-.7�X�10

61 X1777061 SWITCH�VALVE�STEM

14 X1777014 SUPPORT�BRACKET

62 X1777062 O-RING�2.5�X�1.5

15 X1777015 LATCH�LEVER

63 X1777063 SWITCH�SPRING

16 X1777016 PLATE

64 X1777064 TRIGGER�VALVE�GUIDE

17 X1777017 PUSHER

65 X1777065 O-RING�9�X�1.8

18 X1777018 FLAT�COILED�SPRING

66 X1777066 O-RING�6.4�X�2

19 X1777019 BRACKET

67 X1777067 O-RING�6.2�X�1.8

20 XPRP02M ROLL�PIN�3�X�16

68 X1777068 TRIGGER�VALVE�SEAT

21 XPSB57M CAP�SCREW�M3-.5�X�6

69 X1777069 O-RING�17.4�X�1.5

22 X1777022 LOCK�NUT�M4-.7

70 X1777070 O-RING�15�X�2.65

23 X1777023 MAGAZINE

71 X1777071 GUN�BODY

24 X1777024 NAIL�PLATE

72 X1777072 CYLINDER�COVER�GASKET

25 X1777025 COMPRESSION�SPRING

73 X1777073 SPECIAL�WASHER

26 XPSB17M CAP�SCREW�M4-.7�X�10

74 X1777074 BUMPER

27 X1777027 PIN

75 X1777075 MAIN�PISTON

28 XPEC01M E-CLIP�3MM

76 X1777076 O-RING�31�X�3.55

29 XPSB50M CAP�SCREW�M5-.8�X�10

77 X1777077 CYLINDER�COVER

30 X1777030 RELEASE�LATCH

78 X1777078 O-RING�42�X�3.55

31 XPSB18M CAP�SCREW�M4-.7�X�8

79 X1777079 O-RING�42�X�2.5

32 X1777032 NOSE�COVER

80 X1777080 COLLAR

33 X1777033 SPACER�PIN

81 X1777081 O-RING�60�X�2.5

34 X1777034 E-CLIP�2.5MM

82 X1777082 SWITCH�VALVE

35 X1777035 SPACER

83 X1777083 O-RING�48.7�X�2.65

36 X1777036 DRIVER�GUIDE

84 X1777084 O-RING�38�X�3.5

37 X1777037 BLOCK

85 X1777085 O-RING�25�X�3.5

38 X1777038 COMPRESSION�SPRING

86 X1777086 COMPRESSION�SPRING

39 X1777039 PLATE

87 X1777087 O-RING�18�X�2.65

40 XPSB41M CAP�SCREW�M4-.7�X�14

88 X1777088 CYLINDER�COVER

41 X1777041 SAFETY�STAND

89 XPLW01M LOCK�WASHER�5MM

42 X1777042 ADJUSTING�NUT

90 XPSB38M CAP�SCREW�M5-.8�X�25

43 X1777043 DIRECTION�STAND

91 X1777091 BUMPER�WASHER

44 X1777044 DIRECTION�PIN

92 X1777092 EXHAUST�PORT

45 XPEC09M E-CLIP�6MM

93 X1777093 SPECIAL�CAP�SCREW

46 X1777046 PIN

94 X1777094 SAFETY�GLASSES

47 X1777047 SAFETY�SEAT

95 X1777095 PISTON�REPAIR�KIT

48 X1777048 COMPRESSION�SPRING

96 X1777096 O-RING�REPAIR�KIT

Summary of Contents for SHOP FOX W1777

Page 1: ...T JUNE 2007 BY WOODSTOCK INTERNATIONAL INC REVISED DECEMBER 2007 JM WARNING NO PORTION OF THIS MANUAL MAY BE REPRODUCED IN ANY SHAPE OR FORM WITHOUT THE WRITTEN APPROVAL OF WOODSTOCK INTERNATIONAL INC 9552TS Printed in China MODEL W1777 21 2 16 GAUGE FINISH NAILER OWNER S MANUAL ...

Page 2: ... personal protective equipment The manufacturer will not be held liable for injury or property damage from negligence improper training machine modifications or misuse Some dust created by power sanding sawing grinding drilling and other construction activities contains chemicals known to the State of California to cause cancer birth defects or other reproduction harm Some examples of these chemic...

Page 3: ...ment to do a job for which it was not designed 9 DO NOT USE UNDER THE INFLUENCE OF DRUGS OR ALCOHOL For Your Own Safety Read Instruction Manual Before Operating This Equipment The purpose of safety symbols is to attract your attention to possible hazardous conditions This manual uses a series of symbols and signal words which are intended to convey the level of importance of the safety messages Th...

Page 4: ...ccessories 16 REDUCE THE RISK OF UNINTENTIONAL FIRING Do not carry tool with hand on trigger and always disconnect from air when not in use 17 DISCONNECT TOOLS before servicing changing accessories or moving to another location 18 DO NOT OVERREACH Keep proper footing balance at all times 19 USE THE RECOMMENDED ACCESSORIES Consult owner s manual for recommended accessories The use of improper acces...

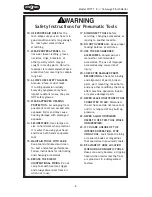
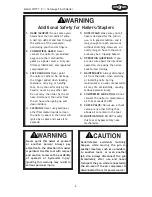
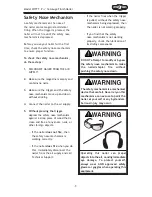
Page 5: ... not keep the trigger pulled when loading fasteners carrying or holding tool Carry the nailer only by the handle never by any other part Do not carry the nailer by the air hose Disconnect the nailer from the air hose when going up and down ladders 4 CLEANING Never use gasoline or other flammable liquids to clean the nailer vapors in the nailer will ignite by a spark and cause it to explode Additio...

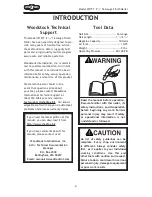
Page 6: ...77 21 2 16 Gauge Finish Nailer has been specially designed to pro vide many years of trouble free service Close attention to detail ruggedly built parts and a rigid quality control program assure safe and reliable operation Woodstock International Inc is commit ted to customer satisfaction Our intent with this manual is to include the basic information for safety setup operation maintenance and se...

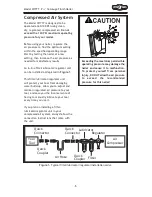
Page 7: ...This filter lubricator regulator unit will protect your tool from damaging water build up allow you to adjust and maintain regulated air pressure to your tool and save you the inconvenience of having to manually lubricate your tool every time you use it If you plan on installing a filter lubricator regulator unit in your compressed air system always follow the connection instructions that come wit...

Page 8: ...llowing is a description of the main components shipped with the Model W1777 Lay the components out to inventory them Note If you can t find an item on this list check the mounting location on the tool or examine the packaging materials carefully Occasionally we pre install certain components for safer shipping Model W1777 Inventory Qty A Safety Glasses 1 B Nail Gun 1 C Carrying Case 1 D Hex Wrenc...

Page 9: ...If the nailer does not fire then the safety nose mechanism is working correctly If the nailer does fire when you do this immediately disconnect the nailer from the air supply and call Technical Support Safety Nose Mechanism If the nailer fires when the trigger is pulled without the safety nose mechanism being depressed then the nailer is not working properly If you find that the safety nose mechan...

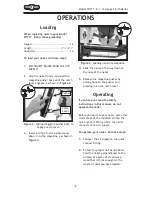
Page 10: ...he nailer Before you operate your nailer place five to six drops of the included oil into the quick connect fitting where the nailer connects to the air supply To operate your nailer do these steps 1 Connect the air supply to the quick connect fitting 2 To test for proper nail penetration hold the nailer perpendicular to the surface of a piece of clean scrap wood that is thick enough for the lengt...

Page 11: ... of the workpiece as shown in Figure 4 Besides damaging your workpiece deflection can cause injury if your free hand is securing the workpiece in the location that the nail deflects Figure 4 Example of nail deflection Adjusting Depth A depth adjustment knob is attached to the nose for setting the nail depth To adjust the nail depth do these steps 1 DISCONNECT NAILER FROM THE AIR SUPPLY 2 Rotate th...

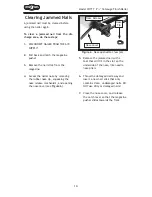
Page 12: ...ubber nose tip squeezing the nose release mechanism and opening the nose cover see Figure 6 Clearing Jammed Nails 5 Remove the jammed nail with a tool that will fit in the slot on the underside of the nose like needle nose pliers 6 Throw the damaged nail away and insert a new nail stick that only contains clean undamaged nails DO NOT use dirty or damaged nails 7 Close the nose cover and release th...

Page 13: ...s 9 Place a new O ring on the new piston and apply a thin film of the nailer lubricating oil on the O ring 10 Insert the new piston in the cylinder Make sure that the grooves on the piston shaft line up with those on the guide at the bottom of the cylinder The new piston should easily slide into the cylinder DO NOT force the piston into the cylinder If the piston is not easily inserted double chec...

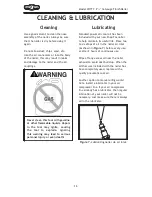
Page 14: ...Figure 7 before every use or after 2 hours of continuous use Wipe off any excess oil near the nailer exhaust to avoid dust build up When the oil that was included with the nailer has been completely used replace with a quality pneumatic tool oil Another option to manual oiling would be to install a lubricator in your air compressor line If your air compressor line already has a lubricator then reg...

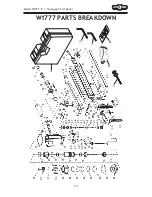
Page 15: ...Model W1777 21 2 16 Gauge Finish Nailer 13 W1777 PARTS BREAKDOWN ...

Page 16: ...5 22 X1777022 LOCK NUT M4 7 70 X1777070 O RING 15 X 2 65 23 X1777023 MAGAZINE 71 X1777071 GUN BODY 24 X1777024 NAIL PLATE 72 X1777072 CYLINDER COVER GASKET 25 X1777025 COMPRESSION SPRING 73 X1777073 SPECIAL WASHER 26 XPSB17M CAP SCREW M4 7 X 10 74 X1777074 BUMPER 27 X1777027 PIN 75 X1777075 MAIN PISTON 28 XPEC01M E CLIP 3MM 76 X1777076 O RING 31 X 3 55 29 XPSB50M CAP SCREW M5 8 X 10 77 X1777077 CY...

Page 17: ...and air pressure 6 Replace O ring and lubricate 7 Replace trigger valve O rings 8 Replace bumper 9 Replace cap seal Tool runs slowly or has a loss of power 1 Undersized air hose 2 Nailer is not lubricated 3 Broken spring in cap assembly 4 Exhaust port in cap is blocked 1 Use a larger hose 2 Lubricate nailer 3 Replace spring 4 Clean or replace damaged internal parts Fasteners frequently jam the nai...

Page 18: ... ...

Page 19: ... to a friend _____ Yes ____ No 6 What is your age group _____ 20 29 ____ 30 39 ____ 40 49 _____ 50 59 ____ 60 69 ____ 70 7 What is your annual household income _____ 20 000 29 000 ____ 30 000 39 000 ____ 40 000 49 000 _____ 50 000 59 000 ____ 60 000 69 000 ____ 70 000 8 Which of the following magazines do you subscribe to 9 Comments _________________________________________________________________...

Page 20: ...TAPE ALONG EDGES PLEASE DO NOT STAPLE FOLD ALONG DOTTED LINE WOODSTOCK INTERNATIONAL INC P O BOX 2309 BELLINGHAM WA 98227 2309 Place Stamp Here FOLD ALONG DOTTED LINE ...

Reviews: