background image

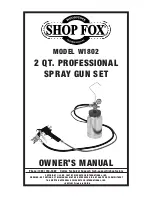
Model W1802  2 QT. Professional Spray Gun 

-2-

10. USE PROPER AIR HOSE 

for the 

tool. Make sure your air hose is in 
good condition and is long enough 
to  reach your work without 
stretching.

11. WEAR PROPER APPAREL. 

Do 

not wear loose clothing, gloves, 
neckties, rings, bracelets, or 
other jewelry which may get 
caught in moving parts. Non-slip 
footwear is recommended. Wear a 
protective hair covering to contain 
long hair.

12. ALWAYS USE SAFETY GLASSES. 

Also use a face or dust mask 
if cutting operation is dusty. 
Everyday eyeglasses only have 
impact resistant lenses, they are 
NOT safety glasses.

13. WEAR APPROVED HEARING 

PROTECTION. 

Air escaping from 

pneumatic tools can exceed safe 
exposure limits and may cause 
hearing damage with prolonged 
exposure.

14. SECURE WORK. 

Use clamps or a 

vise to hold work when practical. 
It is safer than using your hand 
and frees both hands to operate 
tool.

15. MAINTAIN TOOLS WITH CARE. 

Keep tools lubricated and clean 
for best and safest performance. 
Follow instructions for lubricating 
and changing accessories. 

16. REDUCE THE RISK OF 

UNINTENTIONAL FIRING. 

Do not 

carry tool with hand on trigger 
and always disconnect from air 
when not in use.

17. DISCONNECT TOOLS 

before 

servicing, changing accessories, or 
moving to another location.

18. DO NOT OVERREACH. 

Keep proper 

footing/balance at all times.

19. USE THE RECOMMENDED 

ACCESSORIES. 

Consult owner’s 

manual for recommended 
accessories. The use of improper 
accessories may cause risk of injury.

20. CHECK FOR DAMAGED PARTS 

BEFORE USING. 

Check for binding 

and alignment of parts, broken 
parts, part mounting, loose bolts, 
and any other conditions that 
mayaffect machine operation. Repair 
or replace damaged parts.

21. NEVER LEAVE UNATTENDED TOOL 

CONNECTED TO AIR. 

Disconnect the 

air hose and do not leave tool until it 
is relieved of any built up pressure.

22. NEVER ALLOW UNTRAINED 

USERS TO USE THIS TOOL WHILE 
UNSUPERVISED.

23. IF YOU ARE UNSURE OF THE 

INTENDED OPERATION, STOP USING 
TOOL. 

Seek formal training or 

research books or magazines that 
specialize in pneumatic tools.

24. BE AWARE OF HOSE LOCATION 

WHEN USING PNEUMATIC TOOLS. 

Hoses can easily become a tripping 
hazard when laid across the floor or 
spread out in a disorganized fashion.

Safety Instructions for Pneumatic Tools

Summary of Contents for SHOP FOX W1802

Page 1: ...COPYRIGHT JUNE 2007 BY WOODSTOCK INTERNATIONAL INC WARNING NO PORTION OF THIS MANUAL MAY BE REPRODUCED IN ANY SHAPE OR FORM WITHOUT THE WRITTEN APPROVAL OF WOODSTOCK INTERNATIONAL INC 9621JM Printed...

Page 2: ......

Page 3: ...do a job for which it was not designed 9 DO NOT USE UNDER THE INFLUENCE OF DRUGS OR ALCOHOL SAFETY For Your Own Safety Read Instruction Manual Before Operating This Equipment The purpose of safety sym...

Page 4: ...ccessories 16 REDUCE THE RISK OF UNINTENTIONAL FIRING Do not carry tool with hand on trigger and always disconnect from air when not in use 17 DISCONNECT TOOLS before servicing changing accessories or...

Page 5: ...re cleaning changing attachments or when performing maintenance of any kind on this tool Additional Safety Instructions for Spray Guns 8 PROTECTIVE CLOTHING Protect exposed skin from overspray by wear...

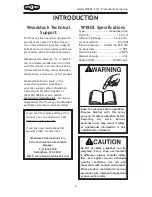
Page 6: ...afe and reliable operation Woodstock International Inc is commit ted to customer satisfaction Our intent with this manual is to include the basic information for safety setup operation maintenance and...

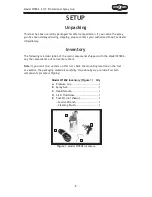
Page 7: ...the main components shipped with the Model W1802 Lay the components out to inventory them Note If you can t find an item on this list check the mounting location on the tool or examine the packaging...

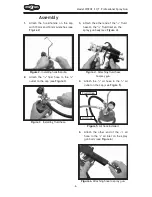
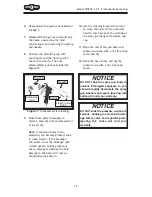
Page 8: ...nd 14mm wrenches see Figure 2 Figure 5 Air hose installed Figure 6 Attaching hose to spray gun Figure 4 Attaching fluid hose to spray gun 3 Attach the other end of the 3 8 fluid hose to the 3 8 fluid...

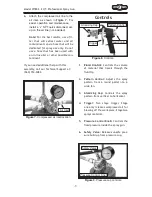
Page 9: ...Support at 360 734 3482 Controls 1 Fluid Control Controls the volume of material that travels through the fluid tip 2 Pattern Control Adjusts the spray pattern from a round pattern to a wide fan 3 Ato...

Page 10: ...s To use your spray system 1 Read and follow the material manufacturer s instructions for spraying mixing safety disposal and any other instruction on the label or Material Safety Data Sheet MSDS 2 Af...

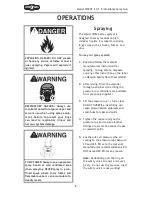
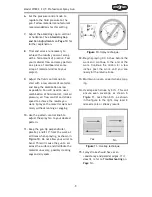
Page 11: ...ay so the material wets out nicely without running or sagging 10 Use the pattern control knob to adjust the spray fan to your desired pattern 11 Keep the gun tip perpendicular parallel and 8 10 from t...

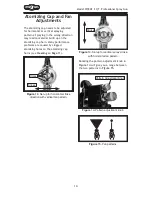
Page 12: ...mance problems are caused by clogged atomizing holes on the atomizing cap horns see Cleaning on Page 11 Figure 12 Set up for horizontal stroke direction with vertical fan pattern Stroke Holes Figure 1...

Page 13: ...solvent 4 Add clean solvent to pressure cup replace the lid and repressurize 5 Spray the gun until the fluid sprays clear to clean the fluid hose Note Check local laws regarding this practice If you a...

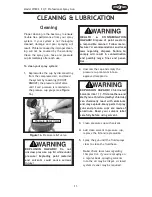
Page 14: ...e service wrench The fully disassembled gun should look like Figure 17 10 Use the cleaning brush with solvent to clean the inner orifice and other hard to reach areas on the outside of the spray gun b...

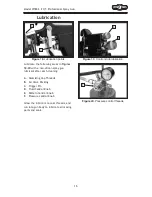
Page 15: ...ach cleaning A Atomizing Cap Threads B Air Valve Packing C Trigger Pin D Fluid Control Knob E Pattern Control Knob F Pressure Control Knob Allow the lubricant to coat threads and run into gun body to...

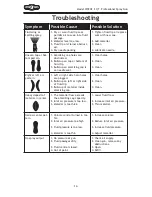
Page 16: ...rn 1 Left or right side horn holes are plugged 2 Build up on left or right side of fluid tip 3 Build up of material inside atomizing cap 1 Clear holes 2 Clean 3 Clean Heavy deposit of material in cent...

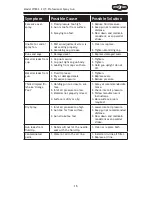
Page 17: ...ot tilt Material leaks from gun 1 Fluid tip loose 2 Dry or damaged seals 3 Excessive pressure 1 Tighten 2 Replace seals 3 Reduce pressure Thick dimpled fin ish aka Orange Peel 1 Holding gun too close...

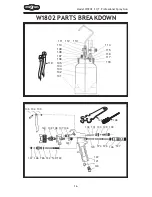
Page 18: ...Model W1802 2 QT Professional Spray Gun 16 W1802 PARTS BREAKDOWN...

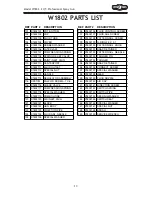
Page 19: ...02110 CENTERPOST 135 X1802135 SNAP RETAINER 111 X1802111 FLUID OUTLET 136 X1802136 CONNECT SCREW 112 X1802112 SPECIAL NUT 137 X1802137 SPECIAL WASHER 113 X1802113 HANDLE 138 X1802138 HEAD 114 X1802114...

Page 20: ......

Page 21: ......
Page 22: ...ternational Inc s warranty then the original owner must bear the cost of storing and returning the product This is Woodstock International Inc s sole written warranty and any and all warranties that m...

Page 23: ...to a friend _____ Yes ____ No 6 What is your age group _____ 20 29 ____ 30 39 ____ 40 49 _____ 50 59 ____ 60 69 ____ 70 7 What is your annual household income _____ 20 000 29 000 ____ 30 000 39 000 __...

Page 24: ...TAPE ALONG EDGES PLEASE DO NOT STAPLE FOLD ALONG DOTTED LINE WOODSTOCK INTERNATIONAL INC P O BOX 2309 BELLINGHAM WA 98227 2309 Place Stamp Here FOLD ALONG DOTTED LINE...

Reviews: