Automatic Tool Changer (ATC) Installation Manual • December 1, 2016
© Copyright 2016 ShopBot Tools, Inc.
page 24
gets, the light will turn on. These are used for homing the X and Y positions and for limiting the safe
table cutting boundaries, among other things.
Input 3 – The Y-axis proximity switch is connected to this input. During normal operation, the input
“3” light will be off in the ShopBot position screen. If the Y-axis proximity switch passes the proxim-
ity targets, the light will turn on. Among other things, this feature will be used for homing the X and Y
positions and for limiting the safe table cutting boundaries.
Input 4 – This input is connected to the stop switch. When active, the switch allows for use of the tool
and when inactive, the connection is severed and the tool comes to a stop.
Input 5 – The Z-axis proximity switch is connected to this input. When working properly, the input “5”
light will be ON during normal operation. When the Z-axis proximity switch passes the proximity tar-
gets, the light will be turned OFF. This switch will be used most often for a reference location in zeroing
the bits in the tool rack and for limiting the safe Z cutting boundary.
Input 6 – NA
Input 7 – Drawbar closed.
Input 8 – Drawbar open (changing tools).
Outputs
Outputs are signals that ShopBot software is sending to cause a desired action. Unused outputs can
be programed to activate other peripherals using an optional relay board.
Output 1 – Switches on the spindle.
Output 2 – NA
Output 3 – Toggles the ATC dust skirt gate open.
Output 4 – Turns on during machine operation (safety flashing screen). Required for spindle “on” sig-
nal.
Output 5 – NA
Output 6 - NA
Output 7 – NA
Output 8 - Toggles the spindle drawbar open /close (releases tool holders from spindle).
Caution: When the spindle is not spinning it is possible to drop the tools from the spindle if this
output is triggered.
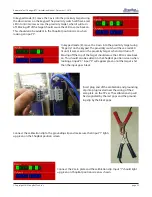
Check that all systems involved are working properly, starting with the proximity switches.
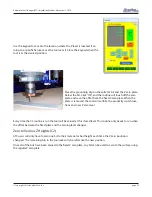
In keypad mode (K) move the X-axis into the proximity target using
the left arrow on the keypad. The proximity switch will have a red
LED lit until it comes across the proximity target, when it will turn
off. Moving off the top of the target should cause the LED to come
back on. This should also be evident in the ShopBot position screen
when looking at input “2”, the light will turn from black (normally
closed) to green (open).


