control knobs. Once the leg assembly is clear of the machine, flip it over so
that it is sitting on the 6 leveling pads. Be sure that it is resting solidly on the
pads, not on the casters. Also be sure to orient the leg assembly so that when
you lift the machine onto it, the front portion faces the front of the machine.
You will see that on one side, the center leg has 2 tabs welded in place on
each side and the outer legs have the door hinge pins welded on, so this leg
should face the front of the machine. Take the 2 doors from their wrapping
and install them on the front of the bench. You will note that the door hinge
pins slide in from the top, so that when the machine is placed on the leg
assembly, they cannot be removed. Now it’s time to lift the machine up onto
the legs. If you have a forklift, it will be easy to just pick the machine up and
slide the legs under it. If you are using an overhead hoist or a roll around
“cherry picker” style hoist, then you will need to place your straps or chains
under the bench pan and get them secured in position so that the machine is
balanced when lifted. Protect the machine finish by placing towels between
the straps or chains and the machine. Also be sure none of the lifting straps
bind against handles, sheet metal etc. At this point, move with care and
caution as you raise the machine up. Do not get your hands or feet under
the machine and keep others away while you proceed. Once the machine is
high enough, slide the leg assembly under it, again noting the position of the
front of the bench. Slowly lower the machine down until it is almost resting
on the legs and then thread the 6 bolts down through the bench pan into the
legs. Lower the machine down completely until it is resting solidly on the
legs and remove your lifting mechanisms. Leave the 6 bolts just finger tight
for now. Don’t be concerned if the assembly seems a bit unsteady at this
point.
In your box of accessories you will find a bag of fasteners for the rear
panels. Place each panel in place and get all the bolts started, but not tight.
Now you may go around and begin tightening all the fasteners for the sheet
metal panels, all the while checking for squareness and even gaps. Once
done, your doors should open and close freely and the latches should catch
the tabs on the center leg when closed. You will also now see that the
assembly has taken on a very strong and solid feel. Now you can tighten
each of the 6 bolts holding the bench pan to the legs, but first, put a bead of
silicone sealer around each hole to prevent leaks if you use a coolant system.
Once those 6 bolts are sealed and tightened, your bench should be rock solid.
Finally, open the front doors and double check the tightness of the 6 bolts
holding the machine to the bench pan. The bolts are accessed by holes in the
3 skids. These holes are sealed at the factory against leaks, but it’s possible
that they may have vibrated loose during transportation.
ADDING SHELVES AND DRAWERS
While your machine is still in the open and accessible from all sides, you
may want to add some shelves and/or drawers. A lower shelf is easy to
measure and cut, and by removing one end sheet metal panel it can be
Summary of Contents for MILL TURN
Page 12: ......
Page 13: ......
Page 14: ......
Page 15: ...5C COLLET SET 4 JAW CHUCK ...
Page 16: ...FOLLOW REST ...
Page 17: ...STEADY REST ...
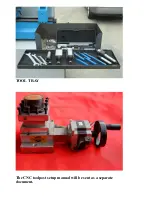
Page 18: ...TOOL TRAY The CNC toolpost setup manual will be sent as a separate document ...


