background image


-                 


19B


to exit menu mode. 

(When  you  operate  the  unit  via  DMX  controller,  set  the  value  of  channel 

“special 

function

”  to  “lamp off”, waiting  for 5 seconds,  then the lamp will be off  if you choose 

“yes” mode). 

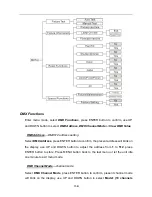
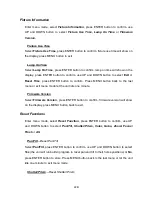
On If DMX On


Lamp turns on when DMX signal is detected 

Select 

On If DMX On

, press ENTER button to confirm, present mode will blink on the 

display, use UP and DOWN button to select 

Yes

 (Lamp turns on when DMX signal is 

detected) or 

No

 (keep the present state), press ENTER button to store. Press MENU 

button back to the last menu or let the unit idle one minute to exit menu mode 

(If the 

lamp is off via DMX signal, you can reconnect the DMX controller to make the lamp on).


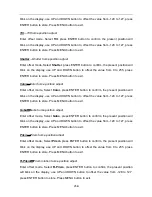
Off If DMX Off


Lamp turns off when DMX signal is cut off


Select 

Off If DMX Off

, press ENTER button to confirm, present mode will blink on the 

display, use UP and DOWN button to select 

Yes

 (Lamp turns off when DMX signal is 

cut off), press ENTER button to store. Press MENU button back to the last menu or let 

the unit idle one minute to exit menu mode. 

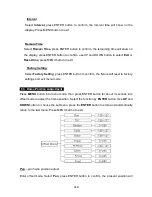
Ignition Delay

Delay time between power on and lamp on


Select 

Ignition Delay

, press ENTER button to confirm, present mode will blink on the 

display,  use  UP  and  DOWN  button  to  adjust  the  delay  time  from  0S  to  255S,  press 

ENTER button to store. Press MENU button back to the last menu or  let the unit idle 

one minute to exit menu mode. 

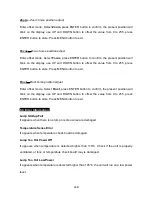
Low Power Delay

Delay time between reduce lamp power and shutter off the unit


Select 

Low Power Delay

, press ENTER button to confirm, present mode will blink on 

the display, use UP and DOWN button to adjust the delay time from 0S to 255S, press 

ENTER button to store. Press MENU button back to the last menu or let the unit idle 

one minute to exit menu mode. 

(If you set the low power delay time to 3S, the lamp will run in half power 3 seconds 

after the unit shutter off) 


Summary of Contents for DIAPro ColorBeam 5R

Page 1: ...DIAPro ColorBeam 5R User Guide Please read these instructions carefully before use...

Page 2: ...2 Lamp 10 5 3 Change the Lamp 11 6 How To Set The Unit 12 6 1 Power On Display 12 6 2 Main Function 12 6 3 Home Position Adjustment 24 6 4 Error Information 26 7 Control By Universal DMX Controller 27...

Page 3: ...sure that no ventilation slots are blocked otherwise the unit will be overheated Before operating ensure that the voltage and frequency of power supply matches the power requirements of the unit It s...

Page 4: ...olet filter must be replaced if they are visibly damaged DO NOT open the unit as there are no user serviceable parts inside Never try to repair the unit by yourself Repairs carried out by unskilled pe...

Page 5: ...re to the support 4 through clamp and fasten the screws 5 Fasten the safety cable 6 through the bottom of the base and over the support Fig 1 Fig 2 Attention Always ensure that the structure to which...

Page 6: ...ed to change battery Wireless control for the unit with wireless receiver built in only Wirelessly controlled by W DMX option Each W DMX is sending out 512 channels of DMX License free band of 2 45 GH...

Page 7: ...e positioning Gobo wheel Gobo Wheel 17 fixed gobos index able Easy calibration and maintenance by magnetic home positioning Prism 8 facet rotating prism Frost Zoom From 1 3 8 Focus Electronic Cooling...

Page 8: ...N PRISM ROTATION PRISM ROTATION 7 P T MACRO EFFECTS MOVEMENT EFFECTS MOVEMENT 8 P T MACRO SPEED FROST FROST 9 COLOR FOCUS FOCUS 10 GOBO PAN PAN 11 PRISM PAN FINE PAN FINE 12 R PRISM TILT TILT 13 R PRI...

Page 9: ...every 90 Caution The head and arm must be unlocked before operation 4 2 Control Panel Front view Rear view 1 Monitor Batter Back up display 2 LED POWER ON Power On BATTERY ON Battery Status 1 Antenna...

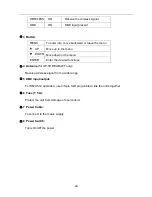
Page 10: ...down in the menu ENTER Enter the desired functions 4 Antenna for XP 5R BEAM WT only Receive wireless signal from a wide range 5 DMX input output For DMX 512 operation use 3 5 pin XLR plug cable to li...

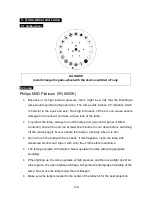
Page 11: ...ol panel or DMX controller and let the unit run at least five minutes to cool down before switching off the mains supply Never handle the lamp or luminary when it is hot Do not touch the bulb with bar...

Page 12: ...e four screws and open the cover 2 Follow the Fig 3 and Fig 4 Loosen the two screws and apart the entire assembly 3 Follow the Fig 5 and Fig 6 Unplug all the connect wires over the lamp and wear Anti...

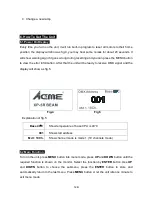
Page 13: ...ll be ready to receive DMX signal and the display will show as fig 5 Fig 4 Fig 5 Explanation of fig 5 Base 40 C Show temperature of base CPU is 40 C 001 Show start address Md 1 19Ch Show channel mode...

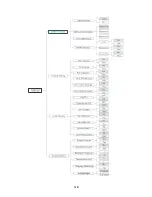
Page 14: ...of disconnecting with mains power press UP button for one minute to enter into menu mode Press MENU button or let the unit idle one minute to exit The main functions are shown below the grayed boxes a...

Page 15: ...14B...

Page 16: ...NTER button to confirm the present address will blink on the display use UP and DOWN button to adjust the address from 1 to 512 press ENTER button to store Press MENU button back to the last menu or l...

Page 17: ...one minute to exit menu mode Active Select Active press ENTER button to confirm use UP and DOWN button to select Yes wireless control available or No wireless control unavailable press ENTER button t...

Page 18: ...onfirm present mode will blink on the display press UP DOWN button to select No Pan or tilt s position will not feedback while out of step or Yes Feedback while pan tilt out of step press ENTER button...

Page 19: ...Off press ENTER button to confirm present mode will blink on the display use UP and DOWN button to select On lamp on or Off lamp off press ENTER button to store Press MENU button back to the last men...

Page 20: ...isplay use UP and DOWN button to select Yes Lamp turns off when DMX signal is cut off press ENTER button to store Press MENU button back to the last menu or let the unit idle one minute to exit menu m...

Page 21: ...isplay use UP and DOWN button to select No display always on or Yes display goes off one minute after exiting menu mode press ENTER button to store Press MENU button back to the last menu or let the u...

Page 22: ...select Fixture Test press ENTER button to confirm use UP and DOWN button to select Auto Test or Manual Test Auto Test Select Auto Test press ENTER button to confirm the unit will run built in programs...

Page 23: ...button back to the last menu or exit menu mode let the unit idle one minute Firmware Version Select Firmware Version press ENTER button to confirm firmware version will show on the display press MENU...

Page 24: ...ENTER button to store Press MENU button to exit Zoom Frost Focus Reset Zoom Frost Focus Select Zoom Frost Focus press ENTER button to confirm use UP and DOWN button to select Yes the unit will run bui...

Page 25: ...lect Factory Setting press ENTER button to confirm the fixture will reset to factory settings and exit menu mode 6 3 Home Position Adjustment Press MENU button into menu mode then press ENTER button f...

Page 26: ...nfirm the present position will blink on the display use UP and DOWN button to offset the value from 128 to 127 press ENTER button to store Press MENU button to exit Gobo Gobo home position adjust Ent...

Page 27: ...t Frost home position adjust Enter offset mode Select Frost press ENTER button to confirm the present position will blink on the display use UP and DOWN button to offset the value from 0 to 255 press...

Page 28: ...damaged CPU B Error CPU C Error CPU D Error They appear when board P C or some wires are damaged Pan Reset Error Pan Encode Error Tilt Reset Error Tilt Encode Error Shutter Reset Fail Dimmer Reset Fa...

Page 29: ...lighting unit needs to have a DMX address to receive the data by the controller The address number is between 0 511 usually 0 1 are equal to 1 5 The end of the DMX 512 system should be terminated to r...

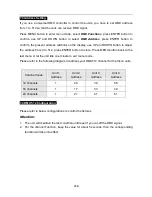
Page 30: ...NTER button to store Press MENU button back to the last menu or let the unit idle one minute to exit menu mode Please refer to the following diagram to address your DMX512 channel for the first 4 unit...

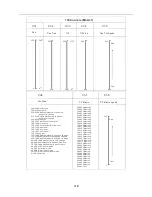
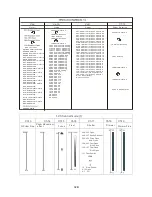
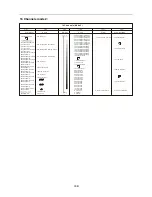
Page 31: ...30B 19 Channels mode1...

Page 32: ...blackout while color change 90 99 Enable blackout while color change 80 89 Disable blackout while pan tilt move 70 79 Enable blackout while pan tilt move 60 69 Pan tilt normal mode 50 59 Pan tilt fast...

Page 33: ...9 21 Gobo6 16 18 Gobo5 13 15 Gobo4 10 12 Gobo3 7 9 Gobo2 4 6 Gobo1 0 3 White 124 127 Gobo17 Shaking 120 123 Gobo16 Shaking 116 119 Gobo15 Shaking 251 255 Prism rotation effects 28 247 250 Prism rotati...

Page 34: ...Strobe 208 212 Open 207 Fast Pulsation 108 Slow Pulsation 104 107 Open 103 Fast Strobe 4 Slow Strobe 0 3 Closed 250 255 Gobo16 Shaking 244 249 Gobo15Shaking 237 243 Gobo14 Shaking 231 236 Gobo13Shaki...

Page 35: ...assing through the unused range and staying 5 seconds in complete reset levels 77 127 Pan Tilt reset Pan Tilt reset is activated passing through the unused range and staying 5 seconds in Pan Tilt rese...

Page 36: ...239 251 Random Fast Strobe 226 238 Random Medium Strobe 213 225 Random Slow Strobe 208 212 Open 207 Fast Pulsation 108 Slow Pulsation 104 107 Open 103 Fast Strobe 4 Slow Strobe 0 3 Closed 250 255 Gob...

Page 37: ...ugh the unused range and staying 5 seconds in complete reset levels 77 127 Pan Tilt reset Pan Tilt reset is activated passing through the unused range and staying 5 seconds in Pan Tilt reset levels 26...

Page 38: ...ry stick as the install folder from the pull down list 4 With the memory stick now plugged into the Pearl choose the Sync Fixture option This option can be found on soft key E of the System USB Stick...

Page 39: ...One of the channels is not working well 1 The stepper motor might be damaged or the cable connected to the PCB is broken 2 The motor s drive IC on the PCB might be out of condition D The lamp is cutt...

Page 40: ...ance Ballast A As the pictures shown above please replace the cable or cable joints immediately once they ve turned yellow B Do maintain the fixtures every two months and make sure that all the screws...

Page 41: ...ics at least every 30 60 days Declaration of Conformity We declare that our products lighting equipments comply with the following specification and bears CE mark in accordance with the provision of t...

Reviews: